Table of Contents
Advertisement
Available languages
Available languages
EN Installation, Operation and Maintenance Instructions
FR Instructions d'installation, d'utilisation et d'entretien
Built in Wine Refrigerator / Cooler
Le vin réfrigérateur intégrées
Note: Wine refrigerators / coolers are designed exclusively
for the storage of wine. Wine refrigerators / coolers cannot
attain storage temperatures suitable for fresh food storage.
Remarque : Les réfrigérateur sont conçues exclusivement
pour y garder des vins. Elles ne peuvent pas atteindre des
températures de conservation convenant à l'entreposage
d'aliments frais.
MP15WSG4**
MP15WSF4**
MP24WSG5**
MP24WSF5**
MP24WDG5**
MP24WDF5**
MP24WSG0**
Advertisement
Chapters
Table of Contents

Related Manuals for Marvel MP15 Series


Summary of Contents for Marvel MP15 Series
- Page 1 EN Installation, Operation and Maintenance Instructions FR Instructions d’installation, d’utilisation et d’entretien Built in Wine Refrigerator / Cooler Le vin réfrigérateur intégrées MP15WSG4** MP15WSF4** MP24WSG5** MP24WSF5** MP24WDG5** MP24WDF5** MP24WSG0** Note: Wine refrigerators / coolers are designed exclusively for the storage of wine. Wine refrigerators / coolers cannot attain storage temperatures suitable for fresh food storage.
-
Page 2: Table Of Contents
CONTENTS Important Safety Instructions Contents: Warnings and safety instructions appearing in this guide Safety information ...............2 are not meant to cover all possible conditions and situa- Unpacking your appliance ..........3 tions that may occur. Common sense, caution, and care Warranty registration .............3 must be exercised when installing, maintaining, or operat- Installing your appliance ............4 ing this appliance. -
Page 3: Unpacking Your Appliance
Keep your carton and packaging until your appliance has been thoroughly inspected and found to be in good condi- tion. If there is damage, the packaging will be needed as proof of damage in transit. Afterwards please dispose of all items responsibly. MARVEL WARNING XXXXXXXXXXXX WARNING - XXXXXXXXXXXX Dispose of the plastic bags which can be a suffocation hazard. -
Page 4: Installing Your Appliance
The over- An optional stacking kit, shown in is required to stack all height of your Marvel appliance may be adjusted higher products. Failure to use a stacking kit could result in (by turning the leveling leg out, CCW) and lower (by turning personal injury. -
Page 5: Electrical Connection
INSTALLING YOUR APPLIANCE WARNING Electrical Shock Hazard Do not remove • Do not use an extension cord with this appliance. ground prong They can be hazardous and can degrade product performance. • This appliance should not, under any circumstanc- es, be installed to an un-grounded electrical supply. •... -
Page 6: Product Dimensions
PRODUCT DIMENSIONS ROUGH-IN OPENING DIMENSIONS CABINET DIMENSIONS MODEL "A" "B" "C" "D" "E" "F" "G" "H" "J" 15" **34 ⁄ " to 35 ⁄ " 24" ⁄ " 34" to 35" ⁄ " ⁄ " ⁄ " ⁄ " MP15WSG (38.1 cm) (87 to 89.5 cm) (61 cm) - Page 7 1" (2.5 cm) ⁄ " Figure 9 (54.6 cm) "F" APPLIES TO THE FOLLOWING MARVEL MODELS * To install (F) models with the door face flush with adja- MP15WS MP24WS cent cabinetry doors, custom decorative panel thickness MP24WD cannot exceed ⁄...
-
Page 8: Using Your Electronic Control
USING YOUR ELECTRONIC CONTROL Upper/Lower Temp Temp zones Lights Minus On/Off Lock Plus System Status (Dual Zone keypad keypad keypad keypad keypad models only) Display Area indicators Figure 10 Electronic control Power Failure ALARM RESET Starting your appliance (Single and Dual Zone: Plug the appliance power cord into a 115 volt wall outlet. -
Page 9: Temperature Mode
USING YOUR ELECTRONIC CONTROL will adjust the temperature colder or warmer respectively. Factors that affect the storage compartment stabilized When you have reached your desired set-point tempera- temperature: ture, press the "On/Off" keypad to accept, or do nothing • Changes to temperature setting. and the "Set"... -
Page 10: Control Lock
USING YOUR ELECTRONIC CONTROL Alarms (Single and Dual Zone): The control will alert you to conditions that could adversely affect the performance of the appliance. Control lock (Single and Dual Zone): The control panel can be locked to avoid unintentional Door Ajar changes. -
Page 11: Power Failure
USING YOUR ELECTRONIC CONTROL This alarm condition can be reset by momentarily pressing the "On/Off" keypad. If this alarm occurs it is recommended Power Failure ALARM RESET that you check the condition of your stored contents, even though the appliance is operating normally and the temper- ature has recovered, as prolonged temperature excursions •... -
Page 12: Overlay Door Panel Installation
OVERLAY DOOR PANEL INSTALLATION If you purchased an overlay panel model, your unit is WARNING equipped with articulated hinges to allow fully integrated built-in installations. Custom panel thicknesses of ⁄ " (15 mm) and ⁄ " (18 mm) are accommodated. Use extreme caution with the articulated hinges. - Page 13 OVERLAY DOOR PANEL INSTALLATION Overlay panel Press and hold down this flush with top tab on the wire connector of door. and pull the connector apart. Figure 12 Overlay panel to Holes in be centered on gasket Step 2: Remove the door gasket width of door.
- Page 14 OVERLAY DOOR PANEL INSTALLATION Clearance for screw head, 4 places Clearance for screw head, 4 places Figure 14 Figure 16 Left Hand Hinged Door Right Hand Hinged 15" (38.1 cm) wide Door 15" (38.1 cm) wide appliance appliance Clearance Clearance for hinge for hinge 2 places...
- Page 15 OVERLAY DOOR PANEL INSTALLATION Clearance for Clearance for Clearance CAUTION screw head, screw head, for hinge 4 places 4 places at top and Weight of overlay door panel bottom must not exceed 10 pounds (4.5 kg) for a glass door model. Figure 18 Left Hand Hinged Door 24"...
- Page 16 OVERLAY DOOR PANEL INSTALLATION Material Type #10 Wood Screw Hardwood ⁄ " (3.2 mm) Diameter. Pilot Hole Counter bore Softwood ⁄ (2.8 mm) Diameter. Pilot Hole lock hole Table B on back side. #10 x ⁄ " screw Step 4: Assemble the panel to the door Figure 22a The preferred method of attaching the panel to the door is to clamp the panel to the door so it cannot move while...
- Page 17 OVERLAY DOOR PANEL INSTALLATION BRASS EXTENSION SPRING WASHER Cabinet "Z" bracket LOCK PHILLIPS SCREW #8 x ⁄ " black 1/2 HOLE screws 13/16 COUNTER BORE 7/16 DEEP (3 places) INNER DOOR 3/4 INCH WOOD PANEL SECTION A-A SCALE 1 : 1 Figure 23 Step 7: Install the door Carefully open the top and bottom hinges on the door being...
-
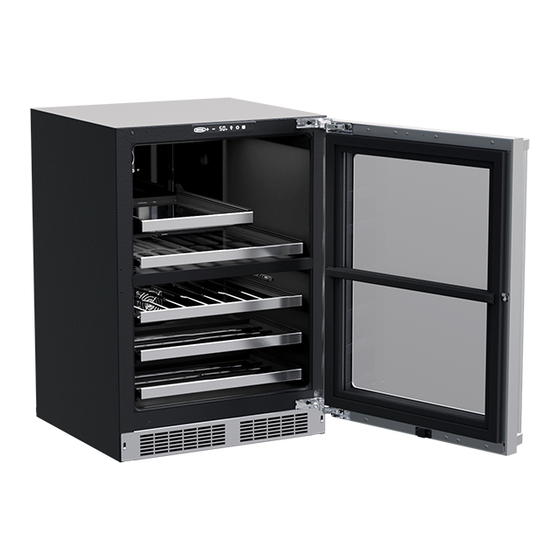
Page 18: Shelving Configurations
SHELVING CONFIGURATIONS Shelving Configurations Your Marvel Professional Series appliance is equipped with full extension ball bearing shelf glides to provide maximum access and visibility for the product stored on the shelving arrangements listed below. Figure 27 Single Zone Wine Cellar: 24"... - Page 19 SHELF REMOVAL AND INSTALLATION CAUTION Never try to remove a loaded shelf, remove everything from the shelf before removing. Use both hands when removing the shelf. Remove the To remove a shelf: wine from the Extend the shelf out of the cabinet until it stops. shelf to be removed Unload the shelf (see Figure 29).
-
Page 20: Care And Cleaning
CARE AND CLEANING AND ENERGY SAVING TIPS Front Grille The following suggestions will minimize the Be sure that nothing obstructs the required air flow open- cost of operating your refrigeration appliance. ings in front of the cabinet. At least once or twice a year, brush or vacuum lint and dirt from the front grille area (see 1. -
Page 21: Obtaining Service
OBTAINING SERVICE If Service is Required: • If the product is within the first year warranty period please contact your dealer or call Marvel Customer Service at 800.223.3900 for directions on how to obtain warranty coverage in your area. •... -
Page 22: Troubleshooting
TROUBLESHOOTING Before You Call for Service CAUTION If the appliance appears to be malfunctioning, read through this manual first. If the problem persists, check the trouble- shooting guide below. Locate the problem in the guide and In the unlikely event you lose cooling in your unit, do not refer to the cause and its remedy before calling for service. -
Page 23: Warranty
1-YEAR LIMITED PARTS AND LABOR WARRANTY For one year from the date of original purchase, this Marvel product warranty covers all parts and labor to repair or replace any part of the product that proves to be defective in materials or workmanship. For products installed and used for normal residential use, material cosmetic defects are included in this warranty, with coverage limited to 60 days from the date of original purchase. - Page 24 Marvel Refrigeration 1260 E. VanDeinse St. Greenville MI 48838 800.223.3900 41014738-EN Rev E All specifications and product designs subject to change without notice. Such revisions do not entitle 4/18/19 the buyer to corresponding changes, improvements, additions, replacements or compensation for...
- Page 25 EN Installation, Operation and Maintenance Instructions FR Instructions d’installation, d’utilisation et d’entretien Built in Wine Refrigerator / Cooler Le vin réfrigérateur intégrées MP15WSG4** MP15WSF4** MP24WSG5** MP24WSF5** MP24WDG5** MP24WDF5** MP24WSG0** Note: Wine refrigerators / coolers are designed exclusively for the storage of wine. Wine refrigerators / coolers cannot attain storage temperatures suitable for fresh food storage.
- Page 26 CONTENU Importantes instructions de sécurité Contenu : Les avertissements et les instructions de sécurité qui ap- Informations de sécurité............2 paraissent dans ce guide n’ont pas la prétention de couvrir Déballage de votre appareil ..........3 toutes les conditions et situations possibles pouvant arriver. Enregistrement de la garantie ........3 Il faut faire preuve de bon sens, de précautions et de soins, Installation de votre appareil ..........4...
-
Page 27: Déballage De Votre Appareil
Important Conservez votre carton d’emballage jusqu'à ce que votre cellier ait été complètement inspecté et trouvé en bon état. S’il présentait MARVEL des dommages, cet emballage serait nécessaire comme preuve qu’ils sont survenus durant le transit. Ensuite veuillez mettre tous ces matériaux d’emballage au rebut d’une façon responsable. -
Page 28: Installation De Votre Appareil
Contactez votre revendeur en arrière. La hauteur totale de votre appareil Marvel peut être ou le service à la clientèle de Marvel au 800-223-3900 pour le ajustée entre le minimum (en vissant les pieds de mise à niveau, commander. -
Page 29: Raccordement Électrique
INSTALLATION DE VOTRE APPAREIL AVERTISSEMENT Risque de commotion électrique • N’utilisez pas de rallonge secteur avec cet appareil. Cela peut être dangereux et peut affecter la performance du N’enlevez pas la produit. borne de terre de • Cet appareil ne doit sous aucun prétexte être installé sur la fiche du cordon une alimentation électrique sans liaison de terre. -
Page 30: Dimensions Du Produit
DIMENSIONS DU PRODUIT DIMENSIONS D’OUVERTURE BRUTE DIMENSIONS D’ARMOIRE MODÈLE «A» «B» «C» «D» «E» «F» «G» «H» «J» 15 po **34 ⁄ po à 35 ⁄ 24 po ⁄ 34 po à 35 po ⁄ ⁄ ⁄ ⁄ MP15WSG (38,1 cm) (87 à... - Page 31 «F» * Pour installer les modèles (F) avec la face de porte APPLICABLE AUX MODÈLES SUIVANTS alignée avec les portes des meubles de rangement adja- DE MARVEL cents, l’épaisseur du panneau décoratif du client ne peut MP15WS MP24WS pas dépasser ¾ po (19mm).
-
Page 32: Utilisation De Votre Commande Électronique
UTILISATION DE VOTRE COMMANDE ÉLECTRONIQUE Zones Augmen- supérieure/ tation inférieure Diminution (Modèles à Allumage Indicateur de Marche/ tempéra- Verrouillage deux zones d’éclairage statut du système Arrêt température ture des touches uniquement) Zone d’affichage Figure 10 Commandes électroniques Power Failure ALARM RESET Démarrage de votre celliers (Zone unique ou deux zones) : Branchez la prise du cordon d’alimentation du cellier dans une... -
Page 33: Mode Température
UTILISATION DE VOTRE COMMANDE ÉLECTRONIQUE • Température des denrées du cellier. La plage de température pour le point de consigne acceptable - Chargement de nouvelles denrées plus chaudes. pour votre celliers va de 45°F (7,3 °C) à 55°F (12,9 °C) pour la - Un contenu chargé... -
Page 34: Verrouillage Des Commandes
UTILISATION DE VOTRE COMMANDE ÉLECTRONIQUE Alertes (Zone unique ou deux zones) : La commande va vous alerter en cas de conditions pouvant nuire à la performance de l’appareil. Verrouillage des commandes (Zone unique ou deux zones : Door Ajar ALARM RESET Le panneau de commandes peut être verrouillé... -
Page 35: Panne De Secteur
UTILISATION DE VOTRE COMMANDE ÉLECTRONIQUE La condition d’alerte peut être supprimée momentanément en ap- puyant sur la commande M/A (On/Off). Si cette alerte se produit, Power Failure ALARM RESET il est recommandé que vous contrôliez la situation de toutes les denrées périssables, même si l’appareil fonctionne de nouveau normalement et que la température soit revenue au niveau de la •... -
Page 36: Installation De Panneau De Revêtement
INSTALLATION DE PANNEAU DE REVÊTEMENT DE PORTE Si vous avez acheté un modèle à panneau de revêtement, votre AVERTISSEMENT cellier est équipé de charnières articulées pour permettre des in- stallations complètement encastrées. Des épaisseurs de panneau ⁄ po (15 mm) et ⁄... - Page 37 INSTALLATION DE PANNEAU DE REVÊTEMENT DE PORTE Panneau de Pressez et maintenez revêtement aligné enfoncée cette patte sur le avec le haut de la connecteur, et séparez en porte. deux le connecteur. Figure 12 Panneau de Trous dans revêtement à Étape 2 : Dépose du joint de porte la retenue être centré...
- Page 38 INSTALLATION DE PANNEAU DE REVÊTEMENT DE PORTE Dégagement pour tête de vis, 4 emplacements Dégagement pour tête de vis, 4 emplacements Figure 14 Porte à charnières à gauche Figure 16 Appareil de largeur Porte à charnières à droite 15 po (38,1 cm) Appareil de largeur 15 po (38,1 cm) Dégagement pour...
- Page 39 INSTALLATION DE PANNEAU DE REVÊTEMENT DE PORTE Dégagement Dégagement ATTENTION pour tête de vis, 4 pour tête de vis, 4 emplacements emplacements Le poids du revêtement de porte ne doit pas dépasser 10 lb (4,5 kg) pour un modèle à porte vitrée. Figure 20 Porte à...
- Page 40 INSTALLATION DE PANNEAU DE REVÊTEMENT DE PORTE Type de matériau Vis à bois #10 Bois dur Avant trou Ø ⁄ po (2 mm) Trou de Bois tendre Avant trou Ø ⁄ po (0,8 mm) verrou alésé Tableau B sur la face Vis #10 x arrière ⁄...
- Page 41 INSTALLATION DE PANNEAU DE REVÊTEMENT DE PORTE EXTENSION EN LAITON Cornière RONDELLE ÉLASTIQUE en «Z» CAME ÉCROU d’armoire VERROU VIS PHILLIPS TROU DE 1/2" Vis à tête CONTRE-ALÉSAGE DE 13/16" bombée DE PROFONDEUR 7/16" #8 x ⁄ INTÉRIEUR DE PORTE PANNEAU DE BOIS DE 3/4"...
-
Page 42: Configurations De Étagères
CONFIGURATIONS DE ÉTAGÈRES Configurations de étagères Votre celliers Série Professional de Marvel est équipée d’un système de étagères sur roulements à billes à extension complète qui fournissent un maximum d’accès et de visi- bilité pour les produits entreposés en fonction des disposi- tions qui suivent. - Page 43 DÉPOSE ET INSTALLATION DES ÉTAGÈRES ATTENTION N’essayez jamais de bouger une clayette chargée, évacuez tout ce qu’elle porte avant de la déplacer. Utilisez vos deux mains pour déplacer une étagère. Déchargez le vin de Pour enlever une étagère l’étagère à Sortez la clayette hors de l’armoire jusqu’à...
-
Page 44: Conseils Pour L'économie D'énergie
CONSEILS POUR L’ÉCONOMIE D’ÉNERGIE, L’ENTRETIEN ET LE NETTOYAGE Les suggestions suivantes vont minimiser le Grille frontale coût de fonctionnement de votre appareil de Assurez-vous que rien n’obstrue les ouvertures pour flux d’air requises à l’avant de l’armoire. Au moins une à deux fois par an, refroidissement. -
Page 45: Obtention De Service
• Si le produit est sorti de sa première année de garantie, le service à la clientèle de Marvel peut vous fournir des recom- mandations sur les centres de service de votre secteur. Une liste des centres de service agréés est également disponible sur le site www.marvelrefrigeration.com sous la section de... -
Page 46: Dépannage
DÉPANNAGE Avant d’appeler pour du service ATTENTION Si l’appareil semble présenter un dysfonctionnement, commencez par bien relire son manuel. Si le problème persiste, consultez le guide de dépannage qui suit. Identifiez le problème dans ce Dans le cas improbable où vous perdriez de la capacité de re- guide et consultez les colonnes de causes et de remèdes avant froidissement sur votre appareil, ne le débranchez pas de son d’appeler pour du service. -
Page 47: Garantie
à 60 jours à partir de la date d’achat d’origine. Toute prestation de service fournie par Marvel dans le cadre de la présente garantie doit être effectuée par une entité... - Page 48 Marvel Refrigeration 1260 E. VanDeinse St. Greenville MI 48838 800.223.3900 Toutes les spécifications et les conceptions des produits sont sujet à des changements sans 41014738-FR Rev E préavis. De telles révisions ne donnent aucun droit pour l’acheteur de produits antérieurs à...
Need help?
Do you have a question about the MP15 Series and is the answer not in the manual?
Questions and answers