Table of Contents
Advertisement
Advertisement
Table of Contents

Related Manuals for Tevo Tarantula Pro


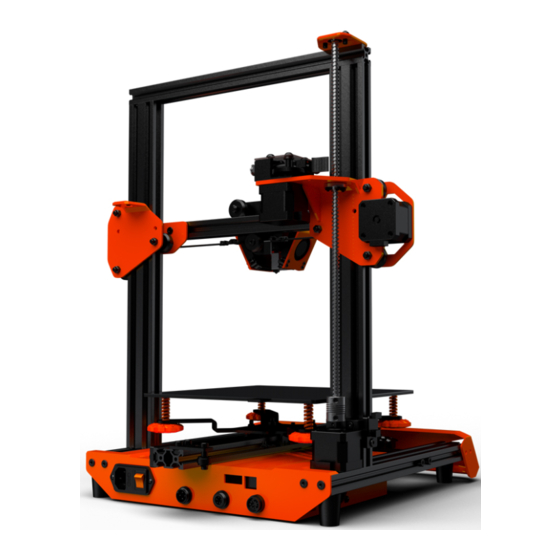
Summary of Contents for Tevo Tarantula Pro
-
Page 2: Table Of Contents
Read me first AND POWERING UP YOUR PRINTER! Contents TEVO support Hazards and Warnings The TEVO Tarantula Pro 3D printer has motorized and heated parts. Specification When the printer is in operation always be aware of possible hazards. Packing list Burn Hazard Assembly of the bottom frame A-01 Never touch the extruder nozzle, or the heater block without first... -
Page 3: Tevo Support
Heat bed type support and expand the market. Print surface PC Platform We are proud to have you be a TEVO member, to have you in the 1.75mm Filament diameter Big TEVO family, and we can "print" our dreams into reality. Togeth-... -
Page 4: Packing List
Packing list Packing list LAYER A A-03 Item Description pics Screws 07-00032A Stepper Motor,40mm A-04 A-04 56-01696A Metal panel,for Y axis A-03 A-03 Screw bag Item Label A-02 A-02 56-01697A Y frame 53-00169A Flange bearing F624zz A-01 56-01335A M4x25 socket head bolt 53-01338A Spacer 4.2mm*7mm 6mm high 56-00624A... - Page 5 53-00008A Timing wheel 5mm 1 Packing list Packing list B-03 Screw bag B-03-1 Screwbag LAYER B Item Label Item Label B-03 56-01256A M3x10 button head bolt Screws 56-00854A M3x6 button head bolt 56-00617A M5x8 bolt, M/C 56-00060A M3x12 socket head bolt, M/C 56-00620A M5 T nut 56-00066A M3 NUT...
-
Page 6: Assembly Of The Bottom Frame
Assembly of the bottom frame A-01 Assembly of the bottom frame A-01 Line up the extrusions as in picture and fasten those together using M4x45 bolts and M5 spring washers. The parts needed for this assembly are found from A-01 bag and A-01 slot. 4 x M4x20 bolt 2x20x40 350mm 4 x M5x45 bolt... -
Page 7: Front Panel Assembly
Y axis parts preparation A-03 Front panel assembly A-02 Prepare the Y axis idler and motor plate as shown in the following Prepare the front panel as shown and then slide it in frame, you can pictures. Leave the M5 bolts with T-nuts loose until the parts will be find these items from slot A-02 and A-02 bag. -
Page 8: Bed Carriage Assembly
Finalizing the assembly A-01, A-02, A-03 and B-02 Bed carriage assembly B-02 Assemble the bed carriage as in picture. Tighten the two bolts which Slide the bed in extrusion and install idler plate in the end of extrusion have 6mm spacers gently but leave the two eccentric nut bolts as shown. -
Page 9: Controller, Psu And Front Panel Installation
Controller, PSU and front panel installation Finalizing the assembly A-01, A-02, A-03, B-02, B-03 M5 T-nut Install the controller and PSU in the frame. Items required are found M5x8 bolt from slot A-04 and bag A-04. Use the M5x8 bolt and T-nut to attach controller to middle extrusion as shown. -
Page 10: Hotbed Assembly
Hotbed assembly Controller, PSU and front panel installation Install the hotbed and tighten the nuts just some turns as these are later used to adjust the bed level. These parts can be found from bag B-02-1. 2 x M5x8 lowprofile 4 x M4x40 countersunk 4 x bed spring 3 x M5x8 lowprofile... -
Page 11: Axis Assembly Left Side
X axis assembly left side B-03 X axis assembly left side B-03 Install the leadscrew nut as shown.From B-03. Then install the stepper motor pulley and limit switch to the endpiece. Motor cable connector should face downwards. From slot B03 and B03-1 bag. -
Page 12: Right Side And Hotend Assembly
Right side and hotend assembly B-04 Right side and hotend assembly B-04 3 x M5x30 low profile boltAssemble the second endplate to the X axis Assemble the hotend carriage as shown. Parts for this step are found as shown. The parts for this step are found from bag B-04 and slot from slot B-04 and bag B-04-1. -
Page 13: Upper Frame Assembly
Upper frame assembly Right side and hotend assembly B-04 Install the assembly to other side of extrusion as shown, you can Install the two Z axis extrusions to bottom frame using 4xM5x25 bolts leave the M5x8 bolts slightly loose still as those will be tightened and 4xM5 spring washers. -
Page 14: Z Axis Assembly B07
Z axis assembly B07 Z axis assembly B07 After this adjust again eccentric nuts so that Z axis moves smoothly 4 x M5x25 boltInstall the leadscrew top bearing bracket and Z axis top extrusion as shown in the following pictures. The parts for lead- and then tighten again the M5 nuts. - Page 15 Z axis assembly B07 Z axis assembly B07 Install the motor bracket and coupler with O-ring as shown and You can now turn the leadscrew around midway in the leadscrew nut install then it to the Z axis extrusion as shown. The parts are found and slide the X assembly on frame.
- Page 16 Z axis assembly B07 Z axis assembly B07 Install the Z axis endstop as shown. Loosen the X axis stepper bolts slightly so that stepper can move in the slots. Install tightly the X axis belt and use zip ties to attach it to carriage and then you can use stepper to tighten the belt little more and then tighten the screws.
-
Page 17: Bed Leveling
Bed leveling Hotend assembly B-04 Adjust the wheels locate in 4 corners and make the filament come out Install the hotend holding plate and hotend assembly as shown in good as shown in picture “Proper nozzle height”. pictures. Parts can be found from bag B-04-1 and slot B-04. 2 x M3x8 bolt 4 x M3x8 button head... -
Page 18: Prepare Slicing Software
first print. First, you can download the software from our website at http://www.tevo.cn/software-download.php After installation in done and you start the software, you should get... - Page 19 Prepare Slicing Software Prepare Slicing Software Go to Printer tab, change the following values: Travel Feed Rate – 15000 On Repetier-Host main screen, click on Slicer tab on the right. Choose Z-Axis Feed Rate – 15000 Slic3r from Slicer drop-down then click on Configuration button. Manual Extrusion Speed –...
- Page 20 Browse to the SD card or the location you saved the config file. (You can download the latest version of the config file from http://ww- Click on the Save icon on the next page, rename it to tevo-Tarantula w.tevo.cn/software-download.php) Select the ini file and click on pro or any name of your choice.
- Page 21 How to Slice 3D Object for SD Print Prepare Slicing Software Click on Load, browse to location of the file to print, then choose Click on Plater tab to go back to the main screen and do the same Open. (Or you can drop and drop the STL file to Repetier-Host soft- for others.
-
Page 22: How To Slice 3D Object For Sd Print
Arduino IDE (http://www.arduino.cc) Firmware Source Code (You can get it from many sources, e.g. our Facebook Page Files section, our Customer Service, Soft- ware Download page on http://www.tevo.cn, or from Marlin directly.) In this chapter, we’re going to use Marlin for demonstration. -
Page 23: Troubleshooting
Troubleshooting Troubleshooting Work Process Troubleshooting Cause Treatment Feedback 1. Clean the SD Card Start SD Card 2. Format SD Card 3. Change SD Card Print from SD File name Change file name into English/numbers File read Garbled Other file print ok Move the model Slicing and slicing again... -
Page 24: Tevo After-Sales
BUT the customer will be responsible for shipping fees. If the part is the LCD panel, Power Supply, or Mainboard, 2.4.1. the customer shall ship the part back to Tevo and Tevo will 1.3. Customer Damaged Parts. send a new part.
Need help?
Do you have a question about the Tarantula Pro and is the answer not in the manual?
Questions and answers