Table of Contents
Advertisement
Available languages
Available languages
Quick Links
Advertisement
Chapters
Table of Contents

Related Manuals for SOEKS QUANTUM

Summary of Contents for SOEKS QUANTUM
-
Page 2: Uygunluk Belgesi
Uygunluk belgesi/ Conformity Sertificate... -
Page 3: Iso 9001 Sertifikası
ISO 9001 Sertifikası/ Sertificate ISO 9001... -
Page 4: Table Of Contents
İÇİNDEKİLER Uygunluk belgesi..................2 ISO 9001 sertifikası..................3 Amaç...................... 5 Cihaz...................... 5 Teknik özellikleri..................6 Güvenlik önlemleri ..................7 Cihazın görünümü..................8 Kullanıma hazırlanması ................9 Pillerin yerleştirilmesi..............9 Cihazı açma/kapatma işlemi............. 10 Tuş kilidi.................. 10 Ekran göstergeleri. -
Page 5: Amaç
Cihazda iyonlaştırıcı radyasyon sensörü olarak iki adet Geiger-Muller SBM-20-1 sayaç mevcuttur. Bunların birisi cihazın sağ tarafında diğeri ise cihazın sol tarafında bulunmaktadır. Üretici cihazda değişiklik yapma hakkını saklı tutar. Yeni sürümler için www.soeks.ru. sitedeki ürün yazılımını takip ediniz. “Soeks Device Manager (Aygıt Yöneticisi)” programını kullanarak cihazınızı güncelleyebilirsiniz. -
Page 6: Teknik Özellikleri
Teknik Özellikleri 1000’e kadar Arka plan radyasyon seviye göstergesi aralığı, mSv / saat Kümülatif doz ölçüm aralığı, Sv 1000’e kadar Doz birikim süresi 999 güne kadar Arka plan radyasyon ölçümlerinin geçmişi, en az 10 saniye aralıklarla 24 saat Gama radyasyon enerjisinin kaydı, 0,1’den Uyarı... -
Page 7: Güvenlik Önlemleri
Güvenlik Önlemleri Ürünü kullanmadan önce lütfen aşağıdaki güvenlik önlemlerini dikkatli bir şekilde okuyunuz ve ürünü kullanırken güvenlik önlemlerine kesinlikle dikkat ediniz. Bu kuralların ihlali, arızaya neden olabilir veya ürünün tamamen kullanılamaz hale gelmesine neden olabilir. Aşağıda belirtilen güvenlik tedbirleri ihlal edildiğinde üreticinin garantisi geçersiz sayılır. •... -
Page 8: Cihazın Görünümü
Cihazın Dış Görünümü Orta düğme [•] Sağ düğme Sol düğme [↘] [↗] mini-USB girişi Sol düğme – menü (liste) yukarı navigasyon düğmesidir. En [↗] üst satıra ulaştığında (ilk pozisyon) en alt (son) pozisyona geçişi sağlar. Parametre değerlerini küçültür. Sağ düğme –... -
Page 9: Kullanıma Hazırlanması
Cihazın arka tarafında pil yatağı bulunmaktadır. Enerji kaynağı olarak cihazda şarj edilebilir veya normal AAA tip piller kullanılabilir. Pil yatağının alt kısmında üretici markası “SOEKS’’ ve işlemcinin modeli bulunmaktadır. Cihazı, sağ tarafında bulunan mini USB girişinden USB bağlantı kablosu vasıtasıyla “Soeks Device Manager’’ yazılımı ile bilgisayara bağlayabilirsiniz. -
Page 10: Cihazı Açma/Kapatma Işlemi
Dikkat! Cihazda normal piller takılıysa, kesinlikle bir şarj cihazına veya USB konektörüne bağlamayın. Bu, pillerin aşırı ısınmasına, hasar görmesine veya cihazın patlamasına neden olabilir. Cihazın açma/kapatma işlemi 1. Cihazı açmak için orta düğmeyi [ • ] basılı tutmalısınız, ekran açıldıktan sonra orta düğmeyi bırakabilirsiniz [ •... -
Page 11: Ekran Göstergeleri
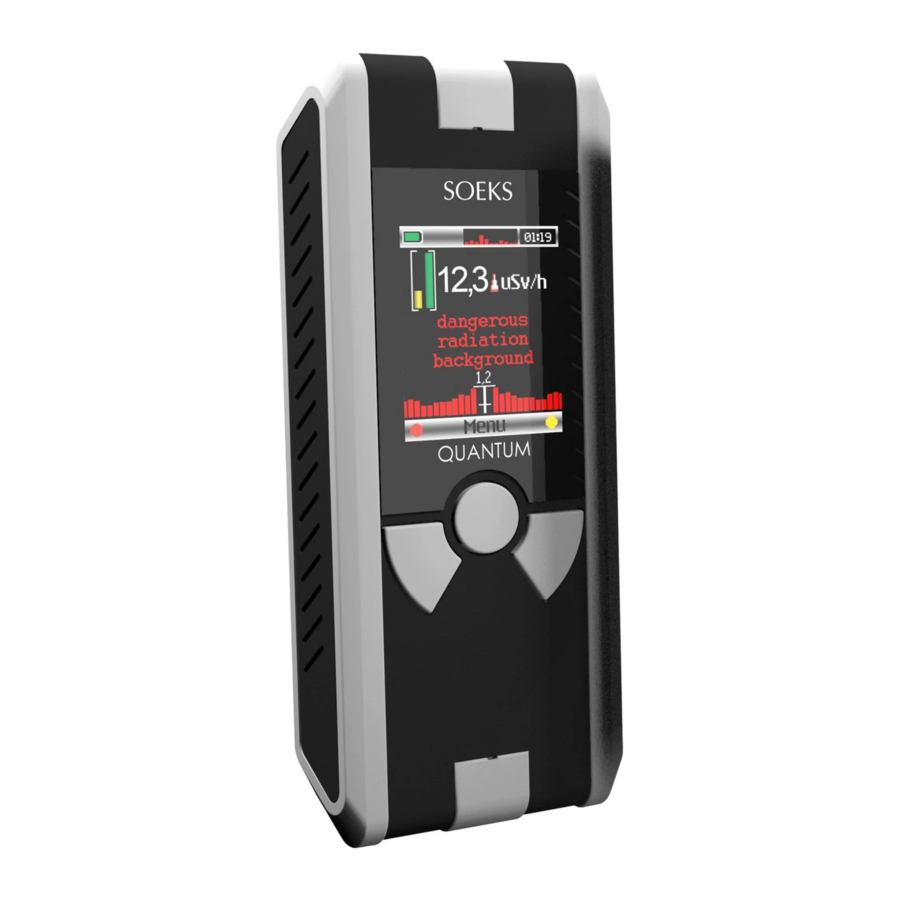
2. Tuş kilidi göstergesi - tuş takımı kilitli 3.Cihaz bilgisayara bağlı göstergesi - cihaz “Soeks Device Manager” programına bağlı 4.Diyagram Çubuk grafik son dakika ortalama radyasyon etkinliğini göstermektedir. Diyagram sağdan sola sürekli hareket eder, sütun yüksekliği ortamdaki radyasyon seviyesini göstermektedir. Sütun rengi, ortamdaki radyasyon eşiğini aşan değere göre yeşil, sarı... - Page 12 5. Saat Saat, 24 saat formatında gösterilir. 6. Araç çubuğu Bu bölüm ilgili kontrol tuşlarının fonksiyonları için isimlerini ve sembollerini belirtir. - listede yukarı hareket - listede aşağı hareket - seçim onayı - menüye dön - değeri azaltmak - değeri yükseltmek 7.
-
Page 13: Ölçüm" Modunda Semboller
"Ölçüm" modunda semboller, Ölçüm modunda aşağıdaki gösterilen ekran görüntüleniyor. 12. Radyoaktivite seviyesi, ekranın ortasında büyük rakamlarla gösterilir. İlk ölçüm yapılırken “ölçüm” kelimesi belirlenir. 13. Birimler; Sv/h 14. Sonuçların hazır olduğunun göstergesi: Gösterge çizgisi 10 saniye içinde tamamlanır. Arka plan radyasyon seviyesi yüksekse ölçüm oldukça hızlı tamamlanır. - Page 14 16. NRB99/2009 Radyasyon Güvenlik Standartlarına dayalı radyasyon seviyesinin hakkında bilgilenirme mesajı - Eğer radyasyon seviyesi ölçüm sonucu 0,4 mSv / saat’ten az ise "RADYASYON SEVİYESİ NORMAL" yazan yeşil renkte mesaj çıkacaktır. - Eğer radyasyon seviyesi ölçüm sonucu 0,4-1,2 mSv / saat aralığında ise "RADYASYON SEVİYESİ...
-
Page 15: Kümülatif Doz" Modunda Semboller
"Kümülatif doz" modunda semboller Kümülatif doz ölçme modunda aşağıda belirtilen öğelerle bir ekran görünür: 23. Toplam radyasyon dozunun sayısal değeridir. 24. Birimler: Sv / h. 25. Birikimi kabul edilebilir seviyesinin çerçeve göstergesidir. Aşırı doz birikiminde çerçeve kırmızı renkte yanıp söner. 26. -
Page 16: Veri" Modunda Semboller
"Geçmiş" modunda semboller "Geçmiş" modunda ekranda aşağıdaki öğeler görüntülenir: 29. Ölçüm geçmişin saati ve tarihi. 30. En son ölçüm geçmişin saati ve tarihi. Cihazının işleminin başlangıcında ya da biriken dozun en son sıfırlama işleminden sonraki tüm ölçüm periyodu için radyasyon aktivitesi ortalama değerlerini gösteren diyagram. -
Page 17: Kişisel Ayarlar
Kişisel ayarlar Ölçümleri yapmadan önce cihazın kişisel ayarlarını yapmanız tavsiye edilir. ● Saat ● Tarih/Saat- Cihazı kullanmadan önçe geçerli tarih ve saati ayarlayın. Bu işlem zamanın doğru gösterilmesi, ölçümlerin tarihinin doğru korunması ve cihazın ‘’Alarm’’ modunu kullanmak için gereklidir. Piller çıkartılsa bile saat ve tarih sıfırlanmaz. -
Page 18: Doz Eşiği
● Doz eşiği Listede verilen 15 değer arasından gerekli eşiği seçin. Önceden belirlenen kümülatif doz eşiği aşıldığında 0,01 mSv sesli alarm aktive edilir. 0,05 mSv 0,1 mSv 0,5 mSv 1,0 mSv 5,0 mSv 10,0 mSv 50,0 mSv 0,1 Sv 0,5 Sv 1,0 Sv 5,0 Sv 10,0 Sv... -
Page 19: Ekran
● Ekran Bu menü öğesinde ekran özelliklerini ayarlayabilirsiniz: parlaklık ve ekranın çalışma süresini. ● Parlaklık -ekranın parlaklığını 1'den 10'a ayarlayın ● Ekran Kapalı -hiçbir düğmeye basılmadığında ekranın açık kalacağı süreyi ayarlayın. Olası değerler - 1 - 10 dakika. «00» seçim sırasında - ekran, cihaz açıkken yanık kalır. Güç... -
Page 20: Ölçümler
Cihaz açıldığıktan sonra kümülatif dozu hemen ölçmeye başlar ve hangi modda kullanıldığından bağımsız olarak kapanana kadar sürekli devam eder. Cihaz bir sonra açıldığında, kümülatif dozun ölçümü devam edecektir. Veriler ancak «Soeks Device Manager» yazılımını yüklü bir PC kullanılarak sıfırlanabilir. -20-... -
Page 21: Geri Yükleme
PC'nize aktarılabilir. Geçmiş parametreleri ayarlar menüsünden ayarlanabilir (Sayfa 38). Cihazınızı bir bilgisayara bağlarsanız, daha ayrıntılı ölçüm geçmişi bilgileri "Soeks Device Manager" yazılımından edinilebilir. Yazılım Kurtarma Çok gerekli olduğu hallerde, aygıtın yazılımını sıfırlayıp fabrika ayarlarını geri yükleyebilirsiniz, ancak tüm verileriniz kaybolacaktır. - Page 22 İşaretleme ve mühürleme Cihazın üzerinde marka ve model adı yazılıdır. Seri numarası ve imalat tarihi pilin/bataryanın altındaki bölümde yazılıdır. Cihaz üretici tarafından mühürlenmemiştir. Ambalaj Ciahzlar, normal iklim koşullarında nakliye ve depolama şartlarında cihazın zarar görmesini engelleyecek şekilde ambalajlanmaktadır Nakliye ve depolama Paketlenmiş...
-
Page 23: Üretici Garantisi
Garanti kapsamında tamir servisine başvurmadan önce bu kılavuzda verilen talimatları dikkatlice okumanızı öneririz. Lütfen görüşlerinizi, www.soeks.ru adresindeki resmi web sitemizdeki e- posta adresimize, telefon ile: +7 (495) 221-05-82, posta adresi: Rusya, 127566, Moskova, Altufievskoye shosse, 48 / 1, ofis 39. iletiniz. Garanti kapsamındaki tamiratlar üreticinin fabrikasında yapılmaktadır. -
Page 24: İngilizce
Please send all your comments to our e-mail addresses at our official website: www.soeks.ru, telephone +7(495)223-27-27 or mailing address: 127566, Moscow, Altufyevskoye Shosse, 48, k.1, office 301. Warranty repairs are done at the manufacturer’s factory. - Page 25 CONTENTS Warranty coupon..................24 Conformity Sertificate................. 2 Sertificate ISO 9001..................3 Purpose...................... 26 Base kit...................... 26 Specification....................27 Precautions....................28 Appearance of the Device................29 Setting-Up Procedures................30 Installing batteries..............30 Power control of the device.
-
Page 26: Purpose
1 pcs A 2 Geiger-Muller counters is used as ion radiation sensor in our dosimeter Quantum. They are positioned on the right and left sides of the device. The manufacturer reserves the right to incorporate additional functions into the device. Keep track of new versions of the firmware on our website at www.soeks.ru. -
Page 27: Specification
Specification up to 1000 Range of indicated background radiation level, mcSv/h Measurement range of cumulative up to 1000 dose, Sv Dose accumulation time up to 999 days History of background radiation 24 hours with 10 second increments measurements, more than Registered gamma radiation energy from 0.1 Levels, mcSv/h from 0.3 to 100... -
Page 28: Precautions
Precautions Before using the product, please read carefully the safety measures below and strictly adhere to them when using the product. Violation of these rules may cause malfunction or cause total failure of the product. The manufacturer’s guarantee will be void if the safety measures stated below are violated. -
Page 29: Appearance Of The Device
Appearance of the device Middle button [•] Right Left button [↘] button [↗] mini-USB [↗] Left button - scrolls the menu (list) up. When the top (first) position on the list is reached, the cursor moves to the bottom (last) position. Decreases the value of the parameter. -
Page 30: Setting-Up Procedures
The device can be powered from rechargeable or disposable AAA batteries. On the bottom of the battery compartment there is a SOEKS trade mark with the make of the board. On the right side of the device, there is a mini-USB connector which can be... -
Page 31: Power Control Of The Device
Power control of the device • 1. To turn the device on, press and hold the middle button [ ] until • the display lights up, then release the middle button [ • 2. To turn the device off, press and hold the middle button [ •... -
Page 32: Screen Indicators
2. Keyboard lock indicator - keyboard is locked. 3. PC connection indicator - the device is connected to «Soeks Device Manager» software 4. Bar graph The bar graph shows the mean radiation activity value for the last minute. The graph moves constantly from right to left, the size of the bar representing the level of the background radiation. - Page 33 5. Clock The clock shows the current time in 24-hour format. 6. Hint line The hint line presents names and symbols for functions of the corresponding control buttons. - scroll the list up - scroll the list down - confirm the action - return to the menu - decrease the value - increase the value...
-
Page 34: Indicators In «Measurement» Mode
Indicators in «Measurement» mode In «Measurement mode» the following symbols appear on the screen: 12. Radioactivity level. The radioactivity level is shown with large figures in the center of the screen. When the device is taking measure- ments for the first time, the word «Measurement» appears on the screen. 13. - Page 35 16. A message about the state of the background radiation based on russian radiation safety standards NRB - 99/2009. - If the measured background radiation is less than 0.4 μSv/h, a green message «radiation background normal» appears. - If the measured background radiation is 0.4–1.2 μSv/h, a yellow message «radiation background high»...
-
Page 36: Indicators In «Accumulated Dose» Mode
Indicators in «Accumulated dose» mode In «Accumulated dose» mode the following symbols appear on the screen: 23. Value of the accumulated dose. 24. Units: μSv/h. 25. Frame-indicator of acceptable accumulated dose level excess. If exceeded frame-indicator becomes red and starts blinking. 26. -
Page 37: Indicators In «Data» Mode
Indicators in «Data» mode In «Data» mode the following symbols appear on the screen: 29. Date and time of the beginning of the history. 30. Date and time of the last entry in the history. 31. Bar graph showing mean radioactivity values for the whole measurement period from the moment the device was put into operation or from the moment the accumulated dose was reset. -
Page 38: Individual Settings
Individual Settings Before making any measurements it is recommended to customize the settings of your device. ● Time/alarm clock ● Date/Time - set the current date and time before using the device. This is necessary to save the measurement history, display current time and use the «Alarm Clock»... -
Page 39: Radiation Dose
● Radiation dose Choose the necessary threshold from 15 preset values on the list. 0.01 mSv When the preset accumulated dose threshold is 0.05 mSv 0.1 mSv exceeded the sound alarm is activated. 0.5 mSv 1.0 mSv 5.0 mSv 10.0 mSv 50.0 mSv 0.1 Sv 0.5 Sv... -
Page 40: Power
● Screen In this menu item you can set the screen properties: brightness and the duration the display remains lit. ● Bridhtness - set the brightness of the screen from 1 to 10. ● Screen Off - set the interval during which the display remains lit if no button is pressed. -
Page 41: Measurements
The next time the device is turned on, the measurement of the accumulated dose will continue. The data can only be reset using a PC with «Soeks Device Manager» software. -41-... -
Page 42: Software Recovery
History parameters can be set in the Settings menu (Page 38). More detailed measurement history information can be obtained in «Soeks Device Manager» software if you connect your device to a PC. Software Recovery When absolutely necessary, you can hard reset the software of the device and restore the factory settings but all your data will be lost. - Page 43 Marking and sealing The name of the device is written on the case. The serial number and date of manufacturing are written in the battery section under the accumulator. The manufacturer does not seal the device. Package The package ensures safety of the device during transportation and storage, provided normal climatic conditions.
Need help?
Do you have a question about the QUANTUM and is the answer not in the manual?
Questions and answers