Table of Contents

Subscribe to Our Youtube Channel
Related Manuals for Obdstar Key Master DP Plus


Summary of Contents for Obdstar Key Master DP Plus
- Page 1 OBDSTAR User Manual Key Master DP Plus Version: V1.0 Revised date: 2018/04/10 Please read the manual carefully before operating your device. ★...
- Page 2 Neither OBDSTAR nor its affiliates shall be liable to the purchaser of this unit or third parties for damages, losses, costs, or expenses, incurred by purchaser or third parties...
- Page 3 OBDSTAR User Manual Safety Precautions Before using this device, please read the following safety information carefully. 1. Never collide, throw, or punch this device, and avoid falling, extruding and blending it. 2. Do not use this device in exceptionally cold or hot, dusty, damp or dry environments.
-
Page 4: Table Of Contents
OBDSTAR User Manual Content 1 INTRODUCTION ......................1 1.1 PRODUCT PROFILE .................... 1 1.2 FEATURES ......................1 1.3 KNOWLEDGE OF THIS DEVICE ................2 1.3.1 The whole set ..................2 1.3.2 The tablet computer ................2 1.4 TECHNICAL PARAMETER ................... 3 1.5 ACCESSORY(Standard Configuration)... - Page 5 OBDSTAR User Manual 3.4 START DIAGNOSING ..................13 3.4.1 Read vehicle information ..............15 3.4.2 Read trouble code ................. 16 3.4.3 Clear trouble code ................. 16 3.4.4 Read data stream .................. 17 3.5 MAINTENANCE DATABASE ................18 3.6 VIDEO CENTER ....................18 3.7 ONE KEY UPGRADE..................
- Page 6 OBDSTAR User Manual 4.4.4 Record a video ..................31 4.4.5 View a video ..................31 4.4.6 Customize camera settings ..............31 4.4.7 Customize video camera settings ............32 4.5 GALLERY ......................32 4.5.1 Open gallery ..................32 4.5.2 Browse images ..................32 4.6 MUSIC ......................
-
Page 7: Introduction
1.1 PRODUCT PROFILE This device is a new Android-based vehicle trouble diagnostic device developed for internet applications. It inherits from OBDSTAR advanced diagnosing technology and it is characterized by covering wide range of vehicles, featuring powerful function, and providing precise result. Through vehicle diagnostic OBD connector and variant mobile intelligent terminals, it achieves vehicle trouble diagnosis for full car model and full system vehicle. -
Page 8: Knowledge Of This Device
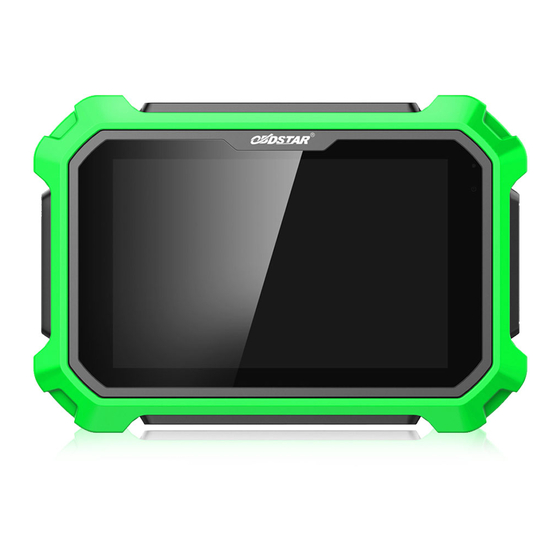
OBDSTAR User Manual 1.3 KNOWLEDGE OF THIS DEVICE 1.3.1 The whole set This device is composed of the tablet computer, main test cable and kinds of connectors. 1.3.2 The tablet computer Product Picture: front view reverse view... -
Page 9: Technical Parameter
OBDSTAR User Manual 1.4 TECHNICAL PARAMETER Operation system: Android 5.1.1 ● ● CPU: Exynos4418 Dual Core ARM Cortex A9 1.4GHz ● Battery: 3700mA, rechargeable polymer lithium battery ● Extension memory card: 32G Micro SD (TF) card supported ● Memory capacity:1GB ●... -
Page 10: Obd Connector
OBDSTAR User Manual 1.5.2 OBD Connector OBD I connector to connect the diagnosis port of non OBD II vehicles. To choose the connector according to the vehicle brand and models. Common connectors are as below: HONDA 3 HYUNDAI 10... -
Page 11: Preparation
OBDSTAR User Manual 2 PREPARATION 2.1 CHARGE THIS DEVICE 1. Connect the included USB cable with charger. 2. Plug the charger into AC outlet. 3. When it connects to charger, battery logo indicates , it indicates that the battery is in charging 4. -
Page 12: Power On/Power Off This Device
OBDSTAR User Manual 2.3 POWER ON/POWER OFF THIS DEVICE 2.3.1 Power on Press and hold Power button for three seconds to turn on this device. Note:set date, time and time zone. 2.3.2 Power off 1. Press and hold Power button for three seconds to turn off this device. -
Page 13: Delete Items On The Desktop
OBDSTAR User Manual 2.5.3 Delete items on the desktop 1. Hold and press the desired item, “X Delete” appears in the upper middle of the screen. 2. Dragon the item to “X Delete”. 3. When the item and icon turn red and then release it. -
Page 14: Unlock The Screen
OBDSTAR User Manual 2.8.2 Unlock the screen Press POWER key to activate the screen and then drag the lock to “Unlock position.” 2.9 NOTIFACTION BAR The notice bar is used to display some activities, messages to remind and inform users. -
Page 15: How To Diagnose
OBDSTAR User Manual 3 HOW TO DIAGNOSE 3.1 CONNECT VCI CONNECTOR Procedure to connect VCI connector: 1. Locate vehicle’s DLC socket. The DLC (Data Link Connector or Diagnostic Link Connector) is the standardized 16-pin connector where diagnostic code readers interface with the vehicle's on-board computer. -
Page 16: User Registration
OBDSTAR User Manual 3 .3.1 User registration Click to enter diagnostic software, select “the user information” in “Settings” menu, then enter user registration window. As shown in following photo: Fill in the information in each field (Items with * must be filled). After inputting, tap “OK”... -
Page 17: Download Diagnosis Software
OBDSTAR User Manual 3.3.2 Download diagnosis software Tap “One Key Upgrade” to enter one key upgrade page, as following picture shown: ap “One Key Upgrade” to start downloading, enter main interface after finishing downloading. (Notes: Ensure internet connection is normal when updating. Besides,... -
Page 18: Diagnostic Software Main Interface Introduction
OBDSTAR User Manual 3.3.3 Diagnostic software main interface introduction Function menu included as follows: Diag Program: operate as a diagnostic tool. Maintenance Database: Provides abundant automotive technology, handbook and repair case for your reference. Video Center: to guide users by video. -
Page 19: Start Diagnosing
OBDSTAR User Manual 3.4 START DIAGNOSING Tap on the main menu screen, and then choose “Diag Program” to enter the function selection and vehicle selection page. As following photo shown: Hereinafter, take OBDII for example, to introduce how to start diagnosing. - Page 20 OBDSTAR User Manual To select software version, as following photo shown: To enter diagnostic function menu, as following photo shown:...
-
Page 21: Read Vehicle Information
OBDSTAR User Manual To select AUTO SCAN, as following photo shown: 3.4.1 Read vehicle information Tap “Read vehicle information”, as following photo shown:... -
Page 22: Read Trouble Code
OBDSTAR User Manual 3.4.2 Read trouble code Tap “Read trouble code”, as following photo shown: 3.4.3 Clear trouble code... -
Page 23: Read Data Stream
OBDSTAR User Manual 3.4.4 Read data stream... -
Page 24: Maintenance Database
OBDSTAR User Manual 3.5 MAINTENANCE DATABASE We have powerful maintenance database. 3.6 VIDEO CENTER We have the details of the operation method of videos. 3.7 ONE KEY UPGRADE Download and upgrade software by “One Key Upgrade” Tap main screen “batch update”, start downloading and upgrading... -
Page 25: System Settings
OBDSTAR User Manual 3.8 SYSTEM SETTINGS It includes VCI information, language, unit, data records, user information, self test, about. 3.8.1 VCI information 3.8.2 Language... -
Page 26: Unit
OBDSTAR User Manual 3.8.3 Unit 3.8.4 Data records... -
Page 27: User Information
OBDSTAR User Manual 3.8.5 User information It used to set and manage user’s information. 3.8.5.1 User login 3.8.5.2 User registration... -
Page 28: Forget Password
OBDSTAR User Manual 3.8.5.3 Forget password 3.8.5.4 Registration information... -
Page 29: Info Modification
OBDSTAR User Manual 3.8.5.5 Info modification 3.8.5.6 Modify password... -
Page 30: Self Test
OBDSTAR User Manual 3.8.6 Self test 3.8.7 About Tap “check for updates” to check if any upgrade software version... -
Page 31: Remote Assistance
OBDSTAR User Manual 3.9 REMOTE ASSISTANCE This application can realize remote hosting operation via the Third Party’s software: Quick Support. 3.10 REPORT CENTER Diagnostic Report: Each diagnosis operation will create new diagnostic report. Those reports will be grouped by Month. - Page 32 OBDSTAR User Manual Maintenance Station Information: Record related information of Maintenance Station.
-
Page 33: Others
OBDSTAR User Manual 4 OTHERS 4.1 EMAIL The function allows you to send and receive email. You can add common web email service provider in this device. For example: Yahoo! ®, Sohu, 163 and external device or IMAP email account of other manufacturers. -
Page 34: Delete An Email Account
OBDSTAR User Manual 4.1.2 Delete an email account 1. Enter main menu screen, and tap to enter account screen. 2. Tap the desired account, and then tap to choose “Settings”. 3. Tap the account to be deleted to enter, and then scroll the screen until ”Remove account”... -
Page 35: Browser
You can use any APP based on browse website and network. 4.3.1 Open browser Enter main menu screen, tap to OBDSTAR the browser. You can choose the desired homepage or input the website address to browse. 1. Tap to input or edit the web link 2. -
Page 36: Open Multiple
OBDSTAR User Manual 4.3.5 Open multiple pages The browser allows you to open multiple web pages and you can toggle between these pages. 1. While browsing a webpage, tap and open new window. 2. Another web page will be displayed in the new window. -
Page 37: Record A Video
OBDSTAR User Manual 4.4.4 Record a video 1. Open the camera, and swipe the screen rightwards to display button , and switch to video mode. 2. Aim the camera lens at the object you want to photograph and adjust it as desired. -
Page 38: Customize Video Camera Settings
OBDSTAR User Manual 4.4.7 Customize video camera settings In video mode: to enter video setting screen: to turn on/off flash light; to turn on/off sudoku mode 4.5 GALLERY This option is used to manage pictures and video files. 4.5.1 Open gallery Enter main menu screen, tap “Gallery”... -
Page 39: Calculator
OBDSTAR User Manual 4.7 CALCULATOR You can use calculator to operate algorithm of plus, subtract, multiply and divide, and function operation of sin, cos, tan and log. 4.8 CALENDAR This function lets you view calendar or create to-do events. -
Page 40: Countdown Set
OBDSTAR User Manual 4.9.4 Countdown set 1. Enter the main menu to tap to choose count down alarm:; 2. Set the time of countdown; 3. Tap to add count down alarm, and tap to delete alarm; 4. Tap to start count down, and tap to stop count down;... -
Page 41: Set Screen Lock
OBDSTAR User Manual 4.12 SET SCREEN LOCK You can set the screen lock pattern, and when the screen is locked, it will not be unlocked until you draw the right pattern. 1. Enter main menu screen, tap “Settings” > “Security” > “Screen lock”. -
Page 42: Set Date&Time
OBDSTAR User Manual 4.15 SET DATE&TIME This device is preset to use the network-provided date, time zone and time. Note: If Automatic date & time is set as Use network-provided time, date, time and time zone will not be defined. -
Page 43: Attachments
OBDSTAR User Manual ATTACHMENTS Safety warnings and cautions Before using and operating the device, please read and observe the following precautions to avoid dangerous or illegal conditions and to ensure the best performance of this device. Medical equipment ▪ In the express provision for medical and health care facilities that prohibit the use of wireless equipment, please comply with the provisions of the premises to shut down this device. - Page 44 OBDSTAR User Manual Child health This device and its accessories may contain small parts, please place them in places where children are not accessible. Children may unintentionally damage this device and its accessories, or swallow small parts to cause suffocation or other hazards.
- Page 45 When the device needs repair, please send it to OBDSTAR Technology Co., Ltd., together with the purchase invoice and problem description. If the device is within the scope of the warranty, OBDSTAR will provide free maintenance; if the device is not in the warranty, OBDSTAR will charge maintenance and return freight.
Need help?
Do you have a question about the Key Master DP Plus and is the answer not in the manual?
Questions and answers
Hi..my obdstar have no display why?
The Obdstar Key Master DP Plus may have no display if the screen is broken. In such cases, users are advised not to touch or attempt to remove the broken part and to stop using the device immediately.
This answer is automatically generated