Table of Contents
Advertisement
Advertisement
Table of Contents

Related Manuals for Advatek Lights PIXLITE 16


Summary of Contents for Advatek Lights PIXLITE 16
- Page 1 ARDWARE REV AND PRIOR ANUAL V1.7...
-
Page 2: Table Of Contents
7. - Specifications ..........................16 7.1 - Operating Specifications ......................16 7.2 - Mechanical Specifications ......................16 8. – Troubleshooting ..........................18 8.1 - LED Codes..........................18 PixLite 16 Older Revs User Manual V1.7 © 2015 Advatek Lights Pty Ltd... - Page 3 8.2 - No Status/Power LEDs On ......................18 8.3 - Other Issues ..........................19 8.4 – Reset To Factory Defaults ......................19 8.5 - Warranty and Service........................ 19 PixLite 16 Older Revs User Manual V1.7 © 2015 Advatek Lights Pty Ltd...
-
Page 4: Introduction
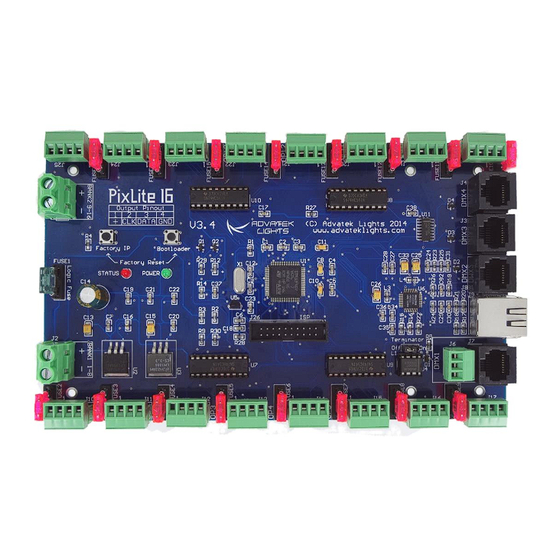
1. – Introduction This is the user manual for the assembled control board version of the PixLite 16 pixel controller. The PixLite 16 controller converts the E1.31 (sACN) protocol from a lighting console or lighting software into various other data protocols and outputs that data in real time to control pixel lighting fixtures. - Page 5 A 500mA M205 fuse (1A mini blade fuse on rev 3.4+) is also provided for the on-board logic, in addition to reverse polarity protection (but not for the light output power – applying power with reverse polarity can destroy your pixels!) PixLite 16 Older Revs User Manual V1.7 © 2015 Advatek Lights Pty Ltd...
-
Page 6: Installation
3.1 - Power and Links The PixLite 16 has two split power banks, each with 8 individual outputs. The split banks allow two different voltages to be used on the controller simultaneously. (You could run 5v lights off one bank and 12v lights off the other one for example.) - Page 7 5V VCC logic or on-board regulator input when either configuration A or B (above) is used for L2. The 1-2 position selects power bank 1 and 2-3 position selects power bank 2. PixLite 16 Older Revs User Manual V1.7 © 2015 Advatek Lights Pty Ltd...
-
Page 8: Control Data
Power Bank Select Jumper Figure 5 All PixLite 16 V3.2 boards are shipped with the jumpers set for the ‘B’ configuration and for VCC power via bank 1 by default. Board Rev 3.3+ On all board revisions after V3.2, no power link settings are required. Power to the logic circuitry is automatically regulated from the bank 1 power input. - Page 9 The DMX output acts as a single E1.31 to DMX bridge output. J6 DMX OUT J8 DMX IN J7 DMX OUT J9 Ethernet Jack Figure 8 Board Rev 3.3+ PixLite 16 Older Revs User Manual V1.7 © 2015 Advatek Lights Pty Ltd...
- Page 10 J4 DMX 4 OUT J3 DMX 3 OUT J8 DMX 2 OUT J9 Ethernet Jack J6/J7 DMX 1 OUT Figure 10 PixLite 16 Older Revs User Manual V1.7 © 2015 Advatek Lights Pty Ltd...
-
Page 11: Lights
Note that this can also happen from poor waterproofing when rain shorts the higher voltage onto either of those wires in your pixels/wiring. PixLite 16 Older Revs User Manual V1.7 © 2015 Advatek Lights Pty Ltd... -
Page 12: Network Configuration
Figure 12 shows a typical network topology for the PixLite 16 controller(s) LAN. The host machine typically connects to a router and then to the PixLite 16 controller(s). If you are only using a few controllers, they can be connected straight to the router. Larger installations will benefit from using a network switch between the router and controllers. -
Page 13: Using A Switch/Direct
Once you can successfully discover the controller in the Assistant, we recommended setting the controller to a static IP address other than the default. Figure 13 shows a screenshot of typical computer network settings to communicate with a PixLite 16 for the first time without a router. -
Page 14: Forcing The Default Ip Address
The refresh rate of the pixels will depend on the operating frequency of the specific pixel chip type. Typically it can vary from a minimum of 25 fps at the low end and up to 100 fps at the higher end. PixLite 16 Older Revs User Manual V1.7 © 2015 Advatek Lights Pty Ltd... -
Page 15: Hardware Test Pattern
6.1 - Physical Setup To perform a firmware upgrade, ensure that you have your PixLite 16 controller connected to the LAN network as per section 3.1.1. 6.2 - Obtaining New Firmware The latest firmware is available from the Advatek Lights website at the following link: http://www.advateklights.com/resources... -
Page 16: Performing A "Forced Boot" Update
7. Power the board down again (move the jumper L5 back to the “Off” position if using board rev 3.2). 8. Apply power again and the board should now be operating with the new firmware. PixLite 16 Older Revs User Manual V1.7 © 2015 Advatek Lights Pty Ltd... -
Page 17: Specifications
7. – Specifications 7.1 - Operating Specifications The table below specifies the recommended operating conditions for a PixLite 16 controller. PARAMETER VALUE/RANGE UNITS TOLERANCE Power Bank Input 5-30 V DC +/-5% Max Capacity Per +/-5% Power Bank Logic Current +/-10%... - Page 18 Figure 15 PixLite 16 Older Revs User Manual V1.7 © 2015 Advatek Lights Pty Ltd...
-
Page 19: Troubleshooting
You should also try disconnecting all outputs and see if the controller starts then. If the supplied power is correct try performing a forced firmware update as per section 6.4. PixLite 16 Older Revs User Manual V1.7 © 2015 Advatek Lights Pty Ltd... -
Page 20: Other Issues
You may then either return the device to a local distributor or return it to us directly for warranty services. The PixLite 16 control board is supplied with a 12 month warranty. PixLite 16 Older Revs User Manual V1.7...
Need help?
Do you have a question about the PIXLITE 16 and is the answer not in the manual?
Questions and answers