Table of Contents
Advertisement
Advertisement
Table of Contents

Related Manuals for Secomam Basic


Summary of Contents for Secomam Basic
- Page 1 USER’S MANUAL Ref. 0NVBAU-F BASIC PHOTOMETER...
-
Page 3: Table Of Contents
BASIC SUMMARY REMARKS ..............................5 WARRANTY..............................7 INFORMATION............................9 PRECAUTIONS OF USE.......................... 11 PRELUDE ..............................13 DESCRIPTION............................15 6.1..........................15 ENERAL OVERVIEW 6.2......................... 15 CREEN AND KEYBOARD 6.3............................. 17 ISPLAY DESIGN 6.4. FLUID CIRCUIT DESCRIPTION......................18 PARAMETERS SETTING ........................19 7.1. - Page 4 BASIC MAINTENANCE ............................49 9.1. LAMP CHANGING..........................49 9.1.1. Warning............................49 9.1.2. Lamp checking ..........................49 9.1.3. Halogen lamp changing ........................ 49 9.2. BATTERY REPLACING ........................51 9.3. PERISTALTIC PUMP HEAD REPLACING ..................52 - 4 -...
-
Page 5: Remarks
BASIC REMARKS The Automatic aspiration system kit is manufactured by AQUALABO ANALYSE. The information contained in this document may be the object of patents or patent applications by AQUALABO ANALYSE. The possession of this document does not confer any license to such patents. -
Page 7: Warranty
If the above consent is given, articles shall be returned in their original packaging on a prepaid basis to the following address: AQUALABO ANALYSE - SECOMAM - 91 avenue des Pins d’Alep – 30100 ALES FRANCE We reserve the right to reship all instruments received collect failing such consent. - Page 8 BASIC SOFTWARE GUARANTEE The software is guaranteed by the designer or the distributor of the software under the conditions specified in the literature accompanying the aforementioned software packages. Under no circumstances whatsoever will AQUALABO ANALYSE supply any type of guarantee for software packages.
-
Page 9: Information
BASIC INFORMATION The AQUALABO ANALYSE equipment has been designed, manufactured, tested and inspected according to the ISO 9001 standards. If the unit is not immediately installed, it should be stored in a dry and clean area. The storage temperature should be between 10 and 35°C. -
Page 11: Precautions Of Use
BASIC PRECAUTIONS OF USE Always make sure that the instrument is connected on the good voltage. (Between 100 – 240V 50-60Hz) Always disconnect the mains plug before starting any work inside the instrument. When dangerous substances for health and environment are used, the laboratory or site rules, where the instrument is installed must be followed. -
Page 13: Prelude
BASIC PRELUDE The BASIC was designed within the framework of In Vitro Diagnostic to cover the need of semi- automatization in clinical biochemistry analysis. It includes the principal functions required by this kind of analysis such as: Wavelength range 340-700 nm, Peltier thermostated cell holder Calculation method adapted to substrate reading and enzyme kinetics. -
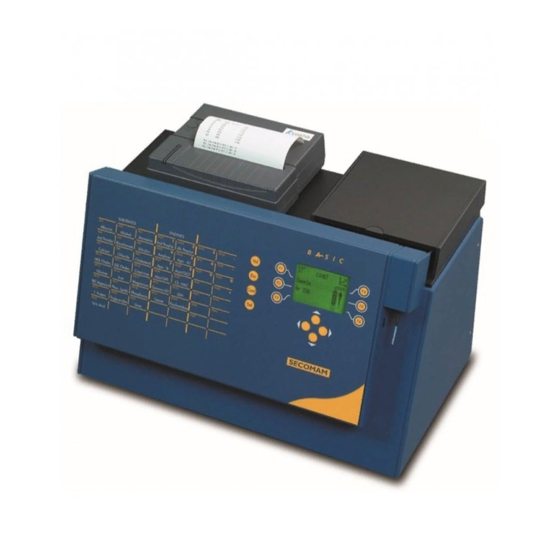
Page 15: Description
4 Function keys. 5 Cursors. 6.2. SCREEN AND KEYBOARD Function screen keys Thanks to these keys, working with BASIC is simplified. Screen instructions well function keys guide throughout the analysis. On the display, Function keys correspond to an icon or a value. - Page 16 BASIC • Cursor keys : Use these keys to have access to other functions of the keyboard such as : elevator movement : BASIC test methods primary secondary positions, next screen display, right arrow for double rinse Program keys: each program key can contain two test methods: on the primary position (noticed in white color) and the secondary position (secondary position are M1 to M47).
-
Page 17: Display Design
BASIC BASIC’s software control keys: Validate an operation Quit active screen Reach software configuration screen Erase & correct data 6.3. DISPLAY DESIGN Test name Programmed temperature Calculating method Concentration value, measuring unit Absorbance value (blank value deducted) Name of sample measured (standard, sample X ...) -
Page 18: Fluid Circuit Description
BASIC 6.4. FLUID CIRCUIT DESCRIPTION 1 – GUIDE FOR SUCTION TUBE REF 80VB0380 3 – PERISTALTIC PUMP 2 – FLOWTHROUGH CUVETTE REF: 0GG174Z8.5 - 18 -... -
Page 19: Parameters Setting
BASIC PARAMETERS SETTING 7.1. GENERAL CONFIGURATION The instrument configuration is carried out using the function key « CONF ». CLOCK - 19 -... -
Page 20: Language Set-Up
BASIC PROGRAM PUMP Access to the menu which Access to pump set- allows modifying parameters up menu of original analysis. QUALITY CONTROL Confirm (F1) or skipping (F4) the quality control function. Display (F3) values and dates of previous control. NOTE: CONFIGURATION screen is active when you see an elevator in the middle of the screen. -
Page 21: Date And Clock Set-Up
BASIC 7.3. DATE AND CLOCK SET-UP Use the corresponding function key to increment date and time. Then « VAL » to store, « ESC » to return to previous display. 7.4. PUMP SET-UP Access to pump functions and set-up: Flow, dead volume, aspiration volume. -
Page 22: Pump Rate (Calibration)
BASIC 7.4.1. Pump rate (calibration) Prepare ahead: • 4 test tubes with 1000 µl of distilled water each, • 1 test tube with 500µl of distilled water to use as standard. • One graduated pipette (vol. up to 500µl) To adjust pump volume, you need to: •... -
Page 23: Dead Volume
BASIC 7.4.3. Dead volume Dead volume is needed to avoid contamination of samples. It is represented by a certain volume of air. Dead volume is influenced by the length of aspiration tube. It is recommended to program dead volume in such a way that the end of the aspirated sample remains approximately 2 cm on top of the cell tip (see drawing). - Page 24 Warning: Never connects a serial printer with a 25-pin cable to the parallel port. This will do serious damage to BASIC and the instrument will emit a continuous beeping noise. This type of error is not covered by the warranty.
-
Page 25: Traceability Set-Up
Press on the (F6) key in order to obtain the following screen: BASIC - PC: this function allows you to download data (patient reports) on computer. BASIC – Prt: this function allows downloading data to a printer. -
Page 26: Data Export
» extension, or by selecting « » icon. FOLLOW • Type «Start» and your terminal will be on reception mode. • On BASIC itself, press « BASIC-PC » button, you will see its data on the PC screen. - 26 -... -
Page 27: On Printer
BASIC 7.7.2. On printer Connect BASIC to a printer. Press « B ». ASIC Two kinds of printing are available: 1) The summary of all analysis (by printing number 0). The printing will be: 47;E; 0.0;%; 29/08/1997;08H17; 47;E; 210.4;%; 29/08/1997;08H19;... -
Page 28: Quality Control Set-Up
BASIC 7.8. QUALITY CONTROL SET-UP The “QUALITY CONTROL” makes it possible to require or not the control of the analysis during its execution. Each Quality Control made, is memorized automatically. When this option is validated by “YES”, the software checks during the analysis measurement if this one must be controlled (in the contrary case “NOT”, no alarm concerning quality will be apparent on... - Page 29 BASIC This control can be done at a regular interval, defined in days: To do so, return to « PROGRAMMING », « MODIFY », select the corresponding analysis method, and validate till you obtain the following display: Enter the frequency (in days) and validate. This procedure determines QC periodicity. Control can be done daily (maximum 31 days).
- Page 30 BASIC Example of print-out (analysis comprising one quality control per day : SECOMAM - Polyphotometer UV-Vis BASIC V1.11 Date: 04/06/1997 Hour: 09H25 User: Analysis: ALBUMIN 37°C S a m p l e A b s . C o n c e n t r a t i o n S t a t u s R e a g e n t B l .
- Page 31 BASIC SECOMAM - Polyphotometer UV-Vis BASIC V1.11 Date: 06/06/1997 Hour: 09H27 User: Analysis: ALBUMIN 37°C S a m p l e A b s . C o n c e n t r a t i o n S t a t u s 0 .
-
Page 33: Programming & Measurement
BASIC PROGRAMMING & MEASUREMENT Basic is an open system. Through configuration, select « PROGRAMMING » to modify a preset analysis method or to create a new one. Programmable parameters are: − suction volume, − temperature, − unit − accuracy, −... -
Page 34: Analysis Name Programming
1500 µl is available. 8.4. TEMPERATURE PROGRAMMING BASIC is equipped with a Peltier-effect temperature control cell-holder. Recommended temperature to use is given by the test method technical sheet. Use key to program the temperature. Select the correct temperature, either the pre programmed temperature for Peltier effect or room temperature represents by “XX°”. -
Page 35: Units Programming
BASIC NOTE: On work organization, it is advised to run all test methods using the same temperature in one session to avoid warm-up delay. For your convenience, the cell-holder will remain on the last temperature used. NOTE: During warm-up, the programmed temperature digits will blink, rather fast at first, slowing down afterwards. - Page 36 BASIC Factor: in Kinetic mode, enzymatic factor (coefficient) value is used instead of calibration factor. Enter factor value indicated on the reagent technical sheet (DELete, and then enter numbers). Results will be calculated using this factor. Linear: In End-point, End-point with blank and Two-points-kinetics analysis modes, calibration is needed (which means, the calculation is done using standard(s)).
-
Page 37: Wavelength Programming
8.8. WAVELENGTH PROGRAMMING Wavelength to use is indicated by the reagent technical sheet. You may not find the exact same wavelength among those proposed by BASIC. In that case, select one closest to the ideal wavelength 8.9. ANALYSIS MODE PROGRAMMING... - Page 38 BASIC computes the straight regression line which will average the means of the points. BASIC allows you to select the duration of analysis reading as well as the number of intervals to be measured.
- Page 39 BASIC For both KINETIC modes, enter Lag time (the waiting time before reaction starts), number of intervals and time segments of each interval. Indicate also whether it is an increasing/decreasing type of reaction. WARNING: Hyperactive samples having a decreasing reaction, can entirely consume the substrates before measurement giving a result close to zero.
-
Page 40: Linearity Limit Programming
BASIC 8.10. LINEARITY LIMIT PROGRAMMING The maximum measuring limit is given in the reagent technical sheet. If result is beyond this limit, it is recommended to dilute the sample or rerun the test. 8.11. NORMAL HIGH AND LOW PROGRAMMING Normal High & Low values border the acceptable pathological range and they are noticed in the reagent technical sheet. -
Page 41: Measure
BASIC 8.13. MEASURE Zero measurement will be asked at the beginning of each analysis. Introduce vial to the nozzle upon instructed by display. Audio beeper indicates aspiration. It is also possible to start the sucking up by pressing the correspondent key. Remove tube as soon as aspiration stopped. -
Page 42: Multi-Standards Calibration
BASIC 8.14. MULTI-STANDARDS CALIBRATION “ESTRADIOL” analysis includes several standards. It is necessary to indicate if it should be recalibrated or if the calibration can be preserved. So choose with the keys “Repeat? ” or “OK”. If the user press “Repeat?”, he will see :... - Page 43 BASIC Measuring results will be displayed as : The standards will be called one after another to establish standard curve to calculate sample values. As soon as the standards are read , the curve will be displayed. Absorbance values of standards are also displayed.
-
Page 44: Error Messages
8.15. ERROR MESSAGES Sample absorbance value is superior to 2,5 (above the reading limit of BASIC) : in this case the software will show « -,--- ». Check any possible manipulation errors : the sample not prepared correctly or the cleanliness of the cuvette. - Page 45 BASIC Non executed quality control procedure will be signaled by « Q». During decreasing kinetics method, if the difference of Optical Density between the initial O.D. at T0 and at T1 (end of the latent time) is superior to the depletion limit, the software does not display any result.
-
Page 46: Patient Report And Print Out
8.16. PATIENT REPORT AND PRINT OUT Daily analysis are memorized automatically by BASIC and indicated at the bottom of the result display as a blinking line. User is recommended to empty the memory at the end his working session (See paragraph 7.7). -
Page 47: Sample Numbering
BASIC When everything goes well OK will be indicated: SECOMAM - Polyphotometer UV-Vis BASIC V1.11 Date : 04/06/1997 Hour : 09H24 User : Analysis : ALBUMIN 37°C S t a n d a r d A b s . C o n c e n t r a t i o n S t a t u s B l . -
Page 49: Maintenance
», it will be necessary to check the lamp or to change it. Repeat? 9.1.3. Halogen lamp changing FIRST OF ALL, DISCONNECT THE BASIC TRANSFORMER FROM THE MAINS. - Remove flow-through cuvette and tubes. 1 – Cuvette well cover. - Unscrew the two screws shown by arrows. - Page 50 BASIC 1 – Halogen lamp connector. 2 – Halogen lamp REF: 80ST0200. 3 – Nuts which hold the halogen lamp. - Disconnect the halogen lamp connector (1). - Remove both black nuts (3) which maintain it. - Remove the faulty lamp (2) after letting it cool down.
-
Page 51: Battery Replacing
The battery which is used is a rechargeable battery. It is used when the mains is off, to maintain data on BASIC screen and to finish kinetical reaction. WARNING: This battery is automatically recharged by the BASIC, so do not replace it by a disposable battery. -
Page 52: Peristaltic Pump Head Replacing
9.3. PERISTALTIC PUMP HEAD REPLACING FIRST OF ALL, DISCONNECT THE BASIC TRANSFORMER FROM THE MAINS. - Remove the peristaltic pump tube out from the flow-through cuvette. - Press, with your fingers on two clips located on each side of the peristaltic pump head (see drawing above). - Page 53 BASIC Note down the analysis names you have modified. SUBSTRATES ENZYMES ............................................................................................................................................................................................................
- Page 54 BASIC Note down the analysis names you have modified. SUBSTRATES ENZYMES Albumin Alcohol Ammonia Acid Phosphat. Alk. Phosphat....................................Anti Thrombin Bicarbonate Bilirubin Amylase Apo-A1 ....................................Calcium Chloride Cholesterol Apo-B Asat / GOT ........
- Page 56 Pour plus d’information, rendez-vous sur www.aqualabo.fr For more information, go to www.aqualabo.fr © 2015 AQUALABO-GROUP - All rights reserved AQUALABO 90 rue du Professeur P. Milliez 94506 Champigny-sur-Marne - FRANCE Tel.: +33 (0)1.55.09.10.10- Fax : +33 (0)1.55.09.10.39 info@aqualabo.fr - www.aqualabo.fr...
Need help?
Do you have a question about the Basic and is the answer not in the manual?
Questions and answers