
Related Manuals for Ateis BOUTIQUE BTQ-VM425W1


Summary of Contents for Ateis BOUTIQUE BTQ-VM425W1
- Page 1 BOUTIQUE Compact and Self-Amplified Public Address and Voice Alarm System User Manual User Manual Revision History v1.13 © 2019, ATEÏS, member of PAX ProAV Group...
-
Page 2: Table Of Contents
Table of Contents Page 1 About this manual 1.1 Firmware version ........................... 8 1.2 Notice signs ........................... 8 1.3 Safety instructions ........................... 8 1.4 Related documentation ........................... 9 2 System overview 2.1 BOUTIQUE PA/VA system ........................... 10 2.2 BTQ-VM4/VM8 - PAVA controller ........................... -
Page 3: Contents
Contents 3.4 ATEIS network (digilink and global-net) ........................... 44 3.4.1 DIGI-LINK ................................44 3.4.2 ................................45 GLOBAL NET 3.5 Ethernet (RJ45) ........................... 45 3.6 Digital paging console ........................... 45 3.6.1 Redundant loop/daisy-chain wiring ................................46 3.6.2 DPM-T5/DPM-T5F/CD-8DF/CD-16DF/CD-T5DF ................................46 3.7 DLR01 ........................... - Page 4 4.3 DPM/DPM-T5 key configuration ........................... 75 4.4 Device ID ........................... 76 4.5 Route BGM sources to zones ........................... 77 4.6 Messages and microphone calls ........................... 78 4.6.1 EVAC ................................79 4.6.2 ................................79 Alert 4.6.3 ................................79 MSG test 4.6.4 Fireman microphone ................................
- Page 5 Contents 5.1.7.1 ............................100 FP saver 5.1.7.1 ............................100 5.1.7.1 ............................101 5.1.7.1 ............................102 Date/time 5.1.7.1 ............................102 Syslog (central log service) 5.1.7.1 RS232 port ............................103 5.1.7.1 Third party controls ............................103 5.1.7.1 ............................103 Zone settings 5.1.7.1 Security mode (power saving) ............................
- Page 6 5.1.10.5 ................................. 135 Marco 5.1.10.6 DSP element ................................. 136 5.1.10.7 Message routing ................................. 136 5.1.10.8 ................................. 137 Singular paging 5.1.10.9 ................................. 137 Singular paging on by zone 5.1.10.10 Singular paging off by zone ................................. 137 5.1.11 Monitor ................................137 5.1.11.1 .................................
- Page 7 Contents © 2019, ATEÏS, member of PAX ProAV Group...
-
Page 8: About This Manual
About this manual This user manual will explicitly describe the hardware installation and the software configuration, provides installers and users the necessary information to setup and configure the system. Firmware version Version v2.41 Notice signs ** The above warning is located on the back of the unit. Explanation of Graphical Symbols To alert the user to the presence of uninsulated The equipment or the property can be damaged,... -
Page 9: Related Documentation
Allow the device to acclimatize for about one hour before use. Related documentation The following related documents are available: BOUTIQUE Quick Start Guide. Refer to the product related information on www.ateis.com © 2019, ATEÏS, member of PAX ProAV Group... -
Page 10: System Overview
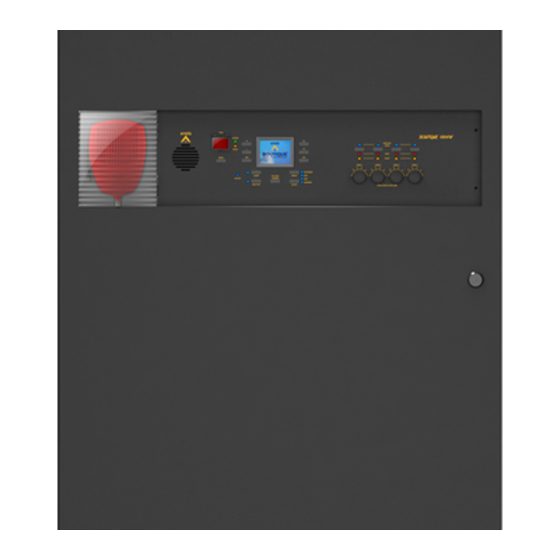
System overview BOUTIQUE PA/VA system The BOUTIQUE is an integrated, self-amplified PA/VA system. It has all the essential functionalities to comply with EN-54 and UL2572 requirements including speaker lines monitoring, EVAC microphone capsule and cable surveillance, micro controller watchdog and memory testing etc.. BTQ-VM4/VM8 - PAVA controller The BTQ-VM4/8 is an compact public address and voice alarm controller with 250W or 500W high efficiency Class-D amplifier built-in. -
Page 11: Front Panel
System overview Components included: Fireman microphone and evacuation button Amplifier built-in 250W or 500W high efficiency Class-D amp built-in and is capable of handling 1000W speaker load per zone and 2000W max. per unit. Internal digital message storage with 90 minutes of memory storage and USB interface available. - Page 12 6. Reset button: This button is used to reset the emergency state. The evac message playing will be canceled, and the red evacuation button will light off. 7. Active LED (fireman microphone): The LED will light up when the fireman microphone is under paging. 8.
-
Page 13: Rear Panel
System overview 21. EVAC LED: The red LED will light up if the zone is in evacuation paging. 22. Alert/Page LED: The blue LED will light up if the zone is under paging (except for evacuation paging). 23. Volume control knob (4 or 8 zones): Individual zone rotary knobs to set the volume of BGM. - Page 14 Voltage mode: Trigger the input by a voltage change (OPEN/CLOSE) with an external 24VDC source provided by external devices. The cable is not monitored in this mode. 6. 24 VDC output: Provide 24VDC (max. 1.3A) power for external devices. Please note the power is shared by the two 24VDC outputs on BTQ-VM4/8 controller and the remote consoles.
-
Page 15: Btq-Vm4W/Vm8W - Wallmount Pava Controller
System overview This terminal outputs the balanced 0 dB audio channel to an external power amplifier. 18. Global net link (RJ45 or fiber-optic): The global network (redundant loops) is used to link the BTQ-VM4/8 controller to the next connected BTQ-VM4/8 or BTQ-SG8 units. Max. -
Page 16: Front Panel
BTQ-VM425W / BTQ-VM450W BTQ-VM825W / BTQ-VM850W The available models: BTQ-VM425W1 / BTQ-VM825W1 BTQ-VM825W1 / BTQ-VM850W1 BTQ-VM425W2 / BTQ-VM825W2 BTQ-VM825W2 / BTQ-VM850W2 The W1 indicates as 1 optional amp is included, and W2 indicates as 2 optional amp are included. 2.3.1 Front panel BTQ-VM4W/VM8W housing with a lockable cover The front panel of BTQ-VM4W/VM8W controller is also identical to BTQ-VM4/VM8 controller, see... -
Page 17: Rear Panel
System overview 2.3.2 Rear panel BTQ-VM4W/VM8W housing with a lockable cover Rear Panel 1. Mains power inlet (euroblock connector): Connect the AC mains power to this euroblock connector. If the AC mains and 48VDC are connected at the same time, the BTQ-VM4W/VM8W controller will use AC mains first, and switch to DC power if the AC mains is not present. -
Page 18: Front Panel
BTQ- SL8 (Local-Link) Loudspeaker zones To increase the number of zones in the system, one or more BTQ-SL8 or BTQ-SG8 secondary units can be connected to the BTQ-VM controller. Each BTQ-SL8/SG8 adds additional 8 zones to the system. Support to connect up to 64 x BTQ-VM4/8 controllers or BTQ-SG8 via redundant-global-net. Support to connect up to 31 x BTQ-SL8 via digi-link local-net. -
Page 19: Rear Panel
System overview 2.4.2 Rear panel BTQ-SG8 (Global-Net) BTQ- SL8 (Local-Link) 1/2. AMPO CH1/CH2 output: The output provides the 100V (EU type)/70V (US type) audio signal from power amplifier, CH1 is for internal amplifier channel, and CH2 is for external amplifier channel. 3. - Page 20 for power saving purpose. 8/9. EVAC & Fault contacts output: EVAC contact: This contact is closed if the system is under EVAC paging. Fault contact: This contact is open if a system or major fault is detected. 10. Remote console (RJ45): The remote port allows the paging consoles or accessories to be connected to BTQ-SG8/SL8.
-
Page 21: Digital Paging Console
System overview 19. 24VDC input (battery backup): Connect the 24VDC battery charger for battery backup. 20. 24VDC input: This input is to connect to the external power transformer. 21. Ground (GND) socket. Digital paging console 2.5.1 DPM paging microphone/microphone keypad/speaker pad DPM-MAIN / DPM-EVA / DPM-KPD DPM-KPD / DPM-EVA / DPM-MAIN The DPM consists of three units: DPM-MAIN, DPM-EVA and DPM-KPD. -
Page 22: Dpm-Main - Digital Redundant Loop Paging Microphone-Main
zone paging, event triggering, recording, message routing, message playing button etc. and can be easily configured via web browser. 2.5.1.1 DPM-MAIN - digital redundant loop paging microphone-main Front panel: 1. Microphone: The unidirectional condenser gooseneck microphone warrants high quality directive signal pick-up and less interference from the surroundings. - Page 23 System overview 6. All/Release button: This button is used for select/deselect all zones. 7. All/Release LED: The LED will light up in blue/light off if all the zones are selected/deselected. 8.Talk button (press-to-talk): Start paging via press-to-talk mode or lock-to-talk mode. The talk mode can be set via web browser.
-
Page 24: Dpm-Kpd - Additional 8+1 Microphone Keypad
1. IDC connector: For transmitting power and data to the next DPM-EVA/DPM-SPK unit via flat cable. 2. Speaker volume control. 3. Mic volume control. 4. Device ID: Set the DIP switch to identify the connection of multiple DPM-MAIN. The DIP switch is followed by the binary code with 4 digit. -
Page 25: Dpm-Eva - Evac Unit With Speaker And Extra Buttons
System overview The LEDs will light up blue when the zones/zone group are selected and allowed to distribute. The LEDs will blink once in blue when the the event is triggered. 4. All/Release LED: The LED will light up/off if all the zones are selected/deselected. 5. - Page 26 1. Monitoring speaker: This built-in speaker is to monitor the zone audio including message, BGM and paging. When the faults detected by the system, the system will generate a buzzer sound (tone) as warning. 2. Evacuation button: Once this button is pushed, the system will enter to emergency state. The red LED will light up and play/route the EVAC messages.
-
Page 27: Dpm-T5/Dpm-T5F Touchpanel Paging Mic
System overview 2.5.2 DPM-T5/DPM-T5F touchpanel paging mic DPM-T5 DPM-T5F The DPM-T5/DPM-T5F 5" TFT touch screen paging mic console provides call-paging, message broadcasting, event triggering, recording, message routing, message play, level control etc.. Up to 8 DPM-T5/DPM-T5F can be connected to BTQ-SL8, and 16 on BTQ-VM4/VM8/SG8; the wiring can be daisy-chain or in redundant loop. -
Page 28: Front Panel
2.5.2.1 Front panel 1. Microphone: The unidirectional condenser gooseneck microphone warrants high quality directive signal pick- up and less interference from the surroundings. 2. Monitoring speaker: This built-in speaker is to monitor the zone audio including message, BGM and paging. When the faults detected by the system, the system will generate a buzzer sound (tone) as warning. -
Page 29: Side & Rear Panel
System overview 2.5.2.2 Side & rear panel 1. Mini-USB port: Connect to PC/Laptop for remote conferencing via Skype, WhatsApp etc.. Use the built-in mic and speaker of DPM- T5/DPM-T5F as the mic input and speaker output. 2. Microphone (DPM-T5 only): 3.5mm (1/8 inch) phone jack female for external microphone. -
Page 30: Front Panel
The CD-8DF/CD-16DF is a digital wall-mount paging console. It is designed with an encased IP30 heavy-duty metal box with a lockable cover. The 8/16 programmable zone buttons represent a single zone or a group of zones, the buttons can also act as zone paging, event triggering, recording, message routing, message playing button etc., and can be configured via web browser. - Page 31 System overview A fully monitored microphone is designed for EVAC paging. The paging button supports both press-to-talk and lock-to-talk mode. The talk mode can be set via web browser. 2. Monitoring speaker: This built-in speaker is to monitor the zone audio including message and BGM. When the faults detected by the system, the system will generate a buzzer sound (tone) as warning.
-
Page 32: Cd-T5Df Wallmount Touchpanel Paging Mic Front Panel
recording, message routing, message play, level control etc.. All paging functions and parameters for site operation such as naming zone buttons, zone group buttons, zone paging, pre/post chime settings can be pre-programmed via web browser. Moreover, several user levels with password protection make the CD-T5DF a versatile console that fits well in a commercial shopping centre or an industrial high-security facility. -
Page 33: Accessories
System overview Accessories 2.6.1 DNM2-ETH digital ambient noise sensing mic, Ethernet With built-in electronic condenser microphone (omni-directional), the DNM2-ETH enhances the ability to detect the background noise and automatically adjusts the output level of loudspeaker to achieve the optimal intelligibility of sound. The DNM2-ETH is powered by using STP CAT5 cable with a max. -
Page 34: Dlr01 - Digital Loop Repeater
2.6.3 DLR01 - digital loop repeater The DLR01 is a digital loop repeater with power injector, it can extend the wiring distances of peripherals such as paging consoles, noise sensing microphones etc. on BOUTIQUE system. If the control signal of remotes in a redundant loop/daisy-chain wiring is not strong enough, the DLR01 can extend the distance of remotes 250m longer. -
Page 35: Front & Rear Panel
System overview 2.6.3.3 Front & rear panel Front panel Rear panel 1. Link LED: Network LED. 2. Pwrin/Pwrout connector: The 24VDC power in/out connector and ground connector. 3. TX connector. 4. RX connector. 5. Active LED: Communication LED. DLR01 Connection Diagram for details. -
Page 36: Va-Dlc Dummy Load Capacitor Module
2.6.6 VA-DLC dummy load capacitor module The VA-DLC dummy load capacitor is used for the speaker line surveillance based on impedance measurement. When a number of speakers are installed with long wires, the VA-DLC can provide a reliable monitoring method to detect the open circuit of entire speaker line even the last speaker. -
Page 37: Network Cards
System overview Network cards The ATEÏS BOUTIQUE network is a monitored and ultra-fast audio network, it is capable to simultaneously transmit 64 audio channels (32 bit, 48 kHz sampling rate) of audio and data with low latency < 0.08 ms per node over STP CAT5/6 cable or Fiber-Optic. Up to 64 BTQ-VM4/8 controllers or BTQ-SG8 secondary units can be connected under the ATEÏS BOUTIQUE global network. -
Page 38: Hardware Installation & Connection
Hardware installation & connection BTQ-VM/SG/SL power supply The BTQ-VM controller has two types of power supply input, AC mains and 48VDC for battery backup via phoenix euro-block connector, and secondary unit by 24VDC. Connection-mains power Connection-battery backup EU type US type BTQ-VM/SG/SL mounting The BTQ-VM4/8 controller is suitable for 19-inch 2U rack-mounting installation. -
Page 39: Btq-Vm4W/Vm8W Wiring
Hardware installation & connection AC power input: 100 VAC ~ 240 VAC, 50/60 Hz BTQ -VM450/850W1 W1: 750W W1: 900W BTQ -VM450/850W2 W2: 1460W W2: 1752W 2. Check if the dimension and weight of BTQ-VM4W/VM8W can fit on the wall, The wall must have sufficient strength to support the entire weight of the BTQ-VM4W/VM8W (including the four 12VDC batteries).The dimension of BTQ-VM4W/VM8W is W:653 mm H:735 mm D:130 mm, the weight is about 22 kg without 4 batteries. - Page 40 3. Make sure that length of L wire/N (Neutral) wire/G (Ground) wire on the AC input terminal is sufficient for the connection of BTQ-VM4W/VM8W. 4. Connect the L wire and N (Neutral) wire on the AC input terminal to the AC-L, AC-N power wires of BTQ-VM4W/VM8W (euroblock connector).
- Page 41 Hardware installation & connection Danger Electrical shock! The wiring of BTQ-VM4W/VM8W must ''only'' be operated when the AC power supply is closed. 6. Use other cable entries for connecting the rest of essential signalling cables such as audio cables, Ethernet cables etc. to BTQ-VM4W/VM8W, see the picture as below. ©...
-
Page 42: Mounting The Batteries In Btq-Vm4W/Vm8W
3.3.3 Mounting the batteries in BTQ-VM4W/VM8W 1. Mount the four 12Ah batteries (10Ah to 30 Ah) in series inside the BTQ-VM4W/VM8W. And use cable ties for fixing the batteries, see the picture as below. © 2019, ATEÏS, member of PAX ProAV Group... - Page 43 Hardware installation & connection 2. Connect the four 12Ah batteries (10Ah to 30Ah). Only connect the four 12VDC batteries of the same voltage, capacity, type, brand and age. Danger Electrical shock! The installation and wiring of batteries must ''only'' be operated when the AC power supply is closed.
-
Page 44: Ateis Network (Digilink And Global-Net)
ATEIS network (digilink and global-net) 3.4.1 DIGI-LINK The BTQ-VM4/8 controller has 1 digi-link port for BTQ-SL8 secondary unit. Use STP CAT5/6 cable with shielded RJ45 connector to connect a BTQ-SL8 secondary unit to BTQ-VM4/8 controller. Up to 31 BTQ-SL8 units can be connected under the local digi-link network. -
Page 45: Global Net
Hardware installation & connection VM8 controller is 1:1, then the ID of the first connected BTQ-SL8 unit on BTQ-VM8 will be 1:2, for the second BTQ-SL8 unit. See Hardware Configuration-SecondaryUnit-Device ID know the ID configuration. 3.4.2 GLOBAL NET Connect the BTQ-VM4/8 controller and SG8 secondary unit together through A, B port via global-net. Ethernet (RJ45) Connect the BTQ-VM4/8 controller and BTQ- SG8 unit to Ethernet by using STP CAT5/6... -
Page 46: Redundant Loop/Daisy-Chain Wiring
3.6.1 Redundant loop/daisy-chain wiring Daisy-chain Redundant loop 1. Connect the [Remote Port 1] on BTQ-VM4/VM8/SG8 to the [Remote Port B] on the first set of DPM-MAIN. 2. Connect the [Remote Port A] on the last set of DPM-MAIN to the [Remote Port 2] on BTQ- VM4/VM8/SG8 via redundant loop. -
Page 47: External Power Amplifier
Hardware installation & connection DLR01 can extend the distance of remotes 250m longer. In addition, the DLR01 is equipped with the 24VDC external power input, providing local power to the remotes. External power amplifier The BTQ-VM4/8 controllers have an internal 250W or 500W amplifier built-in. For system power sharing and/or backup, connect a second power amplifier (DPA or BPA) externally. -
Page 48: Battery Charger (Power Sharing)
The internal amplifier of the main controller can also be used as external power amplifier for the secondary unit, see web configuration -> settings -> controllers/secondary units. Battery charger (power sharing) For DC battery backup power sharing, connect the battery charger to BTQ-VM4/8 controller and external power amplifier as the picture below. -
Page 49: Loudspeakers
Hardware installation & connection 3.10 Loudspeakers In a case of BTQ-VM8 controller, it has 8 speaker zone outputs (Z1 to Z8). Each zone output consists of 2 redundant loudspeaker lines (line A and line B). Normally, the paging calls and BGM are distributed to a zone over both loudspeaker lines. -
Page 50: Va-Eol Branch Wiring With Vat
3.12.1 VA-EOL branch wiring with VAT The VAT remote volume attenuator use 3-wire connection, and is compatible with 100V and 70V loudspeaker lines.The installation of 3-wire connection on SL-SENSOR, VA-EOL and VAT volume attenuator is capable to increase/decrease the volume of background music remotely during BGM broadcasting, and the volume will not be attenuated during EVAC message broadcasting. -
Page 51: Device Id Setting
Hardware installation & connection 3.12.2 Device ID setting Each VA-EOL must have unique ID, set the 8 bit DIP switch for each VA-EOL. 3.13 Logic inputs The logic control Inputs are designed to work with simple contact or button, see the wiring connection as below. -
Page 52: Evac Inputs
3.14 EVAC inputs The 9 evac inputs on BTQ-VM8/SG8/SL8 and 4 on Disable: cables which connect BTQ-VM4 can let the third party systems to signal evacuation input will not be monitored (faults the BOUTIQUE system for triggering events, start will not be detected). evac paging or message announcement. -
Page 53: Rac 5/Rac 8
Hardware installation & connection 3.17 RAC 5/RAC 8 The RAC 5/RAC 8 is using in analogue connection. Connect the pins of RAC 5/ RAC 8 to the logic input control of BTQ- VM4/8, see the picture on the right. 3.18 DNM2-ETH Connect the DNM2-ETH device(s) using STP CAT5/6 cable to the network switch via LAN, then the DNM2-ETH device(s) will be discovered by Boutique system automatically and displayed on the web... - Page 54 2. Install the loudspeakers by circularity and the distance is not far from the loudspeakers, then the DNM2-ETH can installed center loudspeakers (eg: a small conference room etc.). 3. To avoid the problem that if the DNM2- ETH is installed at a quiet place, and the level of broadcasting is too small for the loud side, users can divide the zone to several area, and one DNM2-ETH for one...
-
Page 55: Hardware Configuration & Operation
Hardware configuration & operation Hardware configuration & operation After completed the hardware connection in the previous chapters, please proceed the hardware configuration. If this is the first system setup, users can easily do the hardware configuration directly from LCD touch panel of BTQ-VM4/8 controller, see Setup Wizard. - Page 56 Network connection (STP CAT5/6), multi-mode (2km), single- mode (20km) fibre optics Set the number of controllers (VM4/VM8/VM8W1/VM8W2) and secondary global units (SG). 1. Press [Edit] to change the number of VM4/VM8/VM8W1/VM8W2 and SG units. 2. Press [Save] to apply settings. Set the ID of BTQ-VM4/VM8/VM8W1/VM8W2 controller and SG unit.
-
Page 57: Step 3: Number Of Remotes
Hardware configuration & operation 4.1.1.1.3 Step 3: number of remotes Set the number of DPM8/DPM-T5/CD-8DF/CD-16DF/CD-T5DF on [VM8/1:1 Port 1]. 1. Press [Edit] to change the number of DPM8/DPM-T5/CD-8DF/CD-16DF/CD-T5DF. 2. Press [Save] to apply settings. Select [VM8/1:1 Port 2] block via [ ] button, and set the number of DPM8/DPM-T5/CD-8DF/ CD-16DF/CD-T5DF on [VM8/1:1 Port 2]. -
Page 58: Step 5: Dummy Load Capacitor
in the selected group. 2. Press [Save] to apply settings. Add device and set the unit ID for power amplifier sharing. 1. Press [Edit]. 2. Press [ ] to set ID for the device unit, then press [Add]/[Delete] to add or remove the unit for power sharing in the amplifier. -
Page 59: Step 6: Monitoring
Hardware configuration & operation DLC Installation 1. Each speaker zone has A/B sub zones. Each sub zone requires a dummy load capacitor in the end of speaker line. 2. Set the indicated number to ON position on the DIP switch. 3. -
Page 60: Replace
4.1.1.2 Replace When replacing the broken main controller with the new one, proceed the Replace function to configure and synchronize the system with the broken device only. 1. If the USB flash drive is connected on BTQ-VM4/ VM8/SG8, click [Yes] to use the config. file from USB to replace (figure 1). -
Page 61: Lcd Menu
Hardware configuration & operation 1. Select the config. file, and press [OK]. 2. Press [Yes] to apply the config. file to the system. 3. Press [OK] to enter the menu window. 4.1.2 LCD menu 4.1.2.1 Mic Line/FMM/Recovery/Log List/Fault List/Logout Login Mic/Line: Adjust the volume or mute/unmute the Mic/Line. - Page 62 FMM: Adjust the volume or mute/unmute the fireman microphone. Recovery: Select the chosen main controller used as the default configuration for synchronization to the broken one(s). Log list: Display the content of log list. Fault list: Display the list of fault occurrences. Logout: Click to logout.
-
Page 63: Monitor/System Reset/Paging Reset/Lamp Test/Setup Replace
Hardware configuration & operation 4.1.2.2 Monitor/System Reset/Paging Reset/LAMP Test/Setup Replace Monitor: Click to reset the monitoring of amplifier and speaker line again. System reset: Clean the system fault list, the System Fault LED will light off as well. Paging reset: Cancel all the paging in the system. -
Page 64: Setting
o Relay output: Change the relay output channel on LCD display to open/short. 4.1.2.3 Setting Language/time: Set the language/time. Logout time: Set the time of auto logout when the BTQ-VM4/8 controller is not operating. Ethernet: Set the IP address/Gateway/Submask/DNS/DHCP/MAC. Default Setting BTQ-VM BTQ-SG8 IP address... - Page 65 Hardware configuration & operation Security mode: Enable/disable the power saving mode on BOUTIQUE system. See Security mode (power saving) chapter. Info: List the current firmware version of main controller. Buzzer volume: Adjust the volume or mute/unmute the buzzer sound from the built-in speaker of BTQ-VM4/8 controller when a fault is detected.
- Page 66 Backup write: Create a backup config. file and save it into the connected USB flash drive. If users wish to set the file with a custom file name, press [Rename] button on touch panel, see the pictures as below. USB-BGM: Use the digital message file(s) from the connected USB flash drive to proceed routing.
-
Page 67: Privilege Setting
Hardware configuration & operation If the system is not using the BCU-4830A/BCU-4875A battery charger from ATEÏS, please make sure the charger current(A) of battery charger is sufficient. 4.1.2.4 Privilege setting Privilege setting: When accessing the menu settings which you are not authorized, it will display [Not Enough Privilege]. - Page 68 Press to display the selected zone information. 5. Chime: Press the zone buttons first, then press the [Chime] button to play pre/post- announcement before paging, see Chime/Talk page. 6. Talk: Press the zone buttons first, then press [Talk] button to paging, see Chime/Talk page.
-
Page 69: Button Status
Hardware configuration & operation 4.2.1 Button status The color of zone buttons displayed on the LCD panel will indicate as different status, see as below. The zone button is not selected. The zone button is selected. The priority of this DPM-T5/DPM-T5F/CD-T5DF is lower than other sources, which the unselected zone button / selected zone button cannot be paging. -
Page 70: Modify Zone
4.2.3 Modify zone Press [Modify Zone] button if users wish to add or remove the zone buttons from the current paging, see the steps as below. 1. Select the zone buttons you wish to add or remove on the LCD panel. 2. -
Page 71: Routing
Hardware configuration & operation 2) Press button on the bottom menu and set the count of [message play]. Click [Refresh Message List] to refresh the message list. 3. Switch to [Zone Window] page, and select the zone buttons you wish to be played the message files, see as below. -
Page 72: Fault
2. Select the audio source (CD/AUX/Memory/Internet). 3. Press [Zone Window] page, and select the zone buttons you wish to be routing. If users wish to routing to all the zones, press [Select All Zone] button. 4. After selected the zone buttons, press [Route] button to start routing audio source to zones. -
Page 73: Setting
Hardware configuration & operation 4.2.8 Setting 1. Auto: The DPM-T5/DPM-T5F/CD-T5DF will detect whether the external headset or USB is plugged in, and auto switch to headset or USB I/O connection if it's plugged in. If the headset and USB are plugged in DPM-T5/ DPM-T5F/CD-T5DF at the same time, the audio I/O connection will switch to USB. -
Page 74: Stack Paging
4.2.9 Stack paging When there are other paging sources with higher priority has occupied the zones which DPM-T5/ DPM-T5F/CD-T5DF desires to paging, users can pre-record the paging message and temporarily save it in DPM-T5/DPM-T5F/CD-T5DF, then the recorded messages can be played after the paging source with higher priority has ended. -
Page 75: Dpm/Dpm-T5 Key Configuration
Hardware configuration & operation 8. The recorded messages will be waiting for the stack paging and display a countdown timer based on the time you set on web browser. The waiting time can be set from web browser > System > Device Management > Add Remote >... -
Page 76: Device Id
4) The following key functions as below can be configured into the DPM and DPM-T5/DPM-T5F/ CD-T5DF. DPM-MAIN/DPM-EVA/DPM- Key Function KPD/CD-8DF/CD-16DF Zone Event Wave Record Wave Listen Wave Delete Wave Paging Press to Talk Press to Talk with Chime None DPM-T5/DPM-T5F/CD-T5DF Key Function Zone Event... -
Page 77: Route Bgm Sources To Zones
Hardware configuration & operation The DIP switch of device ID is followed by the DIP switch binary code with 5 digit (BTQ-SL8), 6 digit BTQ-SL8 1~31 (BTQ-SG8), 4 digit (DPM-MAIN). BTQ-SG8 0~63 The Device ID cannot be repeated. The range of DPM-MAIN 0~15 ID can be set as the table on the right. -
Page 78: Messages And Microphone Calls
1. Select the BGM source: Press [SELECT] button to select the BGM source. The LED will light up in blue and indicate that the BGM source that is selected. 2. Select the zones: Press the zone button on [Zone Selector], and the BGM will be routed to the selected zones on main controller and/or secondary units. -
Page 79: Evac
Hardware configuration & operation 4.6.1 EVAC To start a message playing, it can be done by manual zone selection or with pre-defined zone on web browser. Play message to''pre-define zones'' 1. Press [EVAC] button and the "Paging NOW?" message will be displayed on LCD panel, and press [OK]. -
Page 80: Fireman Microphone
Play message with ''manual'' zones selection 1. First, press the zone buttons to select the zones which you wish the message to be played. The corresponded zone LEDs shall light up in blue. 2. Press [MSG TEST] button and the "Paging NOW?" message will be displayed on LCD panel, and press [OK]. -
Page 81: Configuration
Configuration Configuration More advanced configuration such as volume, PEQ, audio routing, monitor, control, event and bell scheduler and paging with priority management etc.. can be configured by a dedicated web browser. If this is the first web configuration, please update the BOUTIQUE firmware to the latest version. Go to System >... -
Page 82: Step 3: Number Of Remotes
3. Set the number of secondary local unit (BTQ-SL8) connected to the main controller/BTQ-SG8 unit. 4. Last, the total number of the connected secondary units will be automatically sum up and display in the row of [SEC]. 5. After completed all the settings, click [Next] to move to [Step 3: number of remotes] settings. 5.1.1.1.3 Step 3: number of remotes Set the number of DPM8/DPM-T5/CD-8DF/CD-16DF/CD-T5DF for your BOUTIQUE system, the default number of DPM8 is 1, and DPM-T5/CD-8DF/CD-16DF/CD-T5DF is 0. -
Page 83: Step 5: Dummy Load Capacitor
Configuration 5.1.1.1.5 Step 5: dummy load capacitor To calculate dummy load capacitance and DIP switch setting. If the VA-DLC dummy load capacitor is not connected in the end of speaker line, please ignore this step, and move to [Step 6: Monitoring] settings. 1. -
Page 84: Replace
1. After the process has completed successfully, click [Next]. 2. The reference results will be displayed on the window. If the results are correct, then click [Ready] and [Activate] to enter the menu window. 5.1.1.2 Replace 5.1.1.2.1 Step 1: net ID 1. -
Page 85: Getting Started
Configuration Recovery Use the config file from other connected BTQ-VM4/VM8 unit, and use it as the default configuration for synchronization to the broken one. 1. Select the netcard ID of the BTQ-VM4/VM8 (as the default configuration) from the drop-down box. 2. -
Page 86: User Level
User ID: Display the account name. Level: Display the authorization level of the user. The user accounts are created based on the four types of level, see User Level > LCD Panel & Web Browser. If more than one user level has been created, you will be requested to login if you wish to operate/modify the system settings from the LCD menu of main controller, see Menu. -
Page 87: Add User
Configuration LCD panel Fault list Logout Setting-Info Monitor Reset Setting-Language/Region/Time/Logout Time/ Brightness Paging Reset System Fault Reset Paging Reset Setting-Ethernet/Net ID/Run Wizard/Power Save/ Configuration File Table Synchronization Lamp Web browser Function Level Info-Fault List/Log Book/About DSP function Machine Setting-General/Date/Time/Zone Settings Message-Management/Playlists Scheduler Evac... -
Page 88: Modify User
5.1.3.3 Modify user 1. Select the user ID first. 2. Modify the password and security level. 3. Click [Save]. 5.1.3.4 Delete user Select the user ID and click [Save] to delete it. 5.1.3.5 Login/logout When trying to operate the authorized functions such as FMM action, you will be requested to login. -
Page 89: System
Configuration button to download the configuration file to the selected path of PC/Laptop. 5.1.6 System 5.1.6.1 Device management Allow to deploy the BOUTIQUE units, paging consoles, amplifiers and other accessories such as DNM2-ETH, and show their information (status, system structure). 5.1.6.1.1 System size Allow to quickly build a BOUTIQUE system by adding the number of main controller/secondary units in the same group, the setting can be dynamically modified and adapted to the current setting. -
Page 90: Add A Dpm-Main/Dpm-T5/Cd-8Df/Cd-16Df/Cd-T5Df
5.1.6.1.3.1 Add a DPM-MAIN/DPM-T5/CD-8DF/CD-16DF/CD-T5DF Name: The name of remote (DPM-MAIN/DPM-T5/CD-8DF/CD-16DF/CD-T5DF/DNM2-ETH/DGL- MIC). Device: The type of remote (DPM-MAIN/DPM-T5/CD-8DF/CD-16DF/CD-T5DF/DNM2-ETH/DGL- MIC). Remote ID: Set the ID number of remote for a BOUTIQUE system. The max. ID number of remote is 15. Device port: Set which remote console port (Port A or Port B) on main controller/secondary unit to connect to this remotes. -
Page 91: Add A Dnm2-Eth
Configuration T5DF, then press [Play] to start the paging. o Stacking paging: If the selected zones are occupied by the source with higher priority and the user requests a paging, users can pre-record the paging message and temporarily save the message in DPM-T5/CD-T5DF, then the recorded messages can be played after the paging with higher priority has ended. -
Page 92: Setting
Device port: Set which remote console port (Port A or Port B) on main controller/secondary unit to connect to this DGL-MIC remotes. Method: o Dynamic: Dynamically increase/decrease the level of speaker based on the background noise during the paging. o Static: Detect the background noise when starts paging, and use the fixed gain based on [Over Noise Level] setting to increase/decrease the level of speaker. -
Page 93: Application1: Economic Type
Configuration amplifier (by its ID). The default setting of AMP1 is to use the [int. AMP] on BTQ-VM4/VM8/ VM8W1/VM8W2; and the BTQ-SL8 can choose either [int. AMP] or [external AMP]. Then choose the power wattage of controller from 240W/250W/480W/500W options, and set the power wattage of [external AMP] on AMP1 channel. -
Page 94: Application3: Large Scale Type
Type AMP1 AMP1 Power AMP2 AMP2 Power BTQ-SL8(2) Int. Connection 5.1.6.1.4.3 Application3: large scale type This application is used for multiple zones such as airport, railway station which requires mass amplification to play the message, chime in single ground floor. For example as airport, the zone of Terminal 1 requires to connect two amplifiers (internal. -
Page 95: Modulation
Configuration 5.1.6.1.5 Modulation 5.1.6.1.5.1 DNM2-ETH/DGL-MIC DNM2-ETH DGL-MIC Device: The main controller/secondary unit which is connected to this DNM2-ETH/DGL-MIC group. Noise sensing mic group: Set the group to be edited by it's ID (max. 8 groups). Mount to: Set a paging zone to work with a selected noise sensing mic group. Priority: If multiple zones are under paging from one source, use the priority to decide which group to detect the background ambient noise and auto adjust the output level. -
Page 96: Dpm-T5/Cd-T5Df Screen Calibration
Group rule: When multiple DNM2-ETH units are installed with different position in the same area, users can use Group Rule to define the detection method of noise ratio. o Avg: Calculate the average among the detected gain value of DNM units, and use this gain value to adjust the level of speaker output. -
Page 97: Power Consumption
Configuration 5.1.6.3 Power consumption Display the used power consumption of BOUTIQUE local-net system(s) and it gives user the recommend battery capacity for the DC backup power of the system. Siren duration (sec.): Set the duration of siren warning sound before distributes the EVAC message. -
Page 98: Update
sure the charger current(A) of battery charger is sufficient. 5.1.6.4 Update 5.1.6.4.1 Firmware Update the BOUTIQUE firmware to the latest version. When starting a new project or using a BOUTIQUE unit for the first time, Follow the steps of [Update] as below: 1. -
Page 99: Skin
Configuration Multilang Tool software The new language file (.lang) which ATEÏS sales/users have updated here will overwrite the default language file (.lang) stored in the BTQ-VM4/8. Users can find the .lang file and font files from Machine > Message > Management, see the picture below. Multiple font files (.ttf) can be uploaded into the BTQ-VM4/8 without limits. -
Page 100: Machine
The [ Table Syn] icon on the right top of the webpage shall indicate whether the system configuration is synchronized (green icon) or asynchronous (red icon), see the pictures below. Synchronized Asynchronous 5.1.7 Machine 5.1.7.1 Settings 5.1.7.1.1 General Language: Choose the language (English, French, German, Italian etc.). Please reboot the BTQ-VM4/8 after changing the language selection, so that this setting will be applied. -
Page 101: Sip
Configuration Default Setting BTQ-VM BTQ-SG8 IP address 192.168.102.125 192.168.102.124 Subnet Mask 255.255.252.0 255.255.252.0 Gateway 192.168.100.254 192.168.100.254 0.0.0.0 0.0.0.0 Enable DHCP/ DNS: Tick the checkbox to enable/disable the Dynamic Host Configuration Protocol and DNS server. You can also change the IP address or other Ethernet settings from the LCD display of main controller, see Menu. -
Page 102: Date/Time
5.1.7.1.5 Date/time NTP (Network Time Protocol): Enable the NTP setting. If the NTP is activated, the system date/ time of BOUTIQUE will be synchronized by NTP server. Date/time or timezone: Manually set the time and the timezone of your BOUTIQUE devices. The changes in [System Time] will also affect the Scheduler function on web browser. -
Page 103: Rs232 Port
Configuration 5.1.7.1.7 RS232 port Speed baud, date bits, stop bits, parity: Set the settings for 3rd party control. 5.1.7.1.8 Third party controls Allow 3rd party devices to control the paging events via RS232, Modbus and Ethernet (UDP). RS232 & Modbus serial type: o Modbus DTMF: Choose which DTMF code to proceed the zone paging via Modbus, see DTMF paging call via Modbus... -
Page 104: Security Mode (Power Saving)
5.1.7.1.10 Security mode (power saving) Enter security mode: o Auto: If the AC mains power is not present, the controller will switch to DC power (for battery backup). Once switch to DC power, the system will automatically enter the security mode. o Manual: Force the system to enter the security mode. -
Page 105: Fp Speaker
Configuration 5.1.7.1.12 FP speaker Mute: Enable/disable to mute the buzzer sound which comes from the built-in speaker of BTQ- VM4/8 controller when a fault is detected. Volume (dB): Adjust the volume of the buzzer sound which comes from the built-in speaker of BTQ-VM4/8. -
Page 106: Message
5.1.7.2 Message 5.1.7.2.1 Management Display all the message files stored in the BTQ-VM4/8 controller or USB flash drive. BOUTIQUE internal storage memory: The internal storage memory (max. 200 MB) of main controller. USB external memory: The USB flash drive (format FAT32) connected to the main controller. Delete folder/file: Select the folder/file on the list, and click this button to delete it. -
Page 107: Playlists
Configuration actual USB flash drive, click this item to recalculate (refresh) the free memory of USB. 5.1.7.2.2 Playlists Playlist name: Enter the name of your playlist. Play count: Set the play count of the selected playlist. The range of play count is from 1~65535, 65535 indicates to repeat the the playlist endlessly. -
Page 108: Log List
Fault Lists and the troubleshooting for details. 5.1.7.3.2 Log list Read: Set the range of the log number and click [Read] button to read the logs. Click this button again to read the previous log within the same range. For example, if the range of logs is 100, click [Read] button to read from 1 to 100 logs;... -
Page 109: Function
Configuration [General] tab If the FW ver. of remote device is not compatible with the ver. of main controller, it will display in red. Battery tab When the BTQ-VM4W/VM8W controller has connected to the four 12VDC batteries, its battery status includes voltage/charger (A)/impedance/temperature will be shown here. The battery status of BCU-4830A/BCU-4875A battery charger (include 4 batteries) which is connected to the BTQ-VM4/VM8 controller will also be shown here. -
Page 110: Add/Edit/Delete
Scheduler enable/disable: Enable/disable the scheduler function. Today: Click to go back to the area which displays the today's schedule. Day/week/month: Choose from the three types of display window template on scheduler. The default window is Month. Load Excel file: Click to load an excel sheet with the listed events you want to create on Scheduler. -
Page 111: Edit Repeated Event
Configuration The criteria of the event name and description: o Event name: Contain a max. number or letter of 40. o Description: Contain a max. number or letter of 100. 5.1.8.1.2 Edit repeated event Edit the date of the repeated event individually or edit in a whole set. See the steps below: 1. -
Page 112: Evacuation Inputs
calibration: Or it can connect to RAC 5/RAC 8 device by using the normal logic input, and controls the volume and trigger the events remotely. Relay outputs: The 4 relay outputs can be programmed and send a pulse or a static closing/ opening to an external device (NO = normally open and NC = normally close). -
Page 113: Edit Evac/Alarm Event
Configuration o Trigger: Start the event which selects from [ON Function] drop-down box. To stop the event, trigger the Evac Input Reset event which selects from [OFF function]. Stop type: Select a type to deactivate the Evac event/Alarm event. o Immediately: The Evac/alarm message playing on Evac event or Alarm event will be stopped immediately. - Page 114 Priority: Set the priority of the event. 1 is the highest, and 99 is the lowest. Evacuation: If a triggered event enables the Evacuation option, the system will enter the evacuation mode, see Security/Evacuation option for details. Security: Enable this option to let the triggered event still be proceeded under Security mode (power...
-
Page 115: Normal Logic Inputs
Configuration is played in zone1, 2 and 3, Alarm message is played in zone4. Evacuation Input 3 (CH3) activated: If CH1, CH2 and Ch3 are still activated, the Evac message is played in zone1, 2, 3 and 4, Alarm message is played in zone5. In order to avoid any sensitivity issue like unwanted triggering of input, you can set a response time (from 300ms to 5000ms) on Normal Logic inputs or Evacuation Inputs. -
Page 116: Rac Calibration
event. o Analog: Control a DSP Element event to adjust the parameter such as level by RAC remote. o RAC5/RAC8: Control a DSP Element event, which will be triggered to control the event on RAC remote. 4. ON/OFF function: Select the event which will be triggered by this logic input. 5. -
Page 117: Relay Outputs
Configuration 2. To fulfill the accuracy of RAC 5/8 calibration, please rotate the source selector knob on RAC 5/8, and record the current impedance value of every step displayed on [Now]. 3. Then manually set the range of Level1~5/Level1~8 by using the formula (Level1 + Level 2)/2. Example-1: If the current impedance value of 1-step and 2-step on RAC 5 are 25 and 57, then set the Level 1 of RAC 5 as 0~ 41 (25+57/2). -
Page 118: Add Singular Type
There are two types of paging events: 1. Integration: An integration paging event is used for multiple codes (keys) for zone selection. Each code can assign the key of the paging consoles such as DPM-MAIN and DPM-T5. 2. Singular: This paging event is similar to the integration paging event except that it ''only has one code (key)''. -
Page 119: Msg Test/Alert/Evac
Configuration denied. The available zones means the selected paging zones are not occupied by other sources or not occupied by other sources with lower priority. Refresh: Enable this option to let the paging source takes back the zones from the occupied zones when their paging event has finished. -
Page 120: Mic
microphone is always ''Press To Talk''. By default, the priority of the fireman microphone is set to 1 (the highest priority) and its security and evacuation options are also ticked here. The rest of the configuration setting of Fireman mic paging event is also identical to a Singular type of paging event, see Add Singular Type. -
Page 121: Cd/Aux
Configuration 5.1.8.3.1.4 CD/AUX Music sources routing can be performed from the front panel of controller, DPM-T5 and logic input. Paging mode: o Route key: The [Route Key] mode will enable the Music Route function on the front panel of BTQ-VM4/8 and from the DPM-T5 microphone console. o Permanent: The [Permanent] mode allows the paging source is always requested for paging. -
Page 122: Voip
Mode: Choose a source type (Stream Multicast or SHOUTcast/Icecast) to receive the network streaming source and packet. o Stream Multicast: Stream Multicast receives RTP (Real-time Transport Protocol) packet from IGMP IP address. Enter the IGMP IP address and its port. It supports the TERRACOM system or TerraManager to play Internet streaming via Stream Multicast. - Page 123 Configuration Source: Choose a paging source (Modbus/DTMF/DPM-MAIN/DPM-T5/CD-8DF/CD-16DF/CD- T5DF) for this integration paging. o DTMF: See how to create DTMF intercom call. Post-chime/pre-chime: Add a chime message at the beginning of a DTMF/DPM-MAIN/DPM- T5/CD-8DF/CD-16DF/CD-T5DF paging and also at the end of the call. Pre-chime/post chime level: The level of pre-chime/post-chime message.
-
Page 124: Dpm-T5 Record/Listen/Paging
zones. o Wave level: Set this key to adjust the level of recorded wave file via DPM-T5/CD-T5DF, it will auto display the volume bar on LCD panel of DPM-T5/CD-T5DF. o Jump page: Set this key to create a jumping page button on DPM-T5/CD-T5DF, this allows to quickly switch to the page. -
Page 125: Dtmf Intercom Call
Configuration 5.1.8.3.2.2 DTMF intercom call Use the external device such as PPM-IT5 IP console to make the intercom call via VoIP, and select the paging zones by using the DTMF keys. 1. First, create an [Integration Type] event. 2. Choose [DTMF] on [Source] option, and select the zones which the intercom call will be made by the corresponding DTMF keys. - Page 126 3. Click [ Setting] button on [VoIP Paging] event. 4. Enable [DTMF] option and choose [DTMF Integration] event you have created from drop-down box. 5. Select a button which indicates as the BTQ-VM4/VM8 controller on PPM-IT5 console. 6. Then press button to call the BTQ-VM4/VM8 controller.
-
Page 127: Dtmf Paging Call Via Modbus
Configuration 8. Press the DTMF keys, and the intercom call will be called to the zones based on the settings you set on BOUTIQUE web browser (Step The instruction of DTMF key 1. Dial = #X # = start = end Example: o If you would like to paging to Code [2], then dial #2 o The paging function will be activated right way after finishing dialing. -
Page 128: Security/Evacuation Option
3. Click [ Setting] button on [ModBus Paging] event. 4. Go to Machine > Settings > Third Party Controls, and enable the Modbus 3rd party control to control the paging events via DTMF keys. The instruction of DTMF key 1. Dial = #X # = start = end Example:... -
Page 129: Third Party
Configuration setting first, the security mode is activated when under [Security Mode Manual] mode only. For example, if the Security mode is enabled in a evac/alarm paging event, this paging event will continue working even the system is under the power saving mode (sleep mode), see the picture below. -
Page 130: Event
Control action. Type: The [Event] type allows other devices to control the BOUTIQUE system via 3rd party. Event: Choose an event from the drop-down box and allow the 3rd party device to control this action. 5.1.10 Event The action of BOUTIQUE is based on the Event philosophy. The event can be started by different type of interface such as logic, schedule, remote and 3rd party. -
Page 131: Scheduler Switch
Configuration Event name: The name of this event. Security enable/disable: Enable (activate) or disable (deactivate) the security mode when the event is triggered. 5.1.10.1.2 Scheduler switch The [Scheduler Switch] event is used to enable/disable the scheduler function of system. Event name: The name of this event. Scheduler enable/disable: Enable or disable the scheduler function of the system. -
Page 132: Fault Active
5.1.10.1.5 Fault active The [Fault Active] event allows users to set the customized fault for monitoring purpose. When this event is activated, the custom message of this fault will display on LCD panel, as well as the fault LED will light up, and along with other warning indications such fault reply, record the fault on fault list, and trigger the warning tone. -
Page 133: Usb Backup
Configuration o Controller: The selected BTQ-VM4/VM8/SG8 unit. o --: Indicate none of device or system is selected. Please note if the [Evac Input Reset] event is activated on a selected BTQ-VM4/8, the evac inputs of the connected BTQ-SL8 will also be reset, too. 5.1.10.1.8 USB backup The [USB Backup] event is used to auto backup the config file, message files, language file and font files (.ttf) to the connected USB flash drive. -
Page 134: Logic Out
3. An new event will be created and displayed as the picture above. Zone selection All the events which relate to paging have the identical zone setting, this setting informs the BOUTIQUE system that which zones will be distributed audio when proceeds a paging. Device: The device name (main controller or secondary units). -
Page 135: Command String
Configuration Times: The times of OPEN-CLOSE phase. Device list & channel: Choose the device target and its channel to perform this logic out event. 5.1.10.4 Command string Send the commands by RS232/Ethernet to 3rd party device. Event name: The name of this event. String: Set the command strings which the BOUTIQUE will use it to 3rd party device. -
Page 136: Dsp Element
Delay (second): The delay time between the next upcoming event in this list. 5.1.10.6 DSP element The [DSP Element] event is used to adjust the DSP parameter such as audio level of input source. Value/Step: Choose the adjust mode of this event. o Value: Set the parameter to the assigned value such as level control and mute on/mute off. -
Page 137: Singular Paging
Configuration 5.1.10.8 Singular paging This event is for paging to pre-defined zones, please refer to Paging for more details. 5.1.10.9 Singular paging on by zone This event can be used to dynamically add paging zones in Singular Paging event. For example, If Zone1~Zone2 are set as the pre-defined zones in [Singular Paging] event, users can use [Singular paging on by zone] event to add Zone2~Zone3 when this event is triggered. -
Page 138: Zones
Monitor: Enable/disable the monitoring function on all the connected BTQ-VM4/8 controllers. Monitor cycle (s): The interval(sec.) that the connected BOUTIQUE system perform monitoring each time. Monitor tone (Hz): Choose the frequency of monitoring tone signal between 18K or 20K Hz. 1kHz: Enable the 1K tone for monitoring. - Page 139 Configuration 5. Reference: Select the devices either all the BTQ-VM4/VM8/SG8/SL8 units (global-net) or the selected BTQ-VM4/VM8/SL8 units (local-net) from drop-down box. Global (global-net): 6. Get: Get all the reference of impedance value on all the BTQ-VM4/VM8/SG8/SL8 units (global-net). 7. Clear: Clear all the reference of impedance value on all the BTQ-VM4/VM8/SG8/SL8 units (global-net).
-
Page 140: Monitoring Settings Of Zone (A/B Zone)
How to setup the monitoring for all zones: 1. Press [Global Get reference] to get reference. 2. If the variation of impedance measurement on [Realtime] field is big due to the unstable environment or condition, users can manually define the tolerance value for each zone to detect a bad impedance fault The references should be taken only on zone with the connected speaker lines. -
Page 141: Monitoring Settings Of Va-Eol (3 Wire)
Configuration 16 VA-EOL per zone). 5. AMP: The amplifier source which is connected to the zone (external amplifier, VO3 etc.). VO3 is channel that only generate the pilot tone in case no amplifier channel is in used. 6. ZA: The impedance value (ohm) for Line A of one zone. 7. -
Page 142: Faults
the VA-EOL. 7. ZB + /A - ratio (%): Calculate the ratio of speaker open circuit (line A+ and line A-) based on the [Tolerance (%)---ADJ] setting for reference. 8. ZB + ratio (%): Calculate the ratio of speaker open circuit (line B+ and line A-) based on the [Tolerance (%)---ADJ] setting for reference. -
Page 143: Faults
Configuration Clear fault: Clear the fault state on the amplifiers of local net. Amplifier: Indicate the internal or external amplifier. Enable: Enable/disable the amplifier monitoring. If the monitoring of amplifier is disable, the main controller/secondary unit will not detect the faults of amplifiers. Tolerance(%)---ADJ.: Define the value of the tolerance wherein the measured gain of amplifier has to stay before generating a fault state. -
Page 144: Faults
Enable: Enable/disable the leakage detection on the corresponded internal/external amplifier/ VO3 channel. Leakage impedance (ohm): The impedance between the Line A or Line B port and ground wire causes the current leakage. Note: Due to the device component requires to charge, the leakage detection will be mandatory begin in 3 minutes after the device is powered, so that the leakage impedance result will be accurate. -
Page 145: Dsp Function
Configuration 5.1.12 DSP function 5.1.12.1 DSP Structure The BOUTIQUE web browser provides a various DSP configuration and adjustment. Click the component button, and the DSP configuration window will pop up. 5.1.12.1.1 Source settings The source settings are used to edit the settings of the audio sources. The sources you can edit are include the CD/Tuner, Aux, Mic/Line, Fireman Mic, Message, Paging Console, VoIP and Internet. -
Page 146: Message
Level (dB): Set the gain of the source channel. Overload threshold (dB): Set the threshold of the overload (dB). Volume (dB): Display the input volume by meter. 5.1.12.1.1.1 Message Message: The message setting window allows to edit the audio settings of each message source. Please note if the Evac option is enable on EVAC In/Alert In/Message Test/Logic Evac In/Logic Alert In/Event MSG 2/Event MSG2 paging events, the DSP audio control on this setting window will be bypassed. -
Page 147: Dynamic
Configuration The [Paging Console > Equalizer] setting Message: The [Message > Equalizer] setting window allows to edit Equalizer window allows to edit the Equalizer settings of settings of each connected paging console each message source. (DPM-T5, DPM-MAIN etc.). Bandwidth (Oct): Set the width around the frequency (Q factor) of the selected frequency band. - Page 148 The [Paging Console > Dynamic] setting Message: The [Message > Dynamic] window allows to edit the Dynamic settings of setting window allows to edit the Dynamic each connected paging console. settings of each message source. Bypass: Click [Bypass] button to bypass the input signal to the output of Dynamic component.
-
Page 149: Internal/External Ch Output
Configuration o Attack time (ms): Set the time it takes to respond to the input signal. The response time is the period when the compressor has decreased gain to reach the level that is determined by the ratio. Graphic: Adjust the threshold level by moving the blue (Compressor) and red (Limiter) cursors. Gain reduction (dB): This bar indicates the current amount of gain reduction. - Page 150 Group DNM info: Click this button to open the window which displays the information of the DNM2- ETH/DGL-MIC. All the DNM2-ETH/DGL-MIC listed in this window are in the same group. Calibration window: Click to open the DNM Calibration window. Working status: o Light in green: The selected DNM2-ETH is connected.
- Page 151 Configuration 3. Adjust the level of white noise to heard big enough and Click [Max. level] to record the level value, do the same procedure but smallest level for[Min. level]. The recorded level value will be shown on [Max. Level]/[Min. Level]. 4.
-
Page 152: Calibration
A/R time (s): After the ambient noise is detected by DNM2-ETH/DGL-MIC, set the A/R time to define the gain level which will be increased from the current paging level to the level that DNM2- ETH/DGL-MIC has detected.. Differential level: The difference level between the Output Level and the C/Sensing Mic Level. C/Sensing mic level: Display the level which is calculated by dynamic DNM2-ETH/DGL-MIC algorithm. -
Page 153: Parameter Range
Configuration muted, and light in green while the output channel is activated. Bypass: Click to bypass level of Stream Out. Level (dB): Set the gain of the output channel. Overload threshold (dB): Set the threshold of the overload (dB). Volume (dB): Display the output volume by meter. 5.1.12.2 Parameter range This function allows users to define the parameter range of source including CD/TUNER, AUX, MIC/ LINE, Fireman MIC, Message, Paging Console, VoIP, Internet, Internal Amp, External Channel and... -
Page 154: Maintenance
Maintenance Cleaning Make sure to unplug the main power supply of main controller/secondary unit prior to cleaning. The panels and chassis can be cleaned with a soft cloth and mild non-abrasive cleaning solution. Avoid cleaning powders or scrubbing pads, as these will scratch and dull the paint. Do not apply liquid directly to the surface. -
Page 155: Fault Lists & Troubleshooting
1. Check if the cables are connected tightly and correctly. 2. If the wiring is correct, reboot the devices, Ateis Net Port and check if the communication of Port B to v2.13 Occurrence Port A is normal. - Page 156 Supporte Faults Diagnosis (details) Troubleshooting Version the BTQ-SL8 is connected tightly and correctly, and the LED on RJ45 connector flashes, too. 4. Check if the wiring of remotes is connected tightly and correctly. 5. DNM: communicate with the BTQ- Check if the Ethernet port of remote is VM/SG/SL.
- Page 157 Fault lists & troubleshooting Supporte Faults Diagnosis (details) Troubleshooting Version Shutdown the device first, and check if the IC communication does not CODEC Error v2.13 FPGA cables are connected correctly and function. tightly. IC communication does not Int Amp1 Error v2.13 function or the amp board is Shutdown the device.
- Page 158 Supporte Faults Diagnosis (details) Troubleshooting Version 1. If the external amplifier is connected, check Gain Too Low Error: the gain value on [Amplifier Gain] has The difference of [Ref. gain] decreased. and [Measure] is less than 2. If the output level is under normal condition, [Tolerance %] on Amplifier click [Get Reference], and increase the window, which unexpectedly...
- Page 159 Fault lists & troubleshooting Supporte Faults Diagnosis (details) Troubleshooting Version new speaker for testing purpose. 1. Check if the wiring of LINE A is connected Open-Circuit correctly and tightly. 2. Replace a new speaker for testing purpose. 1. Plug out the LINE A speaker lines, and proceed [Reset Monitor].
- Page 160 Supporte Faults Diagnosis (details) Troubleshooting Version among all the BTQ-VM4/8 on global-net is Port B Broken correct and does not loosen. 2. Replace the wires. The user-defined fault has User Fault v2.13 The user-defined fault has been triggered. been triggered. Microphone Open Fail 1.
- Page 161 Fault lists & troubleshooting Supporte Faults Diagnosis (details) Troubleshooting Version 1. Check whether the volume knob on the front panel of BTQ-VM is set as 0. Line Short: 2. Plug out the speaker zone lines, and proceed The speaker line A+/A-/B+ of [Reset Monitor].
-
Page 162: Technical Data
Technical data BTQ-VM4/VM8 Electrical AC power input: 100 VAC ~ 240 VAC, 50/60 Hz power consumption (AC): idle 1/2 full power full power BTQ -VM425 / BTQ -VM825 195W 365W (250W) BTQ- VM450 / BTQ -VM850 345W 645W (500W) Idle: pilot tone -36 dB, 1/2 full power: alarm tone DC power input: 43 ~ 56 VDC (type: 48VDC) power consumption... - Page 163 Technical data Speaker load per zone (max.): 1000W @ 70V/100V line Speaker load per unit (max.): 2000W @ 70V/100V line Internal power amplifier Rated output power: 250W/500W (Class-D) Frequency response: 50 Hz ~ 20 kHz (±3 dB) @ 0 dBu THD+N: <...
-
Page 164: Btq-Vm4W/Vm8W
Environmental Operating temperature: -5 ºC ~ +55 ºC (+23 ºF ~ +131 ºF) Storage temperature: -40 ºC ~ +70 ºC (-40 ºF ~ +158 ºF) Relative humidity: 20% to 95% Air pressure: 600 to 1100 hPa BTQ-VM425/VM825: 375 BTU/hr Heat dissipation: BTQ-VM450/VM850: 495 BTU/hr Standard &... - Page 165 Technical data A/D-D/A bit resolution: 24 Bit Input gain range: 0 ~ -15 dB (3 dB steps) SNR: > 80 dB THD+N: < 0.01 % @ 30 dB gain, -24 dBu (1 kHz) in EIN: < -80 dBu @ 0 dB gain Maximum input level (CD/AUX/mic): 17 dBu Maximum output level (line out):...
- Page 166 EVAC inputs Maximum voltage: 72 VDC Voltage mode: Active voltage: 18 VDC ~ 72 VDC Inactive voltage: < 0.8 VDC Non-isolated analogue interfaces with internal pull-up to +5V by 10k ohm Monitored analogue contact thresholds Contact mode o Faulty-open circuit: > 2.7 VDC o Inactive voltage: 2 ~ 2.5 VDC o Active voltage: 1.35 ~ 1.7 VDC o Faulty-short circuit: <...
-
Page 167: Btq-Sg8/Btq-Sl8
Technical data BTQ-SG8/BTQ-SL8 Electrical DC power input: 21VDC~29VDC BTQ-SG8: o Full power: 15W o Standby mode: 4W Power consumption: BTQ-SL8: o Full power: 13.5W o Standby mode: 3.5W Battery backup power input: 24 VDC Audio characteristics A/D-D/A bit resolution: 24 Bit Sampling rate: 48 kHz Frequency response:... -
Page 168: Digital Paging Consoles
EVAC inputs Maximum voltage: 72 VDC Voltage mode: Active voltage: 18 VDC ~ 72 VDC Inactive voltage: < 0.8 VDC Non-isolated analogue interfaces with internal pull-up to +5V by 10k ohm Monitored analogue contact thresholds Contact mode: o Faulty-open circuit: > 2.7 VDC o Inactive voltage: 2 ~ 2.5 VDC o Active voltage: 1.35 ~ 1.7 VDC o Faulty-short circuit: <... - Page 169 Technical data A/D-D/A bit resolution: 24 Bit Sampling rate: 48 kHz Frequency response: 20 Hz ~ 20 kHz (±1 dB) @ 0 dBu SNR: > 85 dB THD+N: < 0.2 % @ 26 dB gain, -26 dBu (1 kHz) in Max.
-
Page 170: Dpm-Eva/Dpm-Kpd
EN54-16 Europe Voice Alarm (in process) Mass Notification Systems UL2572 (pending) Safety UL60065 (pending) 8.4.2 DPM-EVA/DPM-KPD Electrical DC power input 21VDC~29VDC Full power DPM-EVA: 0.5W DPM-KPD: 1W Power consumption Standby mode DPM-EVA: 0.3W DPM-KPD: 0.5W Audio characteristics (general) A/D-D/A bit resolution: 24 Bit Sampling rate: 48 kHz... -
Page 171: Dpm-T5/Dpm-T5F
Technical data EN54-16 Europe Voice Alarm (in process) EN55032:2015/AC:2016 Class A Europe CE/EMI (in process) EN61000-3-2:2014 EN61000-3-3:2013 Europe CE/EMC EN55020:2007/A11:2011 (in process) Europe CE/LVD EN60065: 2014 (in process) Mass Notification Systems UL2572 (pending) Safety UL60065 (pending) 8.4.3 DPM-T5/DPM-T5F Electrical DC power input 21VDC~29VDC Full power: 15W Power consumption... -
Page 172: Cd-8Df/Cd-16Df
inch) DPM-T5F with mic: 320 x 332 x 174 mm (13 x 13 x 6.9 inch) DPM-T5: 1.1 kg (2.4 lbs) Weight: DPM-T5F: 1.5 kg (3.3 lbs) Color: RAL 7016 Environmental Operating temperature: -5 ºC ~ +55 ºC (+23 ºF ~ +131 ºF) Storage temperature: -40 ºC ~ +70 ºC (-40 ºF ~ +158 ºF) Relative humidity:... -
Page 173: Cd-T5Df
Technical data Mechanical CD-8DF: 329 x 187 x 101 mm (13 x 7.4 x 4 inch) Dimensions (W x H x D): CD-16DF: 349 x 241 x 101 mm (13.7 x 9.5 x 4 inch) CD-8DF: 3.4 kg (7.5 lbs) Weight: CD-16DF: 4.1 kg (9 lbs) Color:... -
Page 174: Accessories
Mechanical Dimensions (W x H x D): 339 x 208 x 101 mm (13.3 x 8.2 x 4 inch) Weight: 3.4 kg (7.5 lbs) Color: RAL 7016 Environmental Operating temperature: -5 ºC ~ +55 ºC (+23 ºF ~ +131 ºF) Storage temperature: -40 ºC ~ +70 ºC (-40 ºF ~ +158 ºF) Relative humidity:... -
Page 175: Dgl-Mic
Technical data 8.5.2 DGL-MIC DC power input: 18~30VDC Max. power consumption: 2.4W Ambient noise measurement 55 dBA~105 dBA range: STP CAT5/6 cable with shielded RJ45 connector Network: Max. distance length: 250m Dimension (W x H x D): 110 x 70 x 52 mm (4.3 x 2.6 x 2 inch) Weight: 0.1 Kg (0.22 lbs) Operating temperature: -5ºC ~ +55ºC (+23 ºF ~ +131 ºF) -
Page 176: Va-Dlc
8.5.5 VA-DLC Electrical Voltage: 100V or 70V loudspeaker line Load: 62W, 125W, 250W, above 250W DIP switch setting 1 step: 0 to 62W speaker load 2 step: 62 to 125W speaker load 3 step: 125 to 250W speaker load 4 step: above 250W speaker load Mechanical &... -
Page 177: Sl-Sensor2/Sl-Sensor4
Technical data EN54-16 Europe Voice Alarm (in process) EN61000-3-3:2013 EN55020:2007/A11:2011 (in process) Europe CE/LVD EN60065: 2014 (in process) Mass Notification Systems UL2572 (pending) Safety UL60065 (pending) 8.5.7 SL-SENSOR2/SL-SENSOR4 Electrical Power source: Supplied from BTQ-VM/SG/SL Max. power consumption: 90 mW Voltage: 70V or 100V loudspeaker line Mechanical &... - Page 178 Dimension (W x H x D): 63 x 15 x 82 mm (2.5 x 0.6 x 3.2 inch) Weight: 0.2 kg (0.4 lbs) Operating temperature: -5°C~ +55°C (+23°F~ +131°F) Storage temperature: -40 ºC ~ +70 ºC (-40 ºF ~ +158 ºF) Environmental: Relative humidity: 20%~95% Air pressure: 600 to 1100 hPa...
-
Page 179: Contact Information
Contact information Contact information www.ateis.com ATEÏS Europe B.V. Penton Audio USA EMEA USA, Canada & Latin America Celsiusstraat 1 - 2652 XN Lansingerland 21 Sabin St. Pawtucket, (Rotterdam Region), Netherlands RI 02860, USA Tel: +31 (0) 10 2088690 Tel: 401-727-1600 info@ateis-europe.com...
Need help?
Do you have a question about the BOUTIQUE BTQ-VM425W1 and is the answer not in the manual?
Questions and answers