Graf CARAT XXL Series Installation/Assembly And Maintenance Instructions
Extinguishing water tanks
Hide thumbs
Also See for CARAT XXL Series:
Table of Contents
Advertisement
Available languages
Available languages
Quick Links
CARAT XXL Löschwasserbehälter
Einbau-/ Montage-/ und Wartungsanleitung für
DE
Graf CARAT XXL Löschwasserbehälter
>> Seite 1-14
Installation/ assembly and maintenance instructions for
EN
Graf Carat XXL extinguishing water tanks
>> Page 15-28
Notice d'installation et d'entretien Carat XXL GRAF
FR
Réserve Incendie
>> Page 29-42
Instrucciones de instalación / montaje y mantenimiento
ES
para GRAF Carat XXL depósito de agua para extinción
de incendios
>> Page 42-56
Advertisement
Chapters
Table of Contents

Related Manuals for Graf CARAT XXL Series


Summary of Contents for Graf CARAT XXL Series
- Page 1 Graf Carat XXL extinguishing water tanks >> Page 15-28 Notice d’installation et d’entretien Carat XXL GRAF Réserve Incendie >> Page 29-42 Instrucciones de instalación / montaje y mantenimiento para GRAF Carat XXL depósito de agua para extinción de incendios >> Page 42-56...
-
Page 2: Table Of Contents
Die in dieser Anleitung beschrie- benen Punkte sind unbedingt zu ALLGEMEINE HINWEISE beachten. Bei Nichtbeachtung er- Sicherheit lischt jeglicher Garantieanspruch. Kennzeichnungspflicht Für alle über GRAF bezogenen Abnahme Zusatzartikel erhalten Sie separate EINBAUBEDINGUNGEN in der Transportverpackung beilie- TECHNISCHE DATEN gende Einbauanleitungen. -
Page 3: Allgemeine Hinweise
Abdeckung ausgetauscht werden. Die Firma GRAF bietet ein umfangreiches Sortiment an Zubehör- teilen, die alle aufeinander abgestimmt sind und zu kompletten Systemen ausgebaut werden können. Die Verwendung, nicht von GRAF freigegebener Zubehörteile führt zu einem Ausschluss der Gewährleis- tung/Garantie. Kennzeichnungspflicht Der Pfosten mit Halter für das Hinweisschild "Löschwasserentnahmestelle", zur direkten Befestigung am... -
Page 4: Einbaubedingungen
Einbaubedingungen Teleskop-Domschacht LKW (Abdeckung nach DIN 3223 - bauseits zu stellen) 750 - 1050 Überdeckungshöhen mit Teleskop Domschacht LKW (Abdeckung nach DIN 3223 - bauseits zu stellen) im begehbaren Grünbereich 750-1050 max. 1500 Maximale Überdeckungshöhe mit Zwischen- stück und Teleskop-Domschacht LKW (Abde- ckung nach DIN 3223 - bauseits zu stellen). -
Page 5: Technische Daten
Technische Daten Max. 440 Min. 140 Htot Htot Tank 16.000 26.000 36.000 46.000 56.000 66.000 76.000 86.000 96.000 106.000 116.000 (Liter) Art.-Nr. 380050 380052 380054 380056 380058 380060 380062 380064 380066 380068 380070 Gewicht 1150 1495 1840 2185... - Page 6 Technische Daten 340 (Mini) 440 (Maxi) Htot Htot Htot Tank 22.000 32.000 42.000 52.000 62.000 72.000 82.000 92.000 102.000 112.000 122.000 (Liter) Art.-Nr. 380051 380053 380055 380057 380059 380061 380063 380065 380067 380069 380071 Gewicht 1015 1360 1705...
- Page 7 Technische Daten m³ Löschwasser Ausbau- komponenten Bezeichnung Material PE/ V2A Gewicht (kg) 11,5 13,5 Ø (mm) DN 125 DN 125 DN 125 DN 100 Pfosten: 40 L (mm) Halter: 250 Pfosten: 40 B (mm) Halter: 200 H (mm)
-
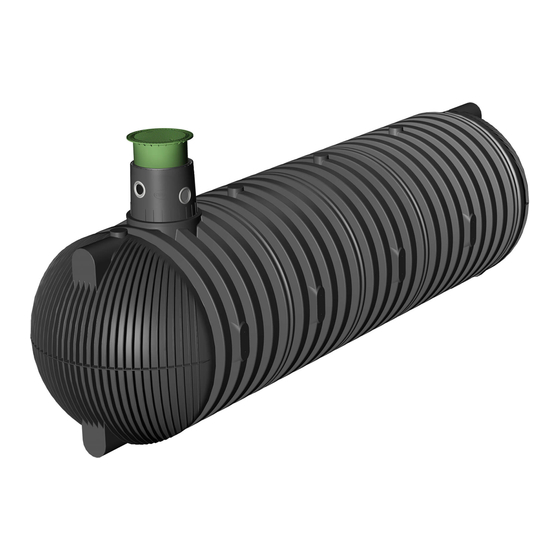
Page 8: Aufbau Tank
Aufbau Tank ³ Teleskop-Domschacht LKW (Abdeckung nach DIN 3223 – bauseits zu stellen) Profildichtung Tankdom/ Teleskop Tankdom (um 360° drehbar) Profildichtung Tank/ Tankdom Carat XXL Löschwasserbehälter Sauganschluss mit A-Festkupplung nach DIN 14244 Verlängerungsstück für Saugrohr mit Flansch DN 125 Saugrohr mit Flansch DN 125 inkl. -
Page 9: Einbauort
Einbau und Montage Einbauort Die Löschwasserentnahmestelle muss sich außerhalb des Trümmerschattens von Gebäuden befinden. Zur Entnahmestelle ist von der öffentlichen Verkehrsfläche eine Feuerwehrzufahrt zu erstellen. Die Zu- fahrt muss den Anforderungen nach DIN 12090 entsprechen, sofern landesrechtliche Vorgaben dem nicht entgegenstehen. - Page 10 Einbau und Montage 5.4.1 Hanglage, Böschung etc. Beim Einbau des Behälters in unmittelbarer Nähe (< 5 m) eines Hanges, Erdhügels oder einer Bö- schung muss eine statisch berechnete Stütz- mauer zur Aufnahme des Erddrucks errichtet werden. Die Mauer muss die Behältermaße um mind.
-
Page 11: Einsetzen Und Verfüllen
Einbau und Montage Einsetzen und Verfüllen Die Behälter sind stoßfrei mit geeignetem Gerät in die vorbereitete Baugrube einzubringen. Vor dem Anfüllen der Behälterumhüllung wird der Behälter mit ca. 25 cm Wasser gefüllt, danach wird die Umhüllung (Rundkornkies max. Körnung 8/16) lagenweise in max. -
Page 12: Tankdom Und Teleskop-Domschacht Montieren
Tankdom und Teleskop-Domschacht montieren Tankdom montieren Vor der eigentlichen Montage wird die mitgelieferte Dichtung zwischen Tank und Tankdom auf das Aufnahmeprofil des Tankhalses „B“ geschoben. Anschließend wird der Tankdom den Leitungen „A“ nach ausgerichtet und bis zum Anschlag in den Tankhals eingeschoben. -
Page 13: Teleskop-Domschacht Pkw-Befahrbar
Tankdom und Teleskop-Domschacht montieren Teleskop-Domschacht PKW-befahrbar Wird der Behälter unter PKW-befahrenen Flächen installiert, muss das Teleskop im Kragenbereich mit Beton (Belastungsklasse B25 = 250 Kg/m²) unterfüttert werden. Die anzufüllende Betonschicht muss umlaufend mind. 400 mm breit und ca. -
Page 14: Löschwasser Ausbaukomponenten
Löschwasser Ausbaukomponenten Saugarmatur Das Saugrohr hat einen Innendurchmesser von 125 mm und wird standardmäßig mit dem, sich im Liefer- umfang enthaltenen, Löschwasser-Sauganschluss nach DIN 14244 mit A-Festkupplung verschraubt. Zur Flanschabdichtung bitte beiliegende Dichtscheibe mit Stahleinlage verwenden! Die Dichtflächen sind sauber, trocken und parallel ausgerichtet vorzubereiten und die Flanschverbindun- gen im Anschluss mit den jeweiligen Schraubensätzen, in mehreren Durchgängen gleichmäßig über... -
Page 15: Inspektion Und Wartung
Dabei sind alle Anlagenteile zu reinigen und auf ihre Funktion zu überprüfen, sodass eine einwandfreie Löschwasserentnahme jederzeit gewährleitet ist. Bei Wartungen sollte wie folgt vorgegangen werden: Flächen und Einbauteile mit Wasser reinigen • Schmutz aus dem Behälter restlos entfernen • Funktionsprüfung der Löschwasser-Ausbaukomponenten • Landesrechtliche Bestimmungen sind zu beachten. www.graf.info 14 / 56 2018-07... - Page 16 Installation / assembly / and maintenance instructions for GRAF Carat XXL extinguishing water tanks 16 000* - 122 000* litres Order no.: 380050 - 380071 *Please note that the useful volume may be up to 10 % below the total tank volume.
-
Page 17: General Information
GRAF provides an extensive range of accessories, which are all coordinated and can be combined to form complete systems. The use of accessories that have not been approved by GRAF results in the exclusion of the warranty/guarantee. -
Page 18: Installation Conditions
Installation conditions Teleskop-Domschacht LKW (Abdeckung nach DIN 3223 - bauseits zu stellen) 750 - 1050 Covering heights with telescopic lorry dome shaft (cover in accordance with DIN 3223 - to be provided by the customer) in landscaped areas suitable for pedestrian loading 750-1050 mm. -
Page 19: Technical Data
Technical data Max. 440 Min. 140 Htot Htot Tank 16 000 26 000 36 000 46 000 56 000 66 000 76 000 86 000 96 000 106 000 116 000 (litres) Item no. 380050 380052 380054 380056... - Page 20 Technical data 340 (Mini) 440 (Maxi) Htot Htot Htot Tank 22 000 32 000 42 000 52 000 62 000 72 000 82 000 92 000 102 000 112 000 122 000 (litres) Item no. 380051 380053 380055...
- Page 21 Technical data m³ Extinguishing water removal components Description Material PE/ V2A Weight (kg) 11.5 13.5 Diameter DN 125 DN 125 DN 125 DN 100 (mm) Post: 40 L (mm) Holder: 250 Post: 40 W (mm) Holder: 200 H (mm)
-
Page 22: Structure Of Tank
Structure of tank Telescopic lorry dome shaft (cover in ³ accordance with DIN 3223 - to be pro- vided by the customer) Profile seal of tank dome / telescope Tank dome (can be rotated 360°) Profile seal of tank / tank dome... -
Page 23: Installation Site
InstallationInstallation Installation site The extinguishing water extraction point must be outside the debris zone of buildings. Access for the fire brigade should be provided to the extraction point from the public road. The access route must meet the requirements of DIN 12090 provided these don't contradict local requirements. - Page 24 Installation 5.4.1 Positioning on a slope, embankment etc. If the tank is installed in immediate proximity (less than 5 m) to a slope, mound or embankment, a statically calculated supporting wall must be con- structed to bear the pressure of the soil. The wall...
-
Page 25: Insertion And Filling
Installation Insertion and filling The tanks should be brought into the prepared trench with a suitable device without any jolts. Before the surround is filled the tank is filled with around 25 cm water, the surround (round gravel, max. -
Page 26: Fitting Tank Dome And Telescopic Dome Shaft
Fitting tank dome and telescopic dome shaft Fitting tank dome Before actually fitting, the seal provided between the tank and tank dome is slid onto the support profile of tank neck "B". The tank dome is then aligned to the pipes and slid into the tank neck up "A"... -
Page 27: Telescopic Dome Shaft Suitable For Vehicle Loading
Fitting tank dome and telescopic dome shaft Telescopic dome shaft suitable for vehicle loading If the tank is installed below a surface driven on by vehicles, the telescope must be lined with con- crete in the collar area (load class B25 = 250 kg/ m²). -
Page 28: Extinguishing Water Removal Components
Extinguishing water removal components Intake device The intake pipe has an inner diameter of 125 mm and as standard is screwed down to the extinguishing water suction connection provided in the scope of supply in accordance with DIN 14244 by means of an A fixed coupling. -
Page 29: Inspection And Maintenance
Inspection and maintenance The entire system must be checked for tightness, cleanliness and stability at least once every three months. The entire system should be maintained approximately every 5 years. This involves cleaning all system parts and checking that they are functioning correctly so that extinguish- ing water can be easily extracted at all times. - Page 30 Notice d’installation et d‘entretien Carat XXL GRAF Réserve Incendie 16.000* à 102.000* Litres Ref: 380050 à 380067 SOMMAIRE Afin de garantir le bon fonction- nement et la longévité de votre GENERALITES installation, les différents points Sécurité décrits dans cette notice doivent Obligation de marquage scrupuleusement être respec-...
-
Page 31: Generalites
être remplacé par la rehausse téles- copique avec le couvercle définitif en fonction du besoin. La société GRAF vous propose une large gamme d’accessoires d’une grande compatibilité. GRAF décline toute prise en charge sous garantie en cas d’utilisation d’accessoires non conformes. -
Page 32: Condition D'installation
CONDITION D‘INSTALLATION 750 - 1050 Hauteurs de recouvrement avec dôme et re- hausse télescopique est comprise entre 750mm – 1050mm pour un passage piétons max. 1500 Hauteur de recouvrement maximale avec dôme + rallonge et rehausse télescopique est égale à... -
Page 33: Caracteristique Technique
CARACTERISTIQUE TECHNIQUE Max. 440 Min. 140 Htot Htot Réservoirs 16.000 26.000 36.000 46.000 56.000 66.000 76.000 86.000 96.000 (Litres) Ref. 380050 380052 380054 380056 380058 380060 380062 380064 380066 Poids (kg) 1150 1495 1840 2185 2530 2875 3220... - Page 34 CARACTERISTIQUE TECHNIQUE Max. 440 Min. 140 Htot Htot Réservoirs 22.000 32.000 42.000 52.000 62.000 72.000 82.000 92.000 102.000 (Litre) Ref. 380051 380053 380055 380057 380059 380061 380063 380065 380067 Poids (kg) 1015 1360 1705 2050 2395 2740 3085...
- Page 35 CARACTERISTIQUE TECHNIQUE m³ Accessoires Réserve Incendie Designation Matières PE/ V2A Poids (kg) 11,5 13,5 Ø (mm) DN 100 DN 125 DN 125 DN 100 : 40 Support L (mm) Plaque : 250 : 40 Support l (mm) Plaque...
-
Page 36: Assemblage Du Reservoir
ASSEMBLAGE DU RESERVOIR Rehausse télescopique passage ca- ³ moins (anneau et couvercle – non four- nis) Joint à lèvres EDPM Dôme (pivotant à 360°) Joint à lèvres EDPM Réserve Incendie Carat XXL Raccord pompier DN100 avec bride d‘accouplement Rallonge pour colonne d‘aspiration DN... -
Page 37: Emplacement
MISE EN PLACE ET MONTAGE Emplacement L’emplacement du réservoir incendie doit répondre aux directives des autorités. L’accès et le passage doivent être accessibles aux engins de lutte contre l’incendie. Hauteur de remblai La hauteur de recouvrement avec rehausse télescopique passage camions est de 1000mm à 1500mm max avec rallonges. - Page 38 MISE EN PLACE ET MONTAGE 5.4.1 Pentes, talus Pour toute implantation de la cuve à proximité d’une pente (< 5 m), d’un monticule de terre ou d’un talus, il faut mettre en place un mur de sou- tènement issu d’un calcul de résistance statique pour contenir la poussée du terrain.
-
Page 39: Mise En Place Et Remplissage
MISE EN PLACE ET MONTAGE Mise en place et remplissage Les cuves doivent être installées dans la fouille avec un matériel adapté. Pour éviter toute déformation de la cuve et assu- rer son maintien dans la fouille, remplir d’eau 25... -
Page 40: Montage Du Dome Et De La Rehausse Telescopique
MONTAGE DU DOME ET DE LA REHAUSSE TELESCOPIQUE Montage du dôme Placer le joint d’étanchéité livré avec le dôme dans la rainure du trou d’homme de la cuve (B). Le dôme est orientable selon les arrivées de tuyaux. -
Page 41: Rehausse Telescopique Passage Camions
Rehausse telescopique passage camions Dans le cas d’un passage camions jusqu’à 40 T au-dessus de la cuve Il est impératif d’installer une dalle de répartition en béton maigre (classe de charge D400). La dalle de répartition en béton autour de la rehausse, doit faire au moins 400 mm de large et 200 mm de hauteur. -
Page 42: Equipement Incendie
EQUIPEMENT INCENDIE Raccordement d’aspiration La colonne d’aspiration est livrée en DN125 et se réduit en DN100 au niveau du raccord pompier(hydrant) grâce à une bride d’accouplement . Utilisez les brides livrées pour assurer l’étanchéité. Les surfaces d’étanchéité doivent être propres et sèches de part et d’autre des raccords, disposez les face à... -
Page 43: Inspection Et Entretien
INSPECTION ET ENTRETIEN L’étanchéité, la propreté et la stabilité de l’ensemble de l’installation doivent être vérifiées au moins tous les trois mois. L’entretien de l’ensemble de l’installation doit être effectué environ tous les 5 ans. Tous les accessoires doivent être nettoyés et vérifiés. - Page 44 Instrucciones de instalación / montaje y mantenimiento para GRAF Carat XXL depósito de agua para extinción de incendios 16.000 - 122.000 litros Código.: 380050 - 380071 *Tenga en cuenta por favor que el volumen útil puede situarse en hasta un 10% por debajo del volumen total del depósito.
-
Page 45: Indicaciones Generales
GRAF ofrece un amplio surtido de accesorios que han sido todos ellos adaptados entre sí y que pueden ampliarse para formar sistemas completos. El uso de accesorios no aprobados por GRAF da lugar a la pérdida de la garantía legal/comercial. -
Page 46: Condiciones Para La Instalación
Condiciones para la instalación Teleskop-Domschacht LKW (Abdeckung nach DIN 3223 - bauseits zu stellen) 750 - 1050 Altura de cobertura con la cubierta telescópica para camiones (cobertura según DIN 3223 – debe ser instalada por el cliente) en zonas verdes transitables por peatones 750-1050 mm. max. -
Page 47: Datos Técnicos
Datos técnicos Max. 440 Min. 140 Htot Htot Depósito 16.000 26.000 36.000 46.000 56.000 66.000 76.000 86.000 96.000 106.000 116.000 (litros) Código 380050 380052 380054 380056 380058 380060 380062 380064 380066 380068 380070 Peso (kg) 1150 1495 1840 2185 2530 2875 3220 3565... - Page 48 Datos técnicos 340 (Mini) 440 (Maxi) Htot Htot Htot Depósito 22.000 32.000 42.000 52.000 62.000 72.000 82.000 92.000 102.000 112.000 122.000 (litros) Código 380051 380053 380055 380057 380059 380061 380063 380065 380067 380069 380071 Peso (kg) 1015 1360 1705 2050 2395 2740 3085...
- Page 49 Datos técnicos m³ Pack extensión para agua para extinción incendios Denominació Material PE/ V2A Peso (kg) 11,5 13,5 Ø (mm) DN 125 DN 125 DN 125 DN 100 Poste: 40 Longitud Soporte: (mm) Poste: 40 Anchura Soporte: (mm) Altura (mm) 1200 2400 1000...
-
Page 50: Componentes Del Depósito
Componentes del depósito Cubierta teléscopica transitable para ³ camiones (cubierta según DIN 3223 – debe ser instalada por el cliente) Junta perfilada unión cúpula – cubierta telescópica Cúpula para depósito (girable en 360°) Junta perfilada depósito/ cúpula Carat XXL depósito de agua para extinción de incendios Conexión de aspiración con acoplamiento fijo A según DIN 14244... -
Page 51: Lugar De Colocación
Instalación y montaje Lugar de colocación El punto de extracción de agua para extinción de incendios debe situarse fuera del área de caída de escombros. La autoridad con competencia para las superficies de tránsito público debe construir un acceso hasta el punto de extracción del agua para extinción de incendios. Este acceso debe ser conforme con los requisitos según DIN 12090, siempre que las normativas según la legislación nacional no se opongan a ellos. - Page 52 Instalación y montaje 5.4.1 Pendiente, talud, etc. Cuando instale depósito inmediaciones (< 5 m) de una pendiente, de una montaña de tierra o de un talud, se deberá levantar un muro de contención, del que se habrá realizado el cálculo estático correspondiente, para absorber la presión del terreno.
-
Page 53: Colocación Y Rellenado
5.4.4 Interconexión de varios depósitos El empalme de dos o varios depósitos se realiza mediante tomas soldadas DN 250 (diámetro > 600 nominal doble del tubo de aspiración). Las tomas se deben disponer lo más profundamente posible dentro del depósito. Es importante que la separación entre los depósitos soterrados sea de como mínimo de 600 mm Colocación y rellenado... -
Page 54: Montar La Cúpula Del Depósito Y La
Montar la cúpula del depósito y la cúpula telescópica Montar la cúpula del depósito Antes del montaje se inserta la junta incluida entre el depósito y la cúpula del depósito, sobre el perfil receptor boca depósito "B". continuación hay que alinear la cúpula del depósito „A“... -
Page 55: Cubierta Telescópica Transitable Para Turismos
Montar la cúpula del depósito y la cubierta telescópica Cubierta telescópica transitable para turismos Si se va a instalar el depósito bajo superficies transitadas por turismos se deberá recalzar la cúpula telescópica en la zona del collarín con hormigón (clase de carga B25 = 250 kg/m²) La capa de hormigón para recalzar debe tener como mín. -
Page 56: Montaje De La Extensión
Montaje de la extensión Si por ser la cobertura con tierra mayor se precisa una extensión, se encajará la misma en la cúpula del depósito con ayuda de jabón líquido. Se encaja la junta perfilada en la ranura superior de la extensión y se engrasa la misma con una cantidad generosa de jabón. -
Page 57: Escalera Para Entrada
Limpiar con agua las superficies y los componentes incorporados. • Eliminar completamente la suciedad del depósito. • Prueba funcional del pack de extensión para agua para extinción de incendios • Hay que observar las disposiciones según la legislación nacional. www.graf.info 2018-07 56 / 56... - Page 58 Notizen / Notes / Notas...
Need help?
Do you have a question about the CARAT XXL Series and is the answer not in the manual?
Questions and answers