Advertisement
Advertisement
Table of Contents

Related Manuals for Explore Scientific PMC-Eight iEXOS 100


Summary of Contents for Explore Scientific PMC-Eight iEXOS 100
- Page 1 iEXOS 100 InstructIOn Manual Art. No. 0456100...
- Page 2 WELCOME TO THE WORLD OF EXPLORATION.
-
Page 3: Table Of Contents
Contents Besuchen Sie unsere Website über den folgenden QR Code oder Weblink um weitere Informationen zu diesem Produkt oder die verfügbaren Übersetzungen dieser Anleitung zu finden. Visit our website via the following QR Code or web link to find further information on this product or the available translations of these instructions. -
Page 4: Main Features
MAIN FEATURES REVOLUTIONARY INTUITIVE The PMC-Eight has taken GOTO Created specifically for the PMC-Eight, technology to a whole new level by the ExploreStars app streamlines the utilizing a smart electronic design that observing experience and serves as an transcends the industry standard single ideal introduction to the many benefits processor. -
Page 5: Thank You
THANK YOU We would like to thank you for choosing Explore Scientific ’s PMC-Eight Open ® ™ GOTO system to be your personal guide to the universe. Powered by open source software, this revolutionary precision motion control system was engineered to meet the diverse needs of the astronomy community. -
Page 6: Guarantee
GUARANTEE Guarantee The regular guarantee period is 2 years and begins on the day of purchase. Please retain the sales receipt (till receipt or purchase/invoice) carefully as proof of purchase. During the guarantee period defective devices will be accepted on the spot by your specialist retailer or you can send them back directly. -
Page 7: Quick Start
QUICK START iEXOS 100 WITH PMC-Eight System Quick Start Guide ™ Although the iEXOS 100 with PMC-Eight is a complex precision motion control system, it is simple to set up. Contents • iEXOS 100 Mount (With built-in PMC-Eight system) • Tripod •... -
Page 8: Iexos 100 Mount Assembly
iEXOS 100 MOUNT ASSEMBLY iEXOS 100 Mount Set Up... - Page 9 iEXOS 100 MOUNT ASSEMBLY...
- Page 10 iEXOS 100 MOUNT ASSEMBLY Parts List 1. iEXOS 100 Mount (With built-in PMC-Eight system) 2. 8 C Battery DC power supply with cable (batteries not included) 3. Battery pack mounting bracket 4. ST4 (RJ-12) WiFi Channel Switch Dongle 5. DB9 to RJ-25 DEC Cable 6.
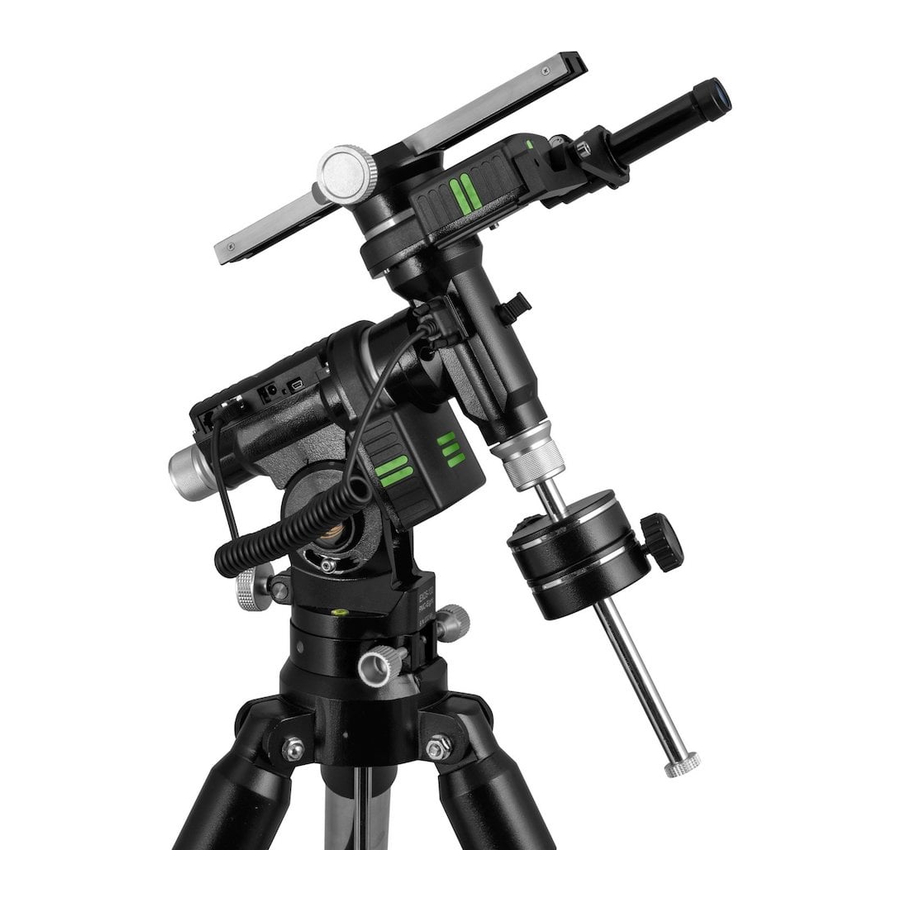
- Page 11 iEXOS 100 MOUNT ASSEMBLY Attaching The Counterweight Bar To properly balance the telescope, the mount comes with a counterweight bar and counterweight. To install the counterweight bar: 1. Locate the opening in the equatorial mount on the DEC axis. It is opposite the telescope mounting platform. 2.
- Page 12 iEXOS 100 MOUNT ASSEMBLY Balancing The Telescope in R.A. To eliminate undue stress on the mount, the telescope should be properly balanced around the polar axis. Proper balancing is crucial for accurate tracking. To balance the mount: 1. Verify that the telescope securing knob on the telescope mounting platform is tight. 2.
- Page 13 iEXOS 100 MOUNT ASSEMBLY Backlash in R.A. or DEC gear. Backlash in the R.A or DEC gear is caused by two things. First, the meshing of the worm to worm gear and second, if there is play of the worm between the two worm bearing blocks. To take out the two causes of backlash, first remove the cover over the motor.
-
Page 14: Connect The Pmc-Eight
CONNECT THE PMC-EIGHT™ Connecting The PMC-Eight System Once the telescope is balanced, it is time to connect the PMC-Eight system. DEC Port (DB9) Mini-USB Port Reset Button 12V DC in LED Lights Indicator DEC Port (RJ25) Auto-Guider Port ST4 (RJ12) To Connect The PMC-Eight System: 1. - Page 15 Wireless Operation. You will have to use the ExploreStars PMC-Eight ASCOM Driver if you want to use the Mini-USB Port. Explore Scientific PMC-Eight® Application Note PMC8-AN003: Switching Between the WiFi Interface and the Serial Interface on the iEXOS 100 Mount Controller for more information.
-
Page 16: Polar Alignment Process
POLAR ALIGNMENT PROCESS 5. Polar VF Cap 1. Dec. Lock 4. R.A. Lock 2. Latitude Adjustment Handle 3. Latitude Dial Fig. 1a Setting the Polar Home Position NOTE: The following procedure will help you initially set up your mount to get it close to the proper alignment with the North Celestial Pole (NCP). - Page 17 POLAR ALIGNMENT PROCESS Finding the Polar Star (for Northern Hemisphere only) Star hopping is a technique used by amateur astronomers to navigate the night sky. By using easily recognizable constellations and asterisms as a guide, an observer can locate stars and other objects. Polaris, which is commonly referred to as The North Star, can be located quickly using star hopping.
-
Page 18: Explorestars App
EXPLORESTARS APP Welcome to ExploreStars! Designed specifically for the PMC-Eight, the intuitive ExploreStars app will streamline your observing experience by making it easy to align your equipment, navigate the stars and learn specifics about tens of thousands of celestial objects. It also leaves room for manual operation. Installing The ExploreStars APP The free ExploreStars application can be downloaded for Microsoft Windows, Apple iOS or Android devices. - Page 19 EXPLORESTARS APP 4. Once you have centered the selected star in the eyepiece, press or click on the “Sync” button which is located under the number 7. 5. After you have synced to this star, the display will show you the next available star and you can begin the same process with the second star.
- Page 20 “compass” image on the left side of the home screen. Press the Explore Scientific logo in the center of the compass and drag it in the direction that you would like the telescope to move, this acts like a virtual joystick controller. As you move the dot, a number will appear in the middle that shows the speed at which you are moving the mount.
-
Page 21: Ascom
System ™ Although Explore Scientific has developed its own app — ExploreStars — to operate the PMC-Eight, we recognize that the astronomy community is a diverse one. That is why we also offer the PMC-Eight ASCOM driver so users may employ the ASCOM-powered planetarium software of their choosing to run the PMC-Eight either wirelessly or through a wired connection. - Page 22 7. Using the menu on the upper left corner of the page, select Telescope/Mount Driver Downloads 8. Scroll down the Telescope/Mount Driver page and locate the Explore Scientific PMC-Eight Section. Press the Visit Site button to go to the Explore Scientific PMC-Eight webpage.
- Page 23 Connecting to device Name Explore Scientific PMC-Eight ASCOM Driver Description ES_PMC8 Telescope DriverInfo Explore Scientific PMC-Eight Mount Controller ASCOM Driver. Developed by GRHubbell. Contact Explore Scientific at www.explorescientificusa.com . Version: 6.0 DriverVersion InterfaceVersion RA, Dec 22:13:05.927 90:00:00.000 Latitude, Longitude 36:10:50.268 -94:11:18.168...
-
Page 24: Programmers
PROGRAMMERS / SHARE THE SKY Join the OpenGOTO community! One of the most revolutionary aspects of the PMC-Eight OpenGOTO system is undoubtedly its open source software. With our precision motion control system, you can create a unique observing experience and find your own inspiration in motion. The PMC-Eight was specifically designed to allow you to create your own vision about how to use the system. -
Page 25: Service
Telephone*: +44 1342 837 098 Teléfono*: +34 91 67972 69 Bresser UK Ltd Bresser Iberia SLU Customer Service Explore Scientific Servicio al Cliente Explore Scientific Unit 1 starborough Farm, c/Valdemorillo,1 Nave B Starborough Road, Nr Marsh Green, P.I. Ventorro del cano Edenbridge, Kent TN8 5RB 28925 Alcorcón Madrid... -
Page 26: Proper Care
PROPER CARE Proper Care The iEXOS 100 is a precision system and keeping all parts free of dust and dirt is crucial for optimal performance. After each use, wipe all parts of the mount down with a clean cloth. DO NOT expose the motor system or any parts to water or other liquids. - Page 27 PROPER CARE BATTERY WARNING: – Battery guidelines: This device contains electronic components that are powered by batteries. Batteries should be kept out of children’s reach. When inserting batteries, please ensure the polarity is correct. Insert the batteries according to the displayed +/- information. Never mix old and new batteries.
- Page 28 Wil Tirion Map Design: ©2019 Explore Scientific GmbH. All model names and logos are registered trademarks.
Need help?
Do you have a question about the PMC-Eight iEXOS 100 and is the answer not in the manual?
Questions and answers