Table of Contents
Advertisement
Available languages
Available languages
Quick Links
Better Back
TM
Better Back
MC
Assembly & Use Instructions
Assembly & Use Instructions
Instructions d'assemblage et d'utilisation
FULL
1
YEAR
COMPLÈTE
1
ANS
To download and print Teeter's
EN
FR
Better Back
Vibration Cushion
™
instructions, visit the product
support page at teeter.com.
Pour télécharger et imprimer
instructions Better Back
vibrant, visitez la page d'assistance
des produits au teeter.com
Vibration Cushion with Neck Arch Support
Coussin vibrant avec support cervical
I created Teeter so people could
live healthier, more active lives.
J'ai créé Teeter pour que les gens puissent
mener une vie plus saine et plus active.
Coussin
MC
-Roger Teeter
For Use with Teeter
Inversion Table
Conçu pour les tables
d'inversion Teeter
* Specifications may vary from this image and are subject to change without
notice. For use with Teeter Inversion Tables. Contents of package include
* Les spécifications peuvent différer de celles de la présente image et peuvent
changer sans préavis. Conçu pour les tables d'inversion Teeter.
L'emballage contient uniquement le coussin vibrant et les composants.
Founder & Innovator
Fondateur et innovateur
Vibration Cushion and components only.
Advertisement
Table of Contents

Related Manuals for Teeter Better Back EP1350


Summary of Contents for Teeter Better Back EP1350
- Page 1 COMPLÈTE * Specifications may vary from this image and are subject to change without notice. For use with Teeter Inversion Tables. Contents of package include Vibration Cushion and components only. * Les spécifications peuvent différer de celles de la présente image et peuvent changer sans préavis.
-
Page 2: Table Of Contents
Congratulations on your purchase of a Teeter Better Back™ Vibration Cushion! This product has been engineered with 10 powerful vibration motors and light-heat technology in the neck arch support to provide you the ultimate in relaxation and stress relief while inverted on your Teeter. -
Page 3: Important Safety Instructions
• ALWAYS read, understand, and follow the instructions and warnings associated with and accompanying any supplementary equipment, such as the Teeter Inversion Table. Use on the inversion table will affect the balance, causing the table to rotate faster. Adjust your user settings per the Inversion Table Owner’s Manual. -
Page 4: Items For Assembly
Items for Assembly Items not shown to scale. ITEM NO. ITEM NAME EP1350 Better Back Vibration Cushion ™ F51140 Neck Arch Support F51144 Controller F51145 AC Adapter F51143 Controller Pouch Better Back Vibration Cushion Controller ™ with 10 vibrating motors (F51144) (EP1350) Head... -
Page 5: Safety Warning Label & Product Specifications
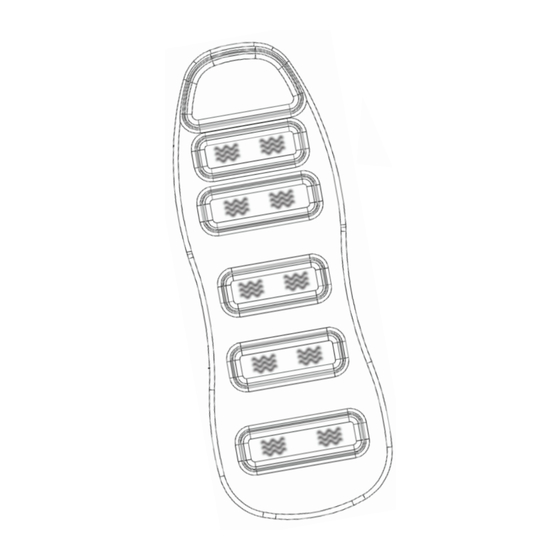
This drawing indicates the locations of the warning labels found on your product. If a label is missing, illegible or is removed, contact Teeter Customer Service to request a complimentary replacement label. Note: Image and labels below not shown at actual size. -
Page 6: Assembly Instructions
STEP 1 Attach Vibration Cushion to Table Bed • Pull apart the Velcro on all of the straps on the Vibration Cushion. FIGURE 1 • Lay the Vibration Cushion on top of the inversion table bed with the Head Support located at the top end of the table bed. Ensure the electrical cords are located on the left as you stand facing the unit and that they are free from the underside of the Vibration Cushion. - Page 7 STEP 2 Attach Neck Arch to Vibration Cushion • Position the Neck Arch Support on top of the Vibration Cushion so that FIGURE 4 the rounded arch is at the top of the table bed. Stretch the two elastic straps around the table bed and secure together with the Velcro Strips (Figure 4).
-
Page 8: Attach Controller
STEP 3 Attach Controller • Attach the Controller Pouch to the A-frame of the inversion table by FIGURE 7 securing the Velcro straps around the rear leg above and below the spreader arm (Figure 7). • Connect the Controller cord to the Controller and place the Controller in the pouch (Figure 8). - Page 9 STEP 4 Connect Adapter • Secure the controller cord and electrical cord from the Vibration FIGURE 9 Cushion to the rear leg of the A-frame using the Velcro strap provided (Figure 9). • Run the electrical cord through the secured Velcro straps of the Controller Pouch –...
-
Page 10: Use, Storage & Maintenance Instructions
ALWAYS read, understand, and follow the instructions and warnings associated with and accompanying any supplementary equipment, such as the Teeter Inversion Table. Use on the inversion table will affect the balance, causing the table to rotate faster. Adjust your user settings per the Inversion Table Owner’s Manual. -
Page 11: Warranty Terms & Registration
Under no circumstances shall Teeter, or any other party involved in the sale of this product, have any liability for incidental or consequential damage arising from breach of an express or implied warranty on any Teeter product. -
Page 13: Instructions De Sécurité Importantes
• TOUJOURS lire, comprendre et respecter les instructions et les avertissements fournis avec les produits complémentaires, comme la table d’inversion Teeter. L’utilisation du coussin modifiera l’équilibre de la table, ce qui la fera pivoter plus rapidement; il faudra donc ajuster les réglages de la table selon les instructions de son manuel d’utilisation. -
Page 14: Éléments De Montage
Éléments de montage Les éléments ne sont pas représentés à l’échelle. NUMÉRO DE NOM DE L’ARTICLE L’ARTICLE. EP1350 Coussin vibrant Better Back F51140 Support cervical F51144 Télécommande F51145 Adaptateur c.a. F51143 Télécommande de rangement Coussin vibrant Better Back Télécommande doté de dix moteurs de vibration (F51144) (EP1350) Appui... -
Page 15: Étiquettes D'avertissement De Sécurité Et Spécifications De Produit
Ce dessin signale la position des étiquettes d’avertissement situées sur votre produit. IS’il manque une étiquette, si elle est illisible ou a été retirée, veuillez contacter le service à la clientèle Teeter par téléphone ou via le site internet indiqué au bas de cette page pour solliciter une étiquette de remplacement gratuite. -
Page 16: Étapes Du Montage
ÉTAPE 1 Installation du coussin vibrant sur le dossier de la table • Détacher toutes les bandes autoagrippantes du coussin vibrant. FIGURE 1 • Placer le coussin vibrant sur le dossier de la table d’inversion en veillant à ce que le support pour la tête soit dans le haut du dossier. Vérifier que les cordons d’alimentation sont situés sur la gauche lorsque l’on fait face à... -
Page 17: Figure
ÉTAPE 2 Installation du support cervical sur le coussin vibrant • Placer le support cervical sur le coussin vibrant de manière à ce que FIGURE 4 la partie arrondie soit dans le haut du dossier de la table. Introduire le dossier dans les deux courroies élastiques, puis fixer celles-ci ensemble à... -
Page 18: Figure
ÉTAPE 3 Installation de la télécommande • Installer l’étui de la télécommande sur le cadre en A de la table FIGURE 7 d’inversion en fixant les bandes autoagrippantes autour du pied arrière, en dessus et en dessous du bras d’écartement (figure 7). •... -
Page 19: Figure
ÉTAPE 4 Branchement de l’adaptateur • Fixer le cordon d’alimentation et le cordon de la télécommande au pied FIGURE 9 arrière du cadre en A l’aide des bandes autoagrippantes prévues à cet effet (figure 9). • Faire passer le cordon d’alimentation du coussin vibrant sous les bandes autoagrippantes de l’étui de la télécommande (figure 10) pour le maintenir à... -
Page 20: Instructions D'utilisation, D'entretien Et D'entreposage
TOUJOURS lire, comprendre et respecter les instructions et les avertissements fournis avec les produits complémentaires, comme la table d’inversion Teeter. L’utilisation du coussin modifiera l’équilibre de la table, ce qui la fera pivoter plus rapidement; il faudra donc ajuster les réglages de la table selon les instructions de son manuel d’utilisation. -
Page 21: Conditions De Garantie & Enregistrement
à cette garantie, son interprétation, ou de toute violation alléguée de celle-ci, qui ne peut être réglé à l’amiable entre Teeter et le propriétaire dans les soixante (60) jours après notification écrite par la partie lésée à... - Page 24 © COPYRIGHT 2018 Teeter. International Law Prohibits Any Copying. Brevets pour les É.-U. et l’étranger en cours. Teeter et le logo Teeter sont des marques déposées de Teeter. Caractéristiques sujettes à modifications sans préavis. © COPYRIGHT 2018 Teeter. Le droit international interdit toute copie. EP1740EF 0618-4...
Need help?
Do you have a question about the Better Back EP1350 and is the answer not in the manual?
Questions and answers