Table of Contents
Advertisement
Advertisement
Chapters
Table of Contents

Related Manuals for Bellingham + Stanley Ltd. RFM300-T Series


Summary of Contents for Bellingham + Stanley Ltd. RFM300-T Series
- Page 1 USER GUIDE 19-461’02 REV D RFM300-T Series Refractometer...
- Page 2 RFM300-T User Guide (EN) Code 19-461 Issue Revision Date September 2017 Bellingham + Stanley, a Xylem brand, has been manufacturing high quality optical instruments in the UK for over 100 years and is a leading manufacturer of refractometers and polarimeters. Our current range of products includes optical and digital hand refractometers as well as a full range of laboratory refractometers and polarimeters available through a network of trained distributors throughout the world.
-
Page 3: Table Of Contents
Contents Section 1: Installation ................3 Instrument overview ..............4 Menu flow chart ................5 Unpacking ..................7 Positioning the system ..............8 Mains connection ................. 8 Section 2: Instrument operation ............9 Basic operation ................11 Setup Wizard ................13 Measurement Display .............. - Page 4 Longfield Road, Tunbridge Wells, Kent TN2 3EY United Kingdom declares that the product Product Name RFM300-T Series Refractometer Model Number Is designed to conform to the following Product Specifications: Safety: BS EN 60950-1:2002 Applied and met EMC test standards: Emissions EN 61326-1:2013 •...
-
Page 5: Section 1: Installation
Section 1: Installation Instrument overview ................4 Menu flow chart ..................5 Unpacking ....................7 Contents list .................. 7 Positioning the system ................8 Mains connection ..................8 Power requirements ..............8 Warning ..................8 RFM300-T Page 3 19-461’02 Rev. D September 2017... -
Page 6: Instrument Overview
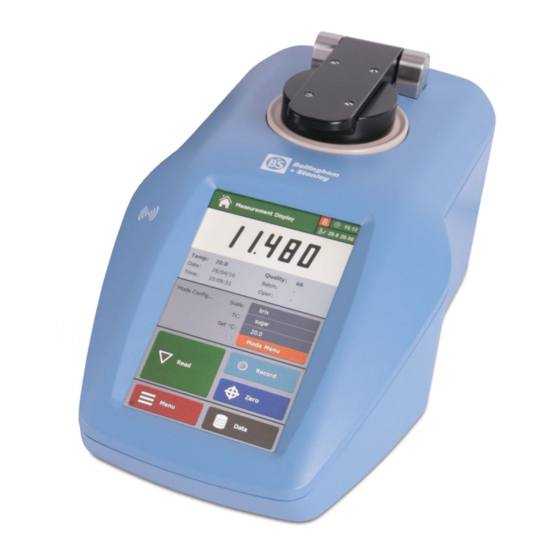
Instrument overview The RFM300-T Series Refractometer is a self-contained easy to use instrument suitable for measuring the refractive index of samples in demanding factory environments as well as for use as a primary quality control tool. The instrument is housed in a case which is light in weight whilst being extremely rugged. -
Page 7: Menu Flow Chart
Menu flow chart 1. Zero 1. Saved Results 2. Span (Top Calibration) 2. System Log 3. Undo 3. Copy PDFs to USB 4. Report 4. Move PDFs to USB 5. Export logs to CSV 1. Calibration 2. Data 1. Use Methods 3. - Page 8 Page 6 RFM300-T 19-461’02 Rev. D September 2017...
-
Page 9: Unpacking
Check that all parts listed below are present and that no transit damage has occurred. If any are damaged or missing, contact the supplier immediately. Contents list Quantity Item Code RFM300-T Series Refractometer See below Mains lead See below Power supply 55-105 Quick Start Guides... -
Page 10: Positioning The System
Positioning the system Place the instrument on a flat and stable bench that is: • Dry and indoors. • Capable of holding the instrument’s weight. • Away from draughty or hot equipment like fans or heaters. • Out of direct sunlight or strong ambient light. •... -
Page 11: Section 2: Instrument Operation
Section 2: Instrument operation Basic operation ..................11 Switching on and off ..............11 Manoeuvring through menus ............. 11 Setup Wizard ..................13 Measurement Display ................14 Title Bar ..................15 Reading display and data ............17 Reading configuration ..............18 Action Buttons ................ - Page 12 Remember text ................32 Statistics print mode ..............33 Data Menu ....................35 The Reading Log ................ 35 The System Log ................. 36 Downloading Logs ..............36 Downloading PDFs ..............36 PDF and FTP ................37 Page 10 RFM300-T 19-461’02 Rev. D September 2017...
-
Page 13: Basic Operation
Manoeuvring through menus The RFM300-T Series Refractometer features a capacitive, high- resolution touchscreen display. On-screen buttons can be easily used by simply touching the display. A compatible stylus can also be used, as supplied with the instrument. - Page 14 Many buttons feature a quick select option, indicated by the two arrows on the right of the button. Simply touch either arrow to cycle through the possible settings. When in a menu, the Quit and Home buttons become available. Press the Quit Button to return to the previous menu. Any changes made will be saved.
-
Page 15: Setup Wizard
Setup Wizard When switching on for the first time, after the instrument has completed its startup procedures, the Setup Wizard will appear. First select the desired language. A list of different options will then appear. • Copy user guides and PC software to USB: Makes copies of all user guides and PC software compatible with the instrument to a removable USB storage device. -
Page 16: Measurement Display
Measurement Display From the Measurement Display readings can be taken, viewed and saved. Quick access to all the frequently used features of the instrument is also available. Title bar Reading display and data Reading configuration Action buttons Menu buttons Page 14 RFM300-T 19-461’02 Rev. -
Page 17: Title Bar
Title Bar The title bar contains several elements that will be displayed on every screen. 1. Title: Current location within the instrument’s menu structure. The colour of the title bar will change depending on the current operation. Red: In the Main Menu structure. This indicates that changes will be made to the instrument’s settings. - Page 18 4. Temperature control status: Displays the stability status, prism set temperature and current prism temperature. The colour and status symbol will change depending on the set-point temperature and the measured temperature. • Temperature stable The tick indicates that the measured prism temperature (second value) is stable to within ±0.05°C of the set-point temperature (first value).
-
Page 19: Reading Display And Data
Reading display and data 1. Reading result: After taking a reading, the final result will be displayed here. The result will be displayed in the units set in the Mode/Method, shown in the reading configuration section of the Measurement Display. Warning and alert messages will also appear here. -
Page 20: Reading Configuration
Reading configuration 1. Reading Configuration Panel: Displays the measurement settings for the currently displayed reading or, if a result is not currently displayed, the settings to be used for the next reading. It also allows for quick changes to the Basic reading settings, see Using the Reading Configuration Panel, Page 21. -
Page 21: Menu Buttons
2. Record button: If a result has yet to be printed or saved and a printer is set, the record icon will appear grey. Pushing the button will record the result to the Reading Log (Page 35) or printer depending on the print settings, see Page 30. -
Page 22: Measurement Settings
Measurement settings The measurement settings affect how a reading is collected and presented. If different sets of measurement settings are required then Methods can be enabled. For simplicity, the instrument is supplied in Mode operation. Changing settings To change measurement settings press the orange Mode button. The Mode Configuration is divided into two screens with Basic and Advanced settings. -
Page 23: Using The Reading Configuration Panel
Using the Reading Configuration Panel Basic settings can be changed with the Reading Configuration Panel. To change a setting, touch and hold the panel and an arrow will appear next to the selected item. If the wrong item is selected, the user can slide their finger up or down until the required item is highlighted. -
Page 24: Set Temp (Temperature Control Set-Point)
Set Temp (temperature control set-point) The temperature control system in the instrument can be set over a wide range of temperatures. In many situations, it is likely that all samples will be measured at the same temperature, e.g. 20°C for a bottling plant or 70°C for a preserves factory. - Page 25 Repeatability will take readings continuously until a number of readings are below a specified range. The range can be set on the reading value, temperature or Quality. Example: A set of consecutive readings is shown below. The displayed result will vary depending on the set repeatability condition. Reading no.
-
Page 26: Limits
Limits Limits notify users if readings have fallen outside set criteria. If the measured values fall outside the set Limit the Reading Display will turn red and a line will be drawn through the result. If the measured values are within the set Limits the Reading Display will turn green. -
Page 27: Resolution
Resolution The instrument has settings for both temperature and reading resolution. The temperature can be shown to 1 (low) or 2 (high) decimal places. Each measurement scale has a number of decimal places assigned to it that is appropriate for that scale. Changing the resolution adjusts the scale’s assigned decimal places, i.e. -
Page 28: Using Methods
Using Methods A Method is a named set of measurement settings. They include all the settings necessary for the instrument to take and check a particular sample. If the complete range of product types that is to be measured with the refractometer requires the same measurement settings then using the Mode Menu is most suitable. -
Page 29: Calibration And Reading
Calibration and Reading Allow the instrument to stabilise for at least 30 minutes after switching on before taking accurate readings. Zeroing the instrument The instrument should be Zeroed regularly to ensure accurate readings. Any sample can be used to set Zero but typically distilled water is used. To Zero the instrument press the Zero button on the Measurement Display or access Zero via the Calibration Menu in the Main Menu. -
Page 30: Auto Zero
Auto Zero When the instrument is turned on or the set-point temperature is changed a Zero calibration will be requested by the instrument. This is to ensure that readings are as accurate as possible. Whilst the temperature stabilises the Reading Result section of the screen will display a warning message. -
Page 31: Span Calibration
Lower the presser, if auto-single or continuous reading recurrence (see Page 51) are active readings will be initiated, otherwise press the Read button. The instrument will display a progress bar dependant on the stability criteria set (see Page 22) whilst the required measurements are taken. The reading will then be displayed using the scales and temperature compensations specified in the Mode Menu or current Method as shown on the Reading Configuration Panel. -
Page 32: Saving Results
Saving results To access the Recording Menu to set up printing and saving, press Menu then select: • 3. Setup • 5. Recording Alternatively hold down the Record button on the Measurement Display for several seconds. Set the print mode The print mode (option 1) has several different settings: Mode Function... -
Page 33: Print Formats
Print formats There are a number of different print formats. Several different printer types are available from Bellingham + Stanley, see the Accessories section. The print format is set in option 2 of the Recording Menu. Printer Description Result will not be sent to a printer, this format can be used if only CSV results are required. -
Page 34: Batch Codes
Batch codes The instrument can request batch codes in the following formats: Setting Description The instrument will not request a batch code. number Number from 0 to 32000. text 14 character alpha-numeric string. The date followed by an auto increasing number from 0 to 9999, in the format of: yymmddnnnn dateinc... -
Page 35: Statistics Print Mode
Statistics print mode If the print mode (see Page 30) is set to statistics, a group of up to 10 readings can be temporarily logged together and a statistical analysis carried out upon the results. To perform a statistical reading set, prepare and read a sample as normal. - Page 36 • 5. Info button: Displays a list of the individual readings • 6. Read button: Stores the current statistics in memory and initiates the next reading. After more readings are taken any that are recorded will be included in the statistical analysis. 7.
-
Page 37: Data Menu
Data Menu The instrument has two separate logs for storing data. This data will be held in the instrument whether the power is on or off and can be downloaded to a computer using the PC Data Acquisition Program, downloadable from the instrument or available for free at the Bellingham + Stanley website, or using a USB removable storage device. -
Page 38: The System Log
The System Log The System Log maintains a record of all changes and adjustments made to the instrument by its users. This will include each Zero and Span calibration, changes to the setup, configuration and Methods. The System Log functions in the same way as the Reading Log however instead of filtering by date the filter is based on the event type. -
Page 39: Pdf And Ftp
PDF and FTP If a large number of PDFs have built up in the instrument, transfer via USB could take several minutes. In this case it may be preferable to transfer PDFs from the instrument via FTP. Additionally, the PDFs can be viewed whilst still in the instrument using FTP. -
Page 40: Section 3: Instrument Setup
Section 3: Instrument Setup Methods ....................39 Hide preset ................. 39 Selection type ................40 Print List ..................40 Adding a new Method ..............41 Editing a Method ................ 41 User accessibility .................. 42 Security features ................ 42 Preset protection levels .............. 44 Users .................. -
Page 41: Methods
Methods A Method is a defined set of measurement settings. This allows for measurement settings to be quickly changed between frequently used configurations or for reading different products with specific test requirements. For example, if a range of different soft drinks is regularly measured a Method could be created for each with the display set to show whether each product is within its set tolerance using the limits system. -
Page 42: Selection Type
Selection type Before reading a sample, the relevant Method should be selected by pressing the Method button on the Measurement Display. Holding down the Method button for several seconds will enable editing of the currently displayed Method, a login from a user with Setup rights will be required if PINs are active. -
Page 43: Adding A New Method
Adding a new Method With Methods switched on, pressing Quit from the Method Settings menu will show a list of current Methods. This list will be shown first when re-entering Methods at a later time. To add a new Method, press the Add new... button. Enter the Method name, this could be a common name, such as mint oil or orange oil, a trade name or a product reference code. -
Page 44: User Accessibility
User accessibility RFID tags offer rapid user clearance, see Page 49. Access to the instrument’s functions and Menus can be restricted, with the sophistication of the protection set to match the operating environment. There are a range of security features that can be activated to preset levels for convenience or customised to user preference. - Page 45 • Keep Logged In (0 (off) to 300 seconds) This option specifies how long a user is kept logged in for whilst idle before automatically being logged out. If set to 0, a user will be logged out on returning to the Measurement Display. Leaving the instrument logged in can lead to security issues as unauthorised use of the instrument could occur.
-
Page 46: Preset Protection Levels
If the user entered their login details correctly a new PIN will be requested. The new PIN must be input twice to ensure no errors are made. After the PIN has changed, the instrument will continue to whatever was requested that required a login to access. Preset protection levels The preset protection levels use the following configurations of the above security features. - Page 47 • Medium This preset improves security by requiring the user to enter their username and then their PIN. This preset does not have features enabled that could increase administration overheads. Security feature Setting User Selection User and PIN PIN length Keep Logged In 30 secs Maximum PIN Age...
-
Page 48: Users
Users After setting the security level as required users can then be added. The current users are shown in the Users menu. There are three default users in the instrument. These users can only have their PINs changed or ID tags paired (see Page 49). Their set rights cannot be altered and have the following settings by default: Username administrator... -
Page 49: Adding A User
The different user rights give access to the following: Right User access If using the Mode Menu, users will be able to change the measurement settings. If Methods are active, Mode / Method users will be able to change Method but Method measurement settings cannot be changed. -
Page 50: Logging In/Out
Logging in/out If “user and PIN” is active, when a user tries to access a Menu, for example, the instrument will first request their username. If “remember last user” is active there may already be a username in the text box. After confirming username entry or if user selection is set to “PIN only”, the PIN entry screen will appear. -
Page 51: Rfid Tags
To log a user out simply touch anywhere on the title bar, the security icon will then turn orange and a logged out message will appear briefly. Logging out can also be performed by swiping an RFID tag. RFID Tags RFID (radio frequency identification) tags are used to wirelessly identify a user. -
Page 52: Fda Regulation 21 Cfr Part 11
RFID tags can only be read when the instrument is showing the Measurement Display, when a PIN or username is requested, or when specifically prompted by the instrument. A flashing RFID icon will be shown on screen when tags can be scanned. To log in, simply swipe the RFID tag over the reader when required. -
Page 53: Reading Setup
Reading setup In addition to the measurement settings there are several other factors that can affect how readings are taken. To access the Reading menu, press Menu, then select: • 3. Setup • 4. Reading Or hold the Read button on the Measurement Display for several seconds. -
Page 54: Application Correction
Application correction • Offset The instrument has the ability to apply a simple offset and scaling factor to results from each individual Method. This can be used, for example, to adjust the refractometer to give values equivalent to a reading taken on a density meter. -
Page 55: Adding Extra Scales
Reset will return the offset and scaler to the default values (0 and 1 respectively). With an offset correction applied, all readings taken with that Method will be displayed with an identifier on the Measurement Display. • Citric acid Acid correction allows for automatic correction of the effects of citric acid on readings. -
Page 56: Adding A Library Scale
Adding a library scale Press the Add new… button in the Scales List screen, then press From Library. The following scales can then be installed. Library Scale Title Scale name number Zeiss zeiss Oechsle (German) oechsle (de) Butyro butyro 42% Fructose 42% fructose 55% Fructose 55% fructose... -
Page 57: Adding A Custom Scale
Adding a custom scale As well as the library scales, readings can be converted to any custom units. To set up a custom scale, press Add new... on the Scales list then select From Data. First, enter a unique name for the scale. Up to 16 characters can be used. -
Page 58: Adding A Custom Temperature Compensation
An Offset value is available in the Constants screen, this can be set to 0 although greater accuracy can be achieved when calculating a polynomial for a range starting at water by using an Offset of –1.33. Set the resolution to have the number of decimal places suitable for the accuracy required of the scale. - Page 59 folder and placing compatible files within, it is possible to import files saved or created by other means • Network It is possible to import scales and temperature compensations to the instrument via a network. Connect to the instrument via FTP (see Page 37), create a folder called “Scales”...
-
Page 60: Communications
Communications The instrument can save and print results in a number of different formats, see Page 30. Serial and USB printers available from Bellingham + Stanley will work on a plug and play basis, see the Accessories section at the rear of this User Guide. However, to print to a network printer its IP address will be required. -
Page 61: Port Settings
When CSV (Lims) mode is active, a CSV result is sent every time the Record button is pressed on the Measurement Display. This allows a result to be recorded as a CSV and by any selected printer simultaneously. Results in the Reading Log are also stored in CSV form and can be downloaded separately, see Page 36. -
Page 62: System Settings
System settings To make changes to the system settings press Menu, then select: • 3. Setup • 6. System Language There are several language options available in the instrument by default. Select the required language and press Yes to confirm the change. If the language you require is not available, contact Bellingham + Stanley and we will do our best to accommodate your needs. -
Page 63: Temperature Control
• Set Clock… Enter the time and date in the format displayed on screen, as specified in Date format. Use the arrow buttons to change the cursor position. Press ok when the clock is set to the correct time and date. Temperature control Under certain conditions it may be useful to disable the prism temperature control or disable the presser. - Page 64 Select the instrument, by serial number, which has the settings required for the current instrument. A list of date and time stamped backups will then appear. Select the backup with the required settings. A backup of the current settings will be made in case the Clone needs to be undone, this will be labelled as an “autobackup”.
-
Page 65: Section 4: System Maintenance
Section 4: System maintenance Maintenance Menu ................64 Maintenance Report ..............64 Filter change ................65 Backup ..................66 Clean screen ................66 Software update ................. 66 Information and Help ................67 Setting default values ................67 RFM300-T Page 63 19-461’02 Rev. -
Page 66: Maintenance Menu
Maintenance Menu There are several options to help keep the instrument in good working order. To access the Maintenance Menu select option 4 in the Main Menu. Maintenance Report It is recommended that the instrument is regularly serviced by Bellingham + Stanley trained personnel. -
Page 67: Filter Change
Filter change The instrument is fitted with a replaceable filter on the cooling air inlet vent which will prevent airborne dust or grease entering the ducting and clogging the fans. Filters should be removed and replaced at regular intervals. The instrument must not be operated with blocked filters or without the filters in place. -
Page 68: Backup
Backup The Backup option creates a copy of all the settings changed in the instrument. Using Clone (see Page 61) these changes can be reloaded at a later date to undo accidental changes or deletions. Alternatively, the settings can be Cloned to another instrument. This is useful if multiple RFM300-Ts are available for use. -
Page 69: Information And Help
Information and Help From the Main Menu the Help Menu can be accessed (option 5). From here information regarding the instrument’s software, hardware and network configuration can be seen and printed. This is useful to have available when contacting Bellingham + Stanley for assistance and can be printed to the selected printer. - Page 70 Press Restore to load a backup stored on a USB removable storage device. The instrument will request a USB device is inserted then the Clone procedure can be carried out (Page 61). Press Default to return various settings to their factory configuration. Default should be performed as a last resort as all customisation can be lost.
- Page 71 The instrument will ask the user to confirm their choice. Pressing Yes will carry out the default. RFM300-T Page 69 19-461’02 Rev. D September 2017...
-
Page 72: Section 5: Specification
Section 5: Specification Specification ..................71 Performance ................71 Temperature ................71 Temperature compensation ............71 Prism ..................71 Prism plate ................. 71 Communication ports ..............72 Physical ..................72 Power requirements ..............72 Page 70 RFM300-T 19-461’02 Rev. D September 2017... -
Page 73: Specification
Specification Performance Model RFM330-T RFM340-T Refractive index Measurement Range 1.32 to 1.58 1.32 to 1.38115 1.38115 to 1.58 Display resolution 0.0001 0.0001 / 0.00001 / 0.000001 Accuracy (±) 0.0001 0.00002 0.00004 Precision (±) 0.00005 0.000005 Brix Measurement Range 0 to 100 0 to 30 30 to 100 Display resolution... - Page 74 Communication ports Type A x3 Type B x1 Ethernet 10/100Mbps RS232 Baud rate: 4800, 9600, 19200, 38400 Word Length: 7 bit even parity, 8 bit no parity Default values underlined Physical Length (refractometer module only) 340 mm Width (refractometer module only) 200 mm Height (refractometer module only) 170 mm...
-
Page 75: Section 6: Accessories And Contact
Section 6: Accessories and Contact Accessories ................... 74 Calibration fluids ................. 74 AG Fluids ..................74 Calibration Oils ................74 Printers ..................75 Cables ..................75 Other accessories ..............75 Spares ..................75 Power supplies ................75 Sample contact presser insert ............ 76 Contact .................... -
Page 76: Accessories
Accessories Calibration fluids Bellingham + Stanley, a UKAS accredited calibration laboratory number 0834, offer a number of different calibration materials for verifying and calibrating refractometers, traceable to NIST and ICUMSA. The standards are made to the highest quality and are supplied with certificates in either single or multi-pack formats. -
Page 77: Printers
Printers Code Dot matrix impact printer serial: Euro version 230V 55-14 Dot matrix impact printer serial: UK version 230V 55-15 Dot matrix impact printer serial: US version 110V 55-16 USB Printer – Thermal: 110-240V 55-18 Cables Code Computer (9way D type) 54-07 LAN cable –... -
Page 78: Sample Contact Presser Insert
• Waterproof (IP65) Power Supply - Code 55-250 A Waterproof Power Supply can be used in place of the standard Bellingham + Stanley non-sealed unit if it is to be operated in a wet or humid environment. Specification: Ambient Temperature 5 to 40°C Physical L x W x H... -
Page 79: Contact
Contact For product support, please contact your local supplier or contact us via our regional offices below: UK / International United States of America sales.bs.uk@xyleminc.com sales.bs.us@xyleminc.com Bellingham + Stanley Ltd. Bellingham + Stanley Longfield Road 90 Horizon Drive Tunbridge Wells Suwanee Kent TN2 3EY GA 30024...
Need help?
Do you have a question about the RFM300-T Series and is the answer not in the manual?
Questions and answers