Advertisement
USER MANUAL (ENGLISH)
TABLE OF CONTENTS
1 . . . . . . . . . . . . . . . . . . . . . . . . Table of contents
s)
1 . . . . . . . . . . . . . . . . . . . . . . . . System requirements (Window
2 . . . . . . . . . . . . . . . . . . . . . . . . T
9 . . . . . . . . . . . . . . . . . . . . . . . .
SYSTEM REQUIREMENTS (Windows)
Windows XP (Service Pack 2 or later) or Vista
3.2GHz Pentium 4 or faster
Minimum 1GB of system RAM
1
Advertisement
Table of Contents

Subscribe to Our Youtube Channel
Summary of Contents for YUNEEC CGO1
-
Page 1: Table Of Contents
10 ..... . . CGO1 smartphone FPV app 11 ..... . . Using ST24 to control CGO1 12 . -
Page 2: System Requirements (Mac)
SYSTEM REQUIREMENTS (Mac) Mac OS® X 10.4.11 or later 2.0GHz Intel Core Duo or faster Minimum 1GB of systemt RAM TECHNICAL SPECIFICATIONS Dimensions LxWxH (with lens): 64.10x44.60x43.80mm Weight: Battery: 1050mAh 1-Cell 3.7V Li-Po Working Voltage: 3.7-4.2V Operating Time Per Charge: 60min –... -
Page 3: Introduction
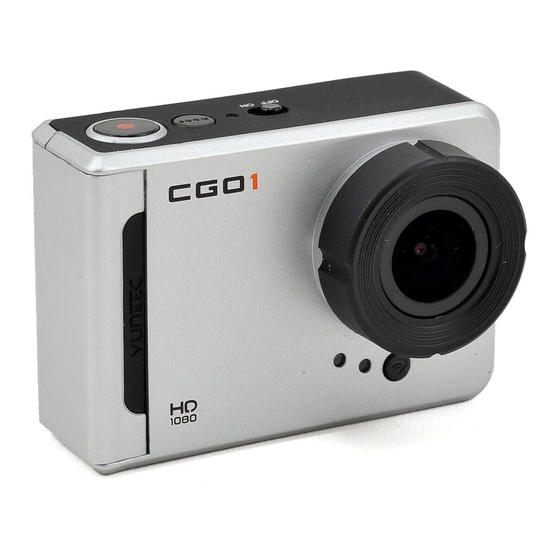
Yuneec for small UAVs. The compact and light- range and low-latency digital Wi-Fi video link, providing users CGO1 can be remotely controlled by Yuneec FREE iOS and Android smart phone applications without the use of extra components. When paired with Yuneec Personal Ground Stations - ST24 / ST15, CGO1’s video downlink performance... - Page 4 Video/Photo Indicator Light (Red; Solid for video mode, Flashing for photo mode) Wi-Fi Indicator Light (Blue; On for Wi-Fi Inactive Wi-Fi ON/OFF Button Wi-Fi Antenna Socket 3mm Mounting Hole Microphone Micro-B USB Port (Supports PC connection and battery charging)
-
Page 5: Getting Started
Battery Mushroom shaped WiFi Antenna GETTING STARTED 1. Remove camera door by applying light pressure on the ‘Yuneec’ logo. 2. Insert a MicroSD card into the card slot with the label facing forward toward the front of the camera. - Page 6 Step 2 Step1 3. Insert battery. 4. Replace camera door. 5. Charge battery. The included Li-Po battery comes partially charged. To charge, connect the included USB cable to the Micro-B USB port on camera and connect the other end of the cable to a suitable USB power source such as a computer.
-
Page 7: Default Camera Settings
DEFAULT CAMERA SETTINGS The CGO1 Camera powers on with following default settings: Video Resolution: 1080p 30fps Photo Resolution: 2MP (Megapixels) Wi-Fi: ON Video MODE: ON Photo MODE: OFF POWERING ON AND OFF To Power ON: Slide the Power Switch to the right toward the MODE Button. -
Page 8: Camera Modes
MicroSD Card Full or MicroSD Card Problem: Video/Photo CGO1 CAMERA MODES Video: Once you power on your CGO1, the camera defaults to Video Mode. The red Video/Photo Indicator Light will glow solid red. To Start Recording: Press and release the SHUTTER BUTTON. The red Video/Photo To Stop Recording: Press and release SHUTTER BUTTON. -
Page 9: Photo
Indicator Light will glow solid red, indicating CGO1 is no longer recording and is in Video Mode. Photo: In the Video Mode, press and release MODE BUTTON to enter indicating CGO1 is in Photo Mode. To Take a Photo: Press and release SHUTTER BUTTON. The Video/Photo Indicator Light will glow solid red for a moment. -
Page 10: Cgo1 Smartphone Fpv App
4. Double click ‘DCIM’ folder icon to view all Photo and Video On a Mac: 1. Connect the CGO1 to the Mac using the included USB cable. 2. Slide the power switch to the right toward the MODE button to switch on the CGO1. -
Page 11: Using St24 To Control Cgo1
IMPORTANT NOTE: remove the MicroSD card. Removing the MicroSD card prior Also your CGO1 to ensure your video is properly stored in the we recommend pressing and holding the SHUTTER Button for 2 seconds until the Video/Photo and Wi-Fi indicator lights... -
Page 12: Cgo1 Led Status
Press Landing Button > System Settings > FPV Quick Review IMPORTANT NOTE: your CGO1 to ensure your video is properly stored in the we recommend pressing and holding the SHUTTER Button for 2 seconds until the Video/Photo and Wi-Fi indicator lights... - Page 13 shes 3 times, red Video/Photo and then both are on (Record Mode, WiFi open). Video Mode: Red Video/Photo Indicator Light is on During Recording: Video/Photo Indicator Light Photo Mode: Video/Photo Indicator Light for 1.4s) Photo Taken: Video/Photo Indicator Light Charging: Both red Video/Photo Indicator Light and blue WiFI Indicator Light are on.
-
Page 14: Safety Warnings
SAFETY WARNINGS Please avoid directly touching the aluminum alloy back cover. When CGO1 is working with Wi-Fi on, the camera body may become hot to touch because of the high- performance nature of the product. CGO1’s aluminum alloy back cover is specially designed to help dissipate heat under normal operating conditions. - Page 15 collection points accept products for free. The separate collection and recycling of your product at the time of disposal will help conserve natural resources and ensure that it is recycled in a manner that protects human health and the environment. This device complies with Industry Canada licence-exempt RSS standard(s).
- Page 16 Charge temperature: The cell should be charged within the range of temperatures diately when the surface temperature of the battery is over 50˚C. Reverse charging: Please make sure the polarities of cells are connected pro- perly before charging, reverse charging is strictly prohibited. Reverse charging cannot charge the cells but will deteriorate their charging/discharging and safety characteristics, or Discharge current:...
- Page 17 SDL- 103228 - 1050 mAh - 1S1P Storage: If you intend to keep the battery for a long time (3months or longer), it is strongly recommended that the battery shall be stored under the environment with temperature 10-25˚C, low humidity and without corrosive gas. The battery should be charged every six months to ensure that each cell’s storage voltage is 3.6~3.9V.
-
Page 18: Warranty
WARRANTY Limited Warranty: Yuneec warrants that for a period of one (1) year from original date of purchase, the product will be free from defects in ma- terials and workmanship under normal use. In the event of a defect, please contact Yuneec Customer Support (www.Yuneec.com) for assistance. -
Page 19: About The Quickstart Manual
ABOUT THE QUICK START MANUAL Yuneec reserves the right to update manuals, quick start guides and warranty information at any time. For the latest manual and quick start information, as well as warranty infor- mation, please visit YUNEEC.COM...
Need help?
Do you have a question about the CGO1 and is the answer not in the manual?
Questions and answers