
Related Manuals for Sartorius CCx-L series


Summary of Contents for Sartorius CCx-L series
- Page 1 Operating Instructions Controller for Automatic Mass Comparators from Software Version 1.22 CC..- L / CCE..- L Model 98648-006-96...
-
Page 2: Table Of Contents
Contents Page Practical Use Manual operation with cursor button Getting Started Configuring the Controller Setting the Language Setting the Time for Averaging Setting the Date and Time Setting the Number of A B B A Cycles Setting the Number of Pre - Cycles Setting the Delay time before taken values Setting the Scale - Timeout Setting the Results via AUX... -
Page 3: Practical Use
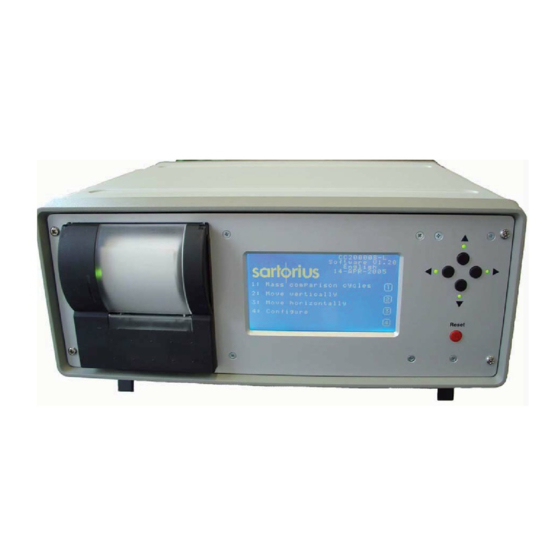
Practical Use The CC..-L / CCE…..-L controller regulates the load alternator function sequences as well as the collection and evaluation of measured data. The individual values measured are output automatically to the built-in printer with the date and time of measurement and the calculated results. A modern, touch-screen display shows all function sequences and also serves as the user interface for operating the controller. -
Page 4: Manual Operation With Cursor Button
Manual operation with the cursor buttons There are four cursor buttons on the front side. With this cursor buttons you can easy operate the load alternator, in it’s basic movements. That means turning right and left, lifting or lowering the platform. This is helpful for loading the platform from the front side and other applications. -
Page 5: Getting Started
Getting Started After you turn on the controller, the Sartorius logo is displayed for approx. 5 second. Then the initial start up window is displayed. The continuous display in the upper C C 1 0 0 0 0 U - L right corner shows: S o f t w a r e V 1.22... -
Page 6: Setting The Language
The main configuration windows is displayed. Setting the Language C C 1 0 0 0 0 U - L S o f t w a r e V 1.22 E n g l i s h 1 - J A N - 2010 Press the numeric key "1 1 "... -
Page 7: Setting The Date And Time
The following setting windows is displayed. C C 1 0 0 0 0 U - L S o f t w a r e V 1.22 E n g l i s h 1 - J A N - 2010 Set a time from 05 to 99 seconds 2: Time for averaging... -
Page 8: Setting The Number Of A B B A Cycles
C C 1 0 0 0 0 U - L S o f t w a r e V 1.22 E n g l i s h For more configuration: 1 - J A N - 2010 1: Language 2: Time for averaging ( 10 ) 3: Date and time 4: More... -
Page 9: Setting The Number Of Pre - Cycles
To optimize measuring sequences to meet the needs of the ambient conditions, the following settings are required. Setting the Number of Pre - Cycles This setting enables user-definable A B B A cycles to be performed immediately before the actual C C 1 0 0 0 0 U - L measurement. -
Page 10: Setting The Delay Time Before Taken Values
S S etting the Delay Time Before Taken Values (XX) This setting defines a period of time before measured values are transmitted after the mass comparator has been loaded. This time begins as soon as the mass comparator is loaded and the load alternator motor shuts off. -
Page 11: Setting The Scale - Timeout
For corrections or control of all settings please 4: More scroll by Configurations . . pressing the numeric key “4 4 “ , or conclude the configurations by pressing the Sartorius logo to access to the main menu. A fourth configuration windows is displayed. -
Page 12: Setting The Start Delay
For corrections or control of all settings please scroll by 3: -- -- pressing the numeric key „4 4 “, or 4: More conclude the configurations by pressing the configurations . . Sartorius logo to access to the main menu. The main window is displayed. -
Page 13: Operating The Controller
C C 1 0 0 0 0 U - L The main menu is displayed. S o f t w a r e V 1.22 If not, press the Sartorius logo. E n g l i s h 1 - J A N - 2010 Always begin with the "Move vertically"... -
Page 14: Move To Centring Position
M M ove to Centering Position C C 1 0 0 0 0 U - L With this function, the load alternator S o f t w a r e V 1.20 E n g l i s h Platform is parked in on intermeditate 1 - J u l - 2005 position as it is lowered. -
Page 15: Move Horizontally
4: Move horizontally 3: in progress. When the load alternator platform is in the upper position, touch the Sartorius logo on the screen to return to the main menu. Horizontal Movement You can only activate this function when the load alternator is in the raised position. - Page 16 3: Turn 90° 4: Move vertically 1: in progress. Then press the Sartorius logo on the display To return to the main menu The main menu is displayed. C C 1 0 0 0 0 U - L S o f t w a r e V 1.22...
-
Page 17: Starting The Mass Comparison
Starting a Measurement without start delay time is setting Before placing a weight on the load alternator platform, make sure that the load alternator is in the initial raised position. See the section entitled "Vertical Movement." Center the reference and test weights within the marking on the load alternator platform. Always position the reference weight on the "N."... -
Page 18: Begin Measurement
Sartorius logo to return to the main menu. C C 1 0 0 0 0 U - L S o f t w a r e V 1.22... -
Page 19: Continuous Function
The measurement procedure starts The printer begins by printing the current time and date, the mass comparator model designation, the number of A B B A cycles and the number of weights. The load alternator begins by centering the weights. The first weight to be tested is centered first. -
Page 20: Starting The Mass Comparison
Starting the Mass Comparison when the start delay time is setting, setting: see on page 12” make sure that the load alternator is in the initial raised position, before placing a weight on the load alternator platform,. See the section entitled "Vertical Movement." Center the reference and test weights within the marking on the load alternator platform. - Page 21 E n g l i s h or cancel by press another number key, 1 - J A N - 2010 or press the Sartorius logo to return to the main menu. 1: 1 A B B A - cycle...
-
Page 22: The Mass Comparison Start
A number will displayed in the window. C C 1 0 0 0 0 U - L e. g. 3 3 0 S o f t w a r e V 1.22 E n g l i s h 1 - J A N - 2010 This number, identicate the setting start delay time, in minute 1: 1 A B B A - cycle... -
Page 23: Continuous Function
Continuous Function With the continuous function option, you can repeat complete measurement cycles continuously. to stop the continuous function. Press the reset key Note: Do n n ot press the reset key while the load alternator platform is in motion! Starting the Continuous Function Start the measurement sequence as described above. -
Page 24: Ata Interface ( Aux )
Data Interface ( Aux ) General: The individual measurements printed out during the measurement process are also available as an ASCII string at the data interface (Aux) and can be received by the PC for further processing, The measurements are always output in a couple of a combined data string. Two different formats selectable. -
Page 25: Values And Times
values and times This means that the data string consists of the transaction counter (number of the ABBA cycle), time of value A, value A, time of value B and value B, or these data for B and A, respectively. The calculations of the differences and the final result does not belong to the output. -
Page 26: Programming For External Control From Pc
Switch on the control unit of the load alternator. Make sure that the main menu is displayed on the controller; if necessary key to the Sartorius logo. To link the PC to the control unit, send a C C R ( Carriage Return only n n o CR/LF ) at intervals until the alternator responds with ready for operation “? ? ?”. -
Page 27: Automatic Weighing
Automatic weighing “5 5 “ 1 x A-B-B-A cycle. Queries with “?“. - Confirms to start with “0“. “6 6 “ 6 x A-B-B-A cycles. Queries with “?“. a) 1 x 6 x A-B-B-A : - Confirms to start with “0“. b) Permanent function 6 x A-B-B-A : - Enter “6 6 “... -
Page 28: T T Roubleshooting
Troubleshooting Error message: C C 1 0 0 0 0 U - L S o f t w a r e V 1.22 E n g l i s h 1 - J A N - 2010 1: Mass comparison cycles 2: Move vertically 3: Move horizontally 4: Configure... - Page 29 Error message: C C 1 0 0 0 0 U - L S o f t w a r e V 1.22 E n g l i s h 1 - J A N - 2010 No correct value available! Please check weights and number loaded - then press the reset button.
-
Page 30: Maintenance
Maintenance Replacing the Paper Roll Turn on the controller. Lift up the printer cover . Locate the small lever to the right of the paper transport roll and move it towards the front. Insert the start of the paper roll w w ith the inside towards the front into the retainer behind the paper transport roll and move the lever back to its original position. - Page 32 Sartorius Lab Instruments GmbH & Co. KG Weender Landstrasse 94–108 37075 Goettingen, Germany Phone +49.551.308.0 +49.551.308.3289 www.sartorius.com Copyright by Sartorius Lab Instruments GmbH & Co. KG, Goettingen, Germany. All rights reserved. No part of this publication may be reprinted or translated in any form or by any means without the prior written permission of Sartorius.
Need help?
Do you have a question about the CCx-L series and is the answer not in the manual?
Questions and answers