Table of Contents
Advertisement
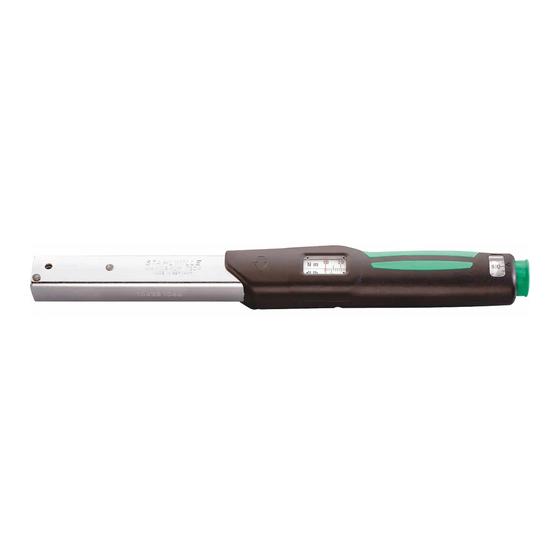
STAHLWILLE
Service Manoskop
730N
List of contents
Technical description ................. 25
ã Important safety points .......... 28
Operation ................................... 29
Maintenance............................... 40
Accessories................................ 46
Disposal ..................................... 47
Technical description
The Manoskop
torque wrench with cut-out function,
audible and tactile cut-out signals.
•
The torque wrench has a safety cut-
out mechanism.
•
The cut-out level can be very quickly
and precisely set with little physical
effort by means of a setting knob.
•
The required value is secured by
means of a fail-safe mechanism on
the control knob.
•
The measuring element is a flexible
rod. The rod is not pre-tensioned and
therefore only under tension from
start to finish of the actual tightening
operation. After use it is not
necessary to reset to the lowest
value.
•
As soon as the torque wrench is
released, it is ready for the next job.
•
The ergonomically-shaped two-
component handle allows for
comfortable and safe operation. The
correct grip is indicated optically and
tactually.
®
®
730N is an adjustable
®
........... 46
25
Advertisement
Table of Contents

Subscribe to Our Youtube Channel
Related Manuals for Stahlwille Manoskop 730N


Summary of Contents for Stahlwille Manoskop 730N
-
Page 1: Technical Description
STAHLWILLE ® Service Manoskop 730N List of contents Technical description ....25 ã Important safety points ..28 Operation ........29 Maintenance....... 40 ® Cleaning the Manoskop ... 46 Accessories........ 46 Disposal ........47 Technical description ® The Manoskop 730N is an adjustable torque wrench with cut-out function, audible and tactile cut-out signals. - Page 2 • The QuickRelease mechanism allows for a quick changeover of insert tools. • The wrenches can only be tightened in one direction. Counter-clockwise tightening is possible with the wrench turned over. The correct direction of tightening is indicated by an arrow on the grip. •...
- Page 3 of technical specifications Range Main scale graduation Fine scale graduation Insertable square Length Weight drive [mm] [mm] [N m] [ft.lb] [in.lb] [N m] [ft.lb] [in.lb] 10 – 50 7 – 37 – – 0,25 N m 9 x 12 – 7 –...
-
Page 4: Ã Important Safety Points
ã Important safety points Intended Purpose ® The Manoskop 730N has been developed for the controlled tightening of screw joints in a workshop environment. In order to loosen a nut or bolt during the normal tightening process, the ® Manoskop can also be used in the ®... -
Page 5: Operation
Correct torque settings ..can be lifesaving in some applications. For this reason, please note the following points: ã C AUTI O N ! In order to ensure the cut-out is working accurately, it should be checked at regular intervals. - Page 6 STAHLWILLE inserts guarantee the connection will be a good fit and that the drive profile will fit exactly.
- Page 7 The calculation for correcting the set values and the extension adjustment size can be found in the STAHLWILLE catalogue. ã C AUTI O N ! Ensure the maximum permissible load of the insert or tool used is not exceeded.
- Page 8 C AUTI O N ! Use of home-made special tools may be dangerous. If you need to manufacture your own tools, please contact STAHLWILLE first. ã D ANG ER ! When using insert tools, ensure that the locking pin has located correctly.
- Page 9 Attaching insert tools 1. Insert the insert tool into the internal square drive on the face of the head of the wrench. 2. The spring-loaded locking pin of the QuickRelease safety lock of the insert tool is depressed by the insertion groove.
- Page 10 5. If you are using a ratchet insert tool, set this to the desired direction by turning the control knob. Removing insert tools 1. If the tool was attached in the "normal" position, press the QuickRelease button on the underside of the wrench head (A). 2.
- Page 11 Setting the torque level The range of measurement and units of measure can be found on the type plate and in the tables. For ease of differentiation they are shown in two colours. Torque levels indicated in the measurement area shown in black are set using the black main and fine scales.
- Page 12 4. Turn the control knob and check the exact setting on the fine scale. ® Example: Manoskop 730N/10: For a desired setting of 62,5 N m, set the level to 2,5 N m. 5. Check the correct setting again. 6. When you have set the desired value, press the control knob back into the locking position.
- Page 13 Setting torque levels using the green scale 1. Pull the control knob out of the locking position until it engages (A). 2. Turn the control knob (B) and check the green main scale. 3. Firstly set a value which lies under the desired setting.
- Page 14 Controlled counter clockwise tightening For reasons of accuracy, these torque wrenches have been designed to work in only one direction. The direction is marked with an arrow. Controlled counter clockwise tightening is ® possible by turning the Manoskop over. For controlled counter clockwise ®...
- Page 15 Using the torque wrench ã D ANG ER ! Before you use the wrench, check that the cut-out value is set to the correct level and that the insert tool is firmly in place. Apply the tool in such a way that it cannot slip off the nut or bolt.
-
Page 16: Maintenance
ã C AUTI O N ! Important! Once the wrench has cut out, never apply more pressure! You should therefore not pull too fast in case you cannot stop the motion quickly enough when you hear the click. As soon as the torque wrench has cut out, it is ready for the next job. - Page 17 If you have access to such a tester, you ® may inspect the Manoskop yourself. Suitable torque testers are available from STAHLWILLE. It is also possible for ® STAHLWILLE to test the Manoskop you. Here, we demonstrate the inspection ®...
- Page 18 4. Operate the torque wrench five times on the torque tester. Check to see that the readings shown on the torque tester are not more than 3.09 % greater and not more than 2.91 % smaller than the value set on the torque wrench.
- Page 19 Adjusting for deviations in cut-out value You may return your torque wrench to STAHLWILLE for adjustment. You will then receive the tool back with a new works calibration certificate. You may adjust the torque wrench yourself. In this case, however, STAHLWILLE‘s accuracy guarantee is...
- Page 20 The screw which is closest to the head is primarily for adjusting the upper end of the scale range. Each screw has a minor effect on the adjusting range of the other screw. To protect the mechanisms from dirt, these two holes are plugged. To adjust the wrench, you will need the torque tester and an Allen key, size 2 mm.
- Page 21 Important! If you cannot compensate for the deviation within the prescribed tolerances using the method described here, it is likely that the cut-out mechanism is damaged. Such defects can only be repaired if the torque wrench is dismantled. Contact STAHLWILLE in such cases.
-
Page 22: Cleaning The Manoskop
7. Replace the plugs, to protect the cut- out mechanism against dirt and damp. Replacement plugs are available from STAHLWILLE. Cleaning the Manoskop ® ã C AUTI O N! Only clean the ® Manoskop using white spirit. Other chemical substances could damage synthetic components. -
Page 23: Disposal
For inspection and readjustment purposes • Mechanical torque testers • Electronic torque testers Services • repairs • testing and readjusting (incl. accuracy guarantee and new works calibration certificate) Disposal When the tool finally has to be disposed of, please observe your local environmental protection laws. - Page 25 P.O. Box 12 01 03 – 42331 Wuppertal Lindenallee 27 – 42349 Wuppertal Germany Tel.: + 49/2 02/47 91-0 Fax: + 49/2 02/47 91-2 00 E-Mail: info@stahlwille.de Internet: www.stahlwille.de © KONTECXT GmbH Technische Dokumentation 45239 Essen www.kx-doku.de Printed in Germany...
Need help?
Do you have a question about the Manoskop 730N and is the answer not in the manual?
Questions and answers