Table of Contents
Advertisement
Advertisement
Table of Contents

Related Manuals for Browning Strike Force HD Pro X BTC-5HDPX


Summary of Contents for Browning Strike Force HD Pro X BTC-5HDPX
- Page 1 MODEL BTC-5HDPX PL E A S E READ THIS MANU A L B E F O R E U S E...
- Page 2 Thank you for purchasing a Browning Trail Camera. Our trail cameras are constructed of the finest workmanship and materials available. As hunters ourselves, we have designed our products to help you get the most of your time in the field. We hope you enjoy scouting game for years to come with your new Browning Trail Camera.
- Page 3 QU IC K ST AR T G U ID E STEP 1 Pres s t he battery tra y eject butto n to rel ease the ba tt er y tr ay. The tr ay wi l l eject ab out 1/2” . Ins ert 6 AA Alk aline Batteries an d an SD c ard...
-
Page 4: Table Of Contents
T AB LE O F CON TE NT S Package Contents SD cards selection Camera Diagram Battery Installation Main Screen Time and Date Capture Mode Capture Delay / Picture Size Multishot Modes Video Quality / Video Length Smart IR / Adjustable IR Flash Timelapse Settings Temp Units / Info Strip / SD Management Motion Test / Camera Name... -
Page 5: Package Contents
Ge t ting Start ed Package contents: 1- Trail Camera 1- 6’ Tree Strap 1- Instruction Manual S D Card S ele ct ion Ins tall a go od qualit y me mory card. The best br ands of SD cards are Bro wn in g br an ded cards, Sa ndis k or Kin gston brande d cards. -
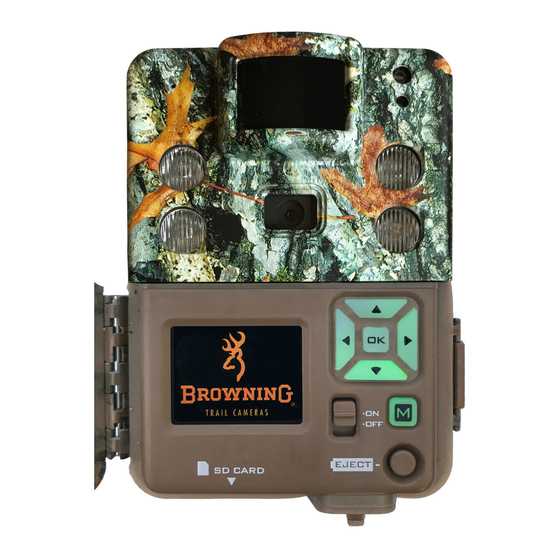
Page 6: Camera Diagram
G am er a Di a gr a m... -
Page 7: Battery Installation
Make sure you install the batteries with the correct polarity, following the markings on the battery tray. For opimtimal performance we recommend using Browning branded batteries,Energizer or Duracell. Slide the battery B a tter y tray into the E j ect closed position. -
Page 8: Main Screen
M ain Scre e n Tu r n the camera’s p ower on by sliding th e p ow e r swit ch to th e ON posit ion. Th e ma i n s cr een d isp la ys the camera operation mode, pictures or videos taken, p ictur es o r vid eos pos sible on t he SD ca rd , ca mera delay c ou nt down and... -
Page 9: Time And Date
T ime and Date To Set the time and date: From the HOME screen, press the MODE button once. The SETUP screen will display showing your available camera settings options. The DATE option will be highlighted. Press the OK buttton to highlight the month Using the UP or DOWN arrows, select the current month. -
Page 10: Capture Mode
C a pt ur e Mode To set the camera's capture Mode, use the DOWN arrow to highlight the MODE option. Using the RIGHT or LEFT arrow keys, select the operation mode for your key when finished. CAPTURE MODE OPTIONS: This setting will take still - STILL pictures of game in daytime... -
Page 11: Capture Delay / Picture Size
Captu re Delay The cap tur e d ela y set s t he "t ime out" in b et ween mo tio n activ ate d image s or vi de o s. Highlig ht the C APTURE DELA Y o pt i o n a nd u se the RIGHT or L EF T but t ons se l e c t the delay. -
Page 12: Multishot Modes
DOWN arrow button to highlight the Multishot option. Use the RIGHT or LEFT buttons to highlight a Multishot option. Your Browning Trail Camera can take multiple shots each time the camera is triggered. The default setting is 1 picture. Your options are as follows: -MULTI SHOT This is the default setting. -
Page 13: Video Quality / Video Length
Vide o Q uality VIDEO RESOLUTION The video options for your Browning trail camera are as follows: HIGH 1296 x 720p @ 30fps ULTRA 1600 x 900 @ 24fps Vide o Le ngth VIDEO LENGTH You can select the length of your video clip as well in the VIDEO LENGTH window. -
Page 14: Smart Ir / Adjustable Ir Flash
Sm ar t IR V i deo Smart IR Video is a feature that will allow a daytime video clip to keep recording as long as the camera detects movement during filming. If the deer stands still in front of the camera and the camera does not detect movement, the camera will end the video clip.The maximum record time for a video... -
Page 15: Timelapse Settings
T ime lapse Se t tings Your B rown ing Tra il Camera has the ability to function as a timelapse camera. This is useful if y ou want to v iew th e entire activity in a given are a su ch a s a larg e field. -
Page 16: Temp Units / Info Strip / Sd Management
Te mp er at ur e Uni t s Your temperature units can be displayed on the picture’s info bar in Fahrenheit or Celsius. To change the selection, Press the RIGHT arrows to make your selection. Inf o Str i p Your trail camera has an information bar that is printed at the bottom of each photo taken. -
Page 17: Motion Test / Camera Name
M otion T es t Your trail camera is equipped with a MOTION TEST feature. This feature helps you aim the camera at your target area. With the motion test turned on, simply walk around in your target area. When your presence is detected, a red LED on the front of the camera will flash. -
Page 18: Default Settings / Delete Images
The following options can be changed by pressing the OK button to highlight the option, and changing the selection using the RIGHT or LEFT arrows. Remember to press the OK button to save your selection. Press the DOWN button to move to each new option to set below. -
Page 19: Image Retrieval
Imag e Ret riev al The mos t p op ula r way t o rev iew the i ma g es on you r SD card is t o re vie w t he i ma g es on you r home comput e r.T he p i ctur es can be viewe d on bot h PC and Ma c co mp u t er s. -
Page 20: Timelapse Viewer Software
T ime lap se V iewer In s ta llat ion I N S T ALLING THE TIM ELAPS E VI EWE R SO F T WARE IS FOR V IEW ING YOU R TIM E LAP SE FILES. YOU COM PUTE R AL R E A D Y HAS PROGR AM S IN STA LLE D TO V I EW STILL PICTUR ES A ND VIDEOS CL I P S . -
Page 21: Field Installation
Fie ld Inst allation TENSION KNOB Y o u r ca me ra ha s a b ui l t i n a dj us ta bl e t ree m o u nt b r a c ke t . Af t e r se curi n g th e c am e ra to a tree, l o os e n t he t e n si on k n ob o n th e s i de o f th e c am era . -
Page 22: Accessories
Ac ce sso ri e s We o ffe r a full lin e o f a ccessorie s f or use wi th y our n ew B ro wn ing Trail C ame ra. AA Bat te ries S TEEL S ECURIT Y BOXES S D CARD S B A TTE RY PAC KS... -
Page 23: Warranty
Warrant y ONE YEAR LIMITED WARRANTY Your Browning Trail Camera warranty covers your trail camera for one year. We warrant that your camera will be free from defects in workmanship and materials when operated in normal use and conditions. This warranty will allow Browning... -
Page 24: Fcc
FC C S t a tem ent This equipment has been tested and found to comply with the limits for a Class B digital device, pursuant to part 15 of the FCC Rules. These limits are designed to provide reasonable protection against harmful interference in a residential installation. -
Page 25: Camera Specifications / Sd Card Size Chart
C a m e r a S p e c i f i c a t i o n s PHOTOS Ultra 20MP High 12MP Medium VIDEOS High 1296 x 720 @30fps (720p) Ultra 1600 x 900 @ 24fps (900p HD+) Length 5, 10, 20, 30 sec. - Page 26 Manuf actur ed a nd D istr ib ut ed by : Prom etheus Gr ou p, LL C P .O. Box 130100 Birmin gham , A laba ma 35 213-010 0 1- 88 8- 61 8- 4496 ©P ro me the us G ro up , LLC B rowni ng tr ad em ar ks licen se d fro m Brow nin g...
Need help?
Do you have a question about the Strike Force HD Pro X BTC-5HDPX and is the answer not in the manual?
Questions and answers