Table of Contents
Advertisement
Advertisement
Table of Contents

Related Manuals for GRAVOTECH MARKING SAS Ring Cube

Summary of Contents for GRAVOTECH MARKING SAS Ring Cube
- Page 1 User Manual Electronic Engraving Machine First Contact Before installing and using this machine, you must read this user guide carefully. Keep it in a safe place, in case you need to refer to it later. F5095 701 - 06.2011 - ENG - (UPDATED EDITION NUMBER : 3)
- Page 2 GravoTech Marking SAS to notify anybody of such revision or changes. Gravotech Marking SAS can not be held liable for any problems arising out of the application or use of any products, circuits, or software described herein. Neither does it convey a license under its patent rights nor the patent rights of third parties.
-
Page 3: Table Of Contents
Summary Information about regulations .............5 Conformity Standards........................5 Electrical security ..........................5 Presentation..................6 Introduction ........................... 6 Contra-indications ........................... 6 Precaution in use of the touchscreen ....................6 Stages of unpacking ........................7 Unpacking - Contents of package ....................... 8 Description ..................10 Front view of the machine ....................... - Page 4 Technical characteristics ..............63 Physical characteristics ........................63 Electrical characteristics ........................64 Engraving software characteristics ....................64 Optional accessories ........................64 RingCube Machine - Electronic Engraving Machine . 4 First Contact...
-
Page 5: Information About Regulations
Information about regulations Conformity standards This hardware was designed and build in conformity with the relevant EC marking and EEC directives : • "Machine Security" Directive 2006/42/EE • "Electromagnetic compatibility" Directive 2004/108/EC • "Low Voltage" Directive 2006/95/EC The modification or transformation of this equipment, the adaptation and installation of accessories not recommended by GRAVOTECH MARKING SAS, the installation of this equi- pment in a manufacturing process, the piloting by a robot, the connection to an external automaton, modify the characteristics of this material and can make it not compliant with the European Directives it is subjected.These modifications voids the responsibility of the manufacturer. -
Page 6: Presentation
"Mechanical block" of this manual's "Installing" chapter. • Do not spill any liquids onto the machine (drinks, cleaning fluids…) unless when recommended by GRAVOTECH MARKING SAS (example : lubrication). • The machine should never be used with anything other than Pro-Pen accessories and tools. -
Page 7: Stages Of Unpacking
Stages of unpacking Before opening the cardboard box, check that it is the right way up. 1. Open the box. 2. Take out the machine with the inside box using the two handles. Make sure that no components are missing from the packaging. If any part has been for- gotten please get in touch with your PRO-PEN dealer. Keep all the packaging materials so that you can move your machine in total safety. This packing was conceived to guarantee the protection of the machine during its transport (for a return in repair for example). This packaging is in conformity with European recycling standards. RingCube Machine - Electronic Engraving Machine . 7 First Contact... -
Page 8: Unpacking - Contents Of Package
Unpacking - Contents of package Check the condition of the packaging when you receive it. If there are any signs of da- mage, inform the carrier and your PRO-PEN dealer immediately by recorded delivery, specifying the exact nature of the problem. Content of package A RingCube engraving machine User instructions (on CD) an accessories drawer One mains cable for the external power supply (F) One external power supply Content of the accessories drawer - Standard (Inside Engraving) A diamond tip for rings... - Page 9 - Option (Outside Engraving) contains the following additional elements A dimond tip for bracelets A dimond tip for rings (longer) 3 rings/outside engraving jaws D10. An adjustable diamond tip holder for outside engraving (for D7 and D8) RingCube Machine - Electronic Engraving Machine . 9 First Contact...
-
Page 10: Description
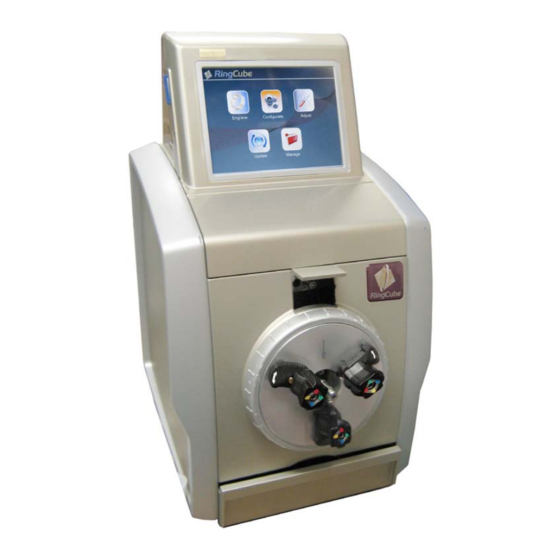
Description The RingCube machine is a machine for engraving bracelets, wedding rings and rings. RingCube is a stand-alone machine dedicated to jewellery boutiques. It has a colour touch-screen (5,7") for preparing and controlling your engraving using an easy-to-use and intuitive engraving software installed in your machine. -
Page 11: Rear View Of The Machine
Rear view of the machine Each connection responds to one of the following security levels : - Dangerous voltage. - Very low security level. Engraving machine connections: External power supply 24V - 30W - Very low security level N1 - SD Card slot - Very low security level USB slot - Very low security level Not used... -
Page 12: Installation
- Brusque temperature changes, - Dust (exhaust pipe), - Liquid splashes, spillages on the electronic rack, cables and connections, and any other part of the machine;unless recommended by GRAVOTECH MARKING SAS (ex. : lubrication), - Vibrations, - Electric or electronic radiation. -
Page 13: Electrical Connections Of The Machine
Electrical connections of the machine Position yourself behind the machine. Plug power supply cord of the external power supply (F) of the machine into the External power supply connection of the RingCube machine. Plug power supply cord (E) into the external power supply (F) of the machine and then into the mains socket. -
Page 14: Switching The Machine On
Switching the machine on Switch on the machine main stop button (L) to position I. After few seconds, the machine will emit a short "beep". The following screens will be displayed on the touch-screen of the machine: Leave the machine plugged in even if it is not in constant use. Problems If one of the operational signs is absent, check the following points : •... -
Page 15: Inside Engraving
Inside engraving Composition of your inside engraving job (Steps 1 to 4) Switch on the machine and wait a few seconds. The following screens will be displayed on the touchscreen of the machine : Touch "Engrave" (1) using the stylus to select the Engraving menu. PREVIOUS NEXT Step 1 : Touch "Inside engraving"... - Page 16 NEXT Step 3 : A preview of the text is displayed on the screen. If necessary, change the texte's length or the characters' height and the compression. Touch "Next" to accede to the Step 4 : PREVIOUS Step 4 : A summary of the engraving job is displayed. If one of the parameters is not correct, touch "Previous"...
- Page 17 Thin ring - Inside Engraving (width : 1,5 to 4 mm) (inside diameter : 12 to 25 mm) Diamond tip (D1) for rings mounted in the center of the chuck. The 3 rings/bracelets jaws (D3) mounted on Red position. Fine ring montage procedure - Inside Engraving described pages 18-19 Wide ring - Inside Engraving (width...
-
Page 18: Positioning A Thin Ring Onto The Jaws And Inside Engraving (Steps 4 And 5)
Positioning a thin ring onto the jaws and Inside Engraving (Steps 4 and 5) Place the 3 ring/bracelet jaws (D3) in position (the white arrows (F2) must be apart from the zone of tightening) onto the chuck, (1) and (2), and then position the red marks to the chuck center (3). - Page 19 Loosen the 2 screws (V1) (in the center of the chuck) slightly Turn the diamond tip (D1) (for rings) at 90° (the tip on the left) (1). Insert it (2) and turn it at 90° (3) in the anti-clockwise direction (the tip is directed downwards) . Tighten the 2 screws (V1) to immobilize it.
-
Page 20: Positioning A Wide Ring Onto The Jaws And Inside Engraving (Steps 4 And 5)
Positioning a wide ring onto the jaws and Inside Engraving (Steps 4 and 5) Place the 3 ring/bracelet jaws (D3) in position (the white arrows (F2) must be apart from the zone of tightening) onto the chuck, (1) and (2), and then position the blue marks to the chuck center (3). - Page 21 Loosen the 2 screws (V1) (in the center of the chuck) slightly Turn the diamond tip (D1) (for rings) at 90° (the tip on the left) (1). Insert it (2) and turn it at 90° (3) in the anti-clockwise direction (the tip is directed downwards) . Tighten the 2 screws (V1) to immobilize it.
-
Page 22: Positioning A Thin Bracelet Onto The Jaws And Inside Engraving (Steps 4 And 5)
Positioning a thin bracelet onto the jaws and Inside Engraving (Steps 4 and 5) Place the 3 ring/bracelet jaws (D3) in position (the white arrows (F2) must be in the chuck center in the zone of tightening) onto the chuck, (1) and (2), and then position the yellow marks to the chuck center (3). - Page 23 Loosen the 2 screws (V1) (in the center of the chuck) slightly. Turn the tool at 90° in the clockwise direction (1) and remove the tool (2). Touch (START) to continue Turn the diamond tip (D2) (for bracelets) at 90° (the tip on the left) (1). Insert it (2) and turn it at 90°...
- Page 24 11. Touch (START) to start the engraving For your own personal safety and to avoid any risks of being crushed by the machine during engraving, do not stand near the tools In the event of a problem, touch (PAUSE) to stop the engraving process The machine will momentarily pause.
-
Page 25: Positioning A Wide Bracelet Onto The Jaws And Inside Engraving (Steps 4 And 5)
Positioning a thin bracelet onto the jaws and Inside Engraving (Steps 4 and 5) Place the 3 ring/bracelet jaws (D3) in position (the white arrows (F2) must be in the chuck center in the zone of tightening) onto the chuck, (1) and (2), and then position the green marks to the chuck center (3). - Page 26 Loosen the 2 screws (V1) (in the center of the chuck) slightly. Turn the tool at 90° in the clockwise direction (1) and remove the tool (2). Touch (START) to continue Turn the diamond tip (D2) (for bracelets) at 90° (the tip on the left) (1). Insert it (2) and turn it at 90°...
- Page 27 11. Touch (START) to start the engraving For your own personal safety and to avoid any risks of being crushed by the machine during engraving, do not stand near the tools In the event of a problem, touch (PAUSE) to stop the engraving process The machine will momentarily pause.
-
Page 28: Outside Engraving (Option)
Outside engraving (Option) Composition of your outside engraving job (Steps 1 to 4) Switch on the machine and wait a few seconds. The following screens will be displayed on the touchscreen of the machine : Touch "Engrave" (1) using the stylus to select the Engraving menu. PREVIOUS NEXT Step 1 : Touch "Outside engraving"... - Page 29 NEXT Step 3 : A preview of the text is displayed on the screen. If necessary, change the texte's length or the characters' height and the compression. Touch "Next" to accede to the Step 4 : PREVIOUS Step 4 : A summary of the engraving job is displayed. If one of the parameters is not correct, touch "Previous"...
- Page 30 Ring - Outside Engraving (width : 1,5 to 6 mm) (outside diameter : 13.5 to 25 mm) Outside engraving diamond tip holder mounted in the location (E) above the chuck and equipped with the diamond tip (D8) for rings. The 3 rings/Outside engraving (D9) are mounted onto the chuck Ring montage procedure - Outside Engraving described pages 31-33...
-
Page 31: Positioning A Ring Onto The Jaws And Outside Engraving (Steps 4 And 5)
Positioning a ring onto the jaws and Outside Engraving (Steps 4 and 5) Place the 3 ring/outside engraving jaws (D9) onto the chuck (1) and (2) (the white arrows (F2) must be apart from the zone of tightening). Mark the middle of the text length to be engraved on the Outside of the ring : Outside Engraving Middle of the text length... - Page 32 Remove any tool which can be present in the center of the chuck : Loosen the 2 screws (V1) (in the center of the chuck) slightly. Turn the tool at 90° in the clockwise direction (1) and remove the tool (2). Touch (START) to continue Open the trapdoor of the location (E) above the chuck and Loosen the 2 screws (V3) slightly.
- Page 33 Tilt slightly (1) and insert the diamond holder for outside engraving equipped with the diamond tip (D8) for rings in the location.Then turn it at 90° (2) (the tip on the left). Insert it and turn it at 90° (3) in the anti-clockwise direction (the tip is directed downwards).
-
Page 34: Positioning A Thin Bracelet Onto The Jaws And Outside Engraving (Steps 4 And 5)
Positioning a thin bracelet onto the jaws and Outside Engraving (Steps 4 and 5) Place the 3 ring/bracelet jaws (D3) in position (the white arrows (F2) must be apart from the zone of tightening) onto the chuck, (1) and (2), and then position the yellow marks to the outside of the chuck (3). - Page 35 Remove any tool which can be present in the center of the chuck : Loosen the 2 screws (V1) (in the center of the chuck) slightly. Turn the tool at 90° in the clockwise direction (1) and remove the tool (2). Touch (START) to continue Open the trapdoor of the location (E) above the chuck and Loosen the 2 screws (V3) slightly.
- Page 36 Tilt slightly (1) and insert the diamond holder for outside engraving equipped with the diamond tip (D7) for bracelets in the location.Then turn it at 90° (2) (the tip on the left). Insert it and turn it at 90° (3) in the anti-clockwise direction (the tip is directed downwards).
-
Page 37: Positioning A Wide Bracelet Onto The Jaws And Outside Engraving (Steps 4 And 5)
Positioning a wide bracelet onto the jaws and Outside Engraving (Steps 4 and 5) Place the 3 ring/bracelet jaws (D3) in position (the white arrows (F2) must be apart from the zone of tightening) onto the chuck, (1) and (2), and then position the green marks to the outside of the chuck (3). - Page 38 Remove any tool which can be present in the center of the chuck : Loosen the 2 screws (V1) (in the center of the chuck) slightly. Turn the tool at 90° in the clockwise direction (1) and remove the tool (2). Touch (START) to continue Open the trapdoor of the location (E) above the chuck and Loosen the 2 screws (V3) slightly.
- Page 39 Tilt slightly (1) and insert the diamond holder for outside engraving equipped with the diamond tip (D7) for bracelets in the location.Then turn it at 90° (2) (the tip on the left). Insert it and turn it at 90° (3) in the anti-clockwise direction (the tip is directed downwards).
-
Page 40: Other Menus And Parameters
Other menus and parameters 1 - Engrave Menu To engrave a ring or a bracelet 2 - Configurate Menu To configure the engraving 3 - Adjust Menu ** To adjust the parameters of the machine 4 - Update Menu ** To update RingCube's software 5 - Manage Menu ** To manage RingCube's files... -
Page 41: Language Configuration - Configurate Menu
Language configuration - Configurate Menu Touch (2) using the stylus to select the Configurate menu Select the desired language (En : English) (A) and validate RingCube Machine - Electronic Engraving Machine . 41 First Contact... -
Page 42: Others Parameters Of Configuration - Configurate Menu
Other parameters of configuration - Configurate Menu Touch (2) using the stylus to select the Configurate menu : 2. Define your own parameters : B - AZERTY To indicate the type of the used keyboard (AZERTY or QWERTY) C - Buzzer To activate or not the buzzer D - mm To choose the millimetre like measuring unit E - inches To choose the inch like measuring unit F - cc To launch engraving in continuous cycle... -
Page 43: Password Modification - Configurate Menu
Password modification - Configurate Menu Touch (2) using the stylus to select the Configurate menu: Touch "Next" to accede to the menu where you can modify the password: Type the old password (A) (1234 : default value) and validate : Type the new password (note it on a paper not to forget it) in the "Password" box (B) and then in the "Check"... -
Page 44: Fonts And Logos Management - Manage Menu
Fonts and logos Management - Manage Menu Touch (5) using the stylus to select the Manage menu : Type the password and validate Select the "Logos" menu or "Fonts" menu : Manage your logos and fonts : The green bar allows to navigate from pages to pages. key allows to load logos or fonts from a SD card. -
Page 45: General Maintenance
General maintenance Before carrying out any maintenance, unplug the mains supply cable. No internal part of the Pro-Pen machine requires user intervention : general maintenance is limited to external cleaning. If necessary, the user can change the belt or fuses. If you wish to have the inside of your machine cleaned, contact a Pro-Pen technician. - Page 46 Restoration of reference points from a SD card If you wish to restore reference points adjusted in factory from the SD card delivered with the machine, begin the procedure in the stage 1. If you wish to restore personal reference points saved on another SD card than the SD card supplied with the machine, begin the procedure in the stage 5.
- Page 47 Replace the wall (W) on its place and tighten the 2 screws (V5). Switch on the machine (Switch the main stop button (L) to position I). Touch (3) using the stylus to select the Adjust menu : Type the password and validate RingCube Machine - Electronic Engraving Machine .
- Page 48 Insert the SD card and select ("load") Automatically the machine detects and loads the file containing reference points adusted in factory. The loading is fast, a message appears in the field (G) indicating that the operation is finished. Select to return to the main menu. RingCube Machine - Electronic Engraving Machine .
- Page 49 New adjusting of reference points Touch (3) using the stylus to select the Adjust menu : Type the password and validate Return to the main menu Validation Cancellation Load Saving This menu allows to adjust the 4 reference points in Y, the reference point in X and the reference point in Z, of the machine : (A) - The reference point in Y for the outside engraving of a bracelet - Procedure page 50 (B) - The reference point in Y for the inside engraving of a bracelet - Procedure page 51 (C) - The reference point in Y for the inside engraving of a ring - Procedure page 52...
- Page 50 The reference point in Y for the outside engraving of a bracelet To adjust this reference point in Y you need to use the reference bracelet (D11) delivered with the machine. Positioning the reference bracelet (D11) : (See the description of the assembly in "Positioning a thin bracelet onto the jaws and Outside Engraving"...
- Page 51 The reference point in Y for the inside engraving of a bracelet To adjust this reference point in Y you need to use the reference bracelet (D11) delivered with the machine. Positioning the reference bracelet (D11) : (See the description of the assembly in "Positioning a thin bracelet onto the jaws and Inside Engraving"...
- Page 52 The reference point in Y for the inside engraving of a ring To adjust this reference point in Y you need to use the reference ring (D6) delivered with the machine. Positioning the reference ring (D6) : (See the description of the assembly in "Positioning a thin ring onto the jaws and Inside Engraving"...
- Page 53 The reference point in Y for the outside engraving of a ring To adjust this reference point in Y you need to use the reference ring (D6) delivered with the machine. Positioning the reference ring (D6) : (See the description of the assembly in "Positioning a ring onto the jaws and Outside Engraving"...
- Page 54 The reference point in X Select the reference point in X with the key (E) The diamond holder moves to detect each limit switch and then stop in the saved reference point position. Have a look to check that the directional arrow (J3) is totally vertical and pointing downwards.
- Page 55 The reference point in Z To adjust this reference point in Z you need to use the reference ring (D6) delivered with the machine. Positioning the reference ring (D6) : (See the description of the assembly in "Positioning a thin ring onto the jaws and Inside Engraving"...
-
Page 56: Update The Ringcube Software - Update Menu
Update the RingCube software - Update Menu Touch (4) using the stylus to select the Update menu : Type the password and validate Touch using the stylus to select the Software Upadte menu. RingCube Machine - Electronic Engraving Machine . 56 First Contact... - Page 57 Insert the SD card containing the update of the RingCube software Select "Update" to start the update Automatically, the machine detects and loads required files for the update of the software RingCube. Switch off the machine (Switch the main stop button (L) to position O) Remove the SD card RingCube Machine - Electronic Engraving Machine .
- Page 58 Switch on the machine (Switch the main stop button (L) to position I) The software update start. Wait ... The RingCube software update is finished : RingCube Machine - Electronic Engraving Machine . 58 First Contact...
-
Page 59: Update The Operating System - Update Menu
Update the Operating System - Update Menu Touch (4) using the stylus to select the Update menu : Type the password and validate Touch using the stylus to select the Operating System Update ("OS"). RingCube Machine - Electronic Engraving Machine . 59 First Contact... - Page 60 Insert the SD card containing the update of the Operating System (OS). Switch off the machine (Switch the main stop button (L) to position O). Switch on the machine (Switch the main stop button (L) to position I). The update of the operating system is running. Wait... Follow the instructions indicated on the screen. Switch off the machine (Switch the main stop button (L) to position O) Remove the SD card and Switch on the machine (Switch the main stop button (L) to...
- Page 61 9. Insert the SD card containing the install program of the RingCube software (file: setup.cab) 10. Push on OK and open "My Device" using the stylus : 11. Open the contents of your SD card and launch the Setup program (fichier setup.cab). RingCube Machine - Electronic Engraving Machine . 61 First Contact...
- Page 62 12. Switch off the machine (Switch the main stop button (L) to position O) 13. Remove the SD card 14. Switch on the machine (Switch the main stop button (L) to position I) The software is installing. Wait ... The Operating System update is finished : RingCube Machine - Electronic Engraving Machine .
-
Page 63: Technical Characteristics
Vers 2.4 - 13/04/2011 Technical Characteristics Vers 2.4 - 13/04/2011 Physical characteristics RingCube machine Overall size 225 x 270 x 385 mm (w x d x h) 8.9 x 10.6 x 15.2 in Net weight 7,5 kg - 3.4 lb (without accessories) Package size 385 x 290 x 480 mm... -
Page 64: Electrical Characteristics
Vers 2.4 - 13/04/2011 Sound signal according to standard ISO 11201 RingCube machine Waiting LAeq < 58 dB (A) engraving Nominal LAeq < 58 engraving dB (A) Nominal Lp Cpeak engraving < 76 dB (C) peak Environment Operational temperature min. +5 °C ; + 41°F max.
Need help?
Do you have a question about the Ring Cube and is the answer not in the manual?
Questions and answers