Table of Contents
Advertisement
Quick Links
See also:
User Manual
Advertisement
Table of Contents

Related Manuals for ELTEX WB-2P-LR5


Summary of Contents for ELTEX WB-2P-LR5
- Page 1 User station WB-2P-LR5 User manual Firmware version 2.1.0 IP address: 192.168.1.1 Username: admin Password: password...
-
Page 2: Table Of Contents
WB-2P-LR5. User manual Contents Introduction ............................5 Symbols ............................5 Device description ..........................6 Purpose ............................6 Device specifications..........................7 Main technical parameters......................9 Design ............................11 Light indication..........................12 Reset to factory settings ......................13 Supply package ..........................13 Installation rules..........................14 Safety rules............................ 14 Installation recommendations ..................... - Page 3 WB-2P-LR5. User manual 5.6.2.4 DHCP server settings........................30 5.6.2.5 «MAC Management» submenu ....................... 32 5.6.2.6 «Local DNS» submenu ........................33 5.6.2.7 «NAT and Port Forwarding» submenu ................... 33 5.6.2.8 «Firewall» submenu ........................35 5.6.2.9 «Routes» submenu.......................... 36 5.6.2.10 «Dynamic DNS» submenu....................... 38 5.6.2.11...
-
Page 4: Introduction
WB-2P-LR5 is a user station designed for connection to Wi-Fi access network which might be constructed using base stations within long distances.The case of WB-2P-LR5 is sealed, that is allows to install the device outdoor with different climate conditions. ... -
Page 5: Device Description
Wi-Fi technology and operates at 5 and 6 GHz (the frequency range – 5830–6150 MHz – is supported on WB-2P-LR5 rev.B). The device is supposed to operate with WOP-2ac-LR5. WB-2P-LR5 might be also used for wireless bridge organization. WB-2P-LR5 supports up-to-date requirements to service quality and allows transmitting ... -
Page 6: Device Specifications
• firmware update via web interface; • support for DHCP-based autoprovisioning; • support for TR-069; • remote monitoring and configuration: web interface, Telnet, SSH. The figures below illustrate applications schemes of WB-2P-LR5. Functional scheme of using WB-2P-LR5 for wireless bridge organization... - Page 7 WB-2P-LR5. User manual Functional scheme of using WB-2P-LR5 without router Functional scheme of using WB-2P-LR5 with router...
-
Page 8: Main Technical Parameters
BASE-T Parameters of the wireless interface Standards 802.11a/n/ac Frequency range, MHz 5180–5825 MHz 5180-6150 MHz (for WB-2P-LR5 rev.B) Modulation BPSK, QPSK, 16QAM, 64QAM, 256QAM Data rate, Mbps 802.11a: up to 54 Mbps 802.11n: up to 300 Mbps 802.11ac: up to 867 Mbps ... - Page 9 WB-2P-LR5. User manual Management Remote management Web interface, Telnet, SSH, SNMP, TR-069 Access restriction by password General parameters Processor Realtek RTL8197FS 1 GHz 128 MB Flash 32 MB Power supply PoE 24 V Power consumption no more than 8 W Operating temperature from -45 to +65°С...
-
Page 10: Design
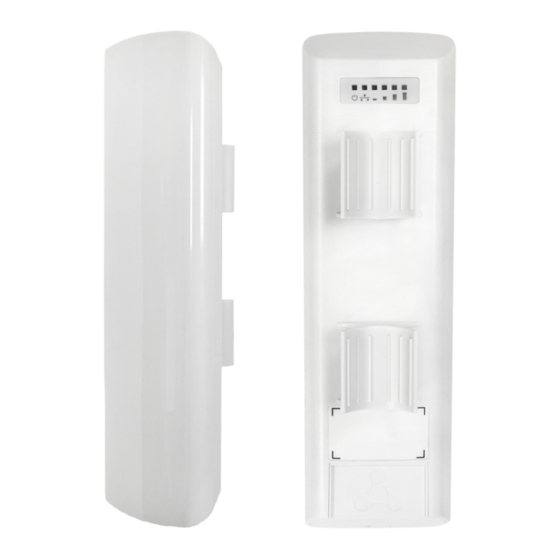
WB-2P-LR5. User manual 3.2 Design WB-2P-LR5 housed in a plastic case, industrial version. The size of the device: 80x66x282 mm. The layout of WB-2P-LR5 is shown in the figure below. WB-2P-LR5 layout LAN port 10/100/1000Base-T (RJ-45 connector) for local network connection and power supply via PoE and the button for resetting to factory settings («Reset») are located on the bottom panel of the device. -
Page 11: Light Indication
The light indication panel of WB-2P-LR5 is shown below. WB-2P-LR5 light indication panel The current state of the device is shown with the help of light indicators located on the back panel of WB-2P-LR5. The list of indicators and their description is shown in the table below. -
Page 12: Reset To Factory Settings
2. Using PoE injector supplied with the device. When the device is loaded, press and hold «RST» button of the injector (approximately 10–15 seconds) until «Power» indicator of WB-2P-LR5 is flashing orange. The device will be rebooted automatically. DHCP client will be launched according to factory settings. If the address is not obtained via DHCP, the device will have the following address — 192.168.1.1, and the... -
Page 13: Installation Rules
2. Do not install the device during storm. There is a risk of lightning stroke. 3. Adhere requierements for voltage, current and frequency mentioned in the manual. 4. Ground measuring instruments and computer before connecting to WB-2P-LR5. The electric potential differnce between devices' cases should not exceed 1 V. ... - Page 14 WB-2P-LR5. User manual recommendations given in Safety rules and Installation recommendations. 2. Remove the bottom cover which close LAN-port. 3. Connect Ethernet cable to LAN port. 4. Close the bottom cover.
-
Page 15: Switching On
4.4 Switching on 1. Plug the injector into 220 V outlet. Connect a PC to LAN port of the injector. 2. WB-2P-LR5 loads in a minute after switching on. Connect to the web configurator of WB-2P-LR5 through a browser. ... - Page 16 WB-2P-LR5. User manual 3. Enter the following in Wi-Fi Client tab: • SSID of the base station; • Authorization type; • Authentication data: login and password if required. Press to apply the settings.
-
Page 17: Managing The Device Through Web Configurator
WB-2P-LR5. User manual 5 Managing the device through web configurator 5.1 Getting started To start, you need to connect the device through a browser: 1. Open a web browser (web-page explorer), for example, Firefox, Opera, Chrome. 2. Enter IP-address of the device to the browser address line. -
Page 18: Changing User
To change a user account, enter the corresponding login and password and press «Log in». 5.3 Web interface operation modes Web interface of WB-2P-LR5 operates in three modes: • Monitoring – system monitoring mode. The mode is used for different device data monitoring: Internet connection status, amount of received/transmitted data via network interfaces, etc. ... -
Page 19: Applying Configuration And Discarding Changes
WB-2P-LR5. User manual You may move from the «Tiles» mode to «Preferences» by clicking «more» link next ro the tiles names. 5.4 Applying configuration and discarding changes 1. Applying configuration Press «Apply» to save configuration to flash memory and apply new settings. All the settings come into operation without device rebooting. -
Page 20: Fast Configuration Mode (Tiles)
WB-2P-LR5. User manual 5.5 Fast configuration mode (tiles) Only main settings are displayed in fast configuration mode (tiles) The settings are divided into the following categories: • Internet – fast configuration of Internet settings; • Wi-Fi Client – wireless connection configuration (for Wi-Fi Client (Wireless Station) mode);... -
Page 21: Wi-Fi Client
WB-2P-LR5. User manual • Protocol – select protocol via which the connection of the device via Wi-Fi interface to service provider network will be implemented: • Static – operation mode, when IP address and other necessary parameters of WAN interface are set statically (manually). -
Page 22: Iptv
WB-2P-LR5. User manual 5.5.3 IPTV IPTV tile is displayed only in «Router» mode. Select «Router» mode on «Internet» tile and press For IPTV function operation, set parameters on IPTV tile. To configure additional parameters, press «more» link. • Enble IPTV – when checked, IPTV signals broadcasting is enable (from WAN interface of the device to the devices connected to the LAN interface);... -
Page 23: Network» Menu
WB-2P-LR5. User manual The user interface is divided into seven areas: 1. Username, which was used to enter the system and «logout» button to finish the user session. 2. Menu tabs which contain submenu tabs are divided into categories: Network, System, IPTV (for router mode). - Page 24 WB-2P-LR5. User manual • Hostname – a name of the network device; • Device mode – a mode of device connection; • Scan Environment – press the button to start scanning at the defined range. The list of found access point...
- Page 25 • Extended Channels – the parameter which allows to use additional channels to connect to a base station (channels 49-51, 65-99, 145-148). The channels 166-230 are available for WB-2P-LR5 rev. B for connection to a base station even with not set «Extended Channels» parameter. ...
- Page 26 WB-2P-LR5. User manual • 802.1p – attribute (also called CoS – Class of Service) is attached to egress IP packets. The value is from 0 (the least priority) to 7 (the highest priority). • Protocol – select protocol for connection of the device via Wi-Fi interface to service provider network: ...
-
Page 27: Wds» Submenu
WB-2P-LR5. User manual • Tx Broadcast Rate Limit (packets/sec) – limits broadcasting to external Wi-Fi network. • Traffic Shaper – rate limit of both Downlink and Uplink directions. The maximum limit is 200 Mbps. VLAN – virtual local area network.VLAN is a group of hosts allocated in a network not depending on the physical location. -
Page 28: Radiointerface» Submenu
WB-2P-LR5. User manual 5.6.2.3 «Radiointerface» submenu «Radiointerface» submenu is available only in «Wireless bridge» mode. In Radiointerface menu, you may configure the radiointerface to organize wireless bridge. Basic settings: • Scan Environment – press the button to start scanning at the defined range. The list of found access points will be displayed. The list of access points consists of seven coloumns: access point SSID, security mode,... -
Page 29: Dhcp Server Settings
(instead of 800 ns) to clients which also support Short GI. • Extended Channels – a parameter which allows to use additional channels to connect to a base station (channels 49-51, 65-99, 145-148). The channels 166-230 are available for WB-2P-LR5 rev. B for connection. • STBC –... - Page 30 WB-2P-LR5. User manual In DHCP server settings section you may configure local network, DHCP server, set static addresses bindings. The device is capable to assign IP addresses and other parameters required to the Internet access to computers connected to LAN interface and WiFi access point through DHCP (Dynamic Host Configuration Protocol). The use of DHCP allows to avoid limits occured while manual configuration of TCP/IP. ...
-
Page 31: Mac Management» Submenu
«Wireless transparent bridge» settings are available for Bridge mode of Wi-Fi station only. When you enable Wireless transparent bridge, WB-2P-LR5 will not substitute client MAC addresses from LAN with own MAC address. The limit is 15 MAC addresses without substitution. When the value is exceeded client's MAC address will be substituted. -
Page 32: Local Dns» Submenu
WB-2P-LR5. User manual 5.6.2.6 «Local DNS» submenu Local DNS submenu is available only in router mode. You may configure local DNS server of the device by adding IP address and domain name in local DNS submenu. Local DNS allows gateway to obtain an IP address of connected device using its network name (host). In case of lack of DNS server in a network segment in which the gateway is located, you may use Local DNS to route using network names or to use its network name as a SIP server address. - Page 33 WB-2P-LR5. User manual You may configure Port Forwarding from WAN interface to LAN interface in NAT and Port Forwarding submenu. NAT (Network Address Translation) mode allows to modify IP addresses and network ports of IP packets. Port forwarding is necessary when TCP/UDP connection with local PC (connected to LAN interface) is established via external network.
-
Page 34: Firewall» Submenu
WB-2P-LR5. User manual • Destination Ports of WAN – destination TCP/UDP ports in external network, packets from which will follow the rule (you may assign either single port or range of ports using dash). The port forwarding rule is implemented as follows: a packet received via «Protocol» on a port defined in «Destination Ports of WAN»... -
Page 35: Routes» Submenu
WB-2P-LR5. User manual • Name – a name of the rule; • Traffic Type – select traffic type for which you create the rule: • Input – incoming traffic (the receiver is one of the network interfaces of the device). When selected, the following traffic types are available for editing: ... - Page 36 WB-2P-LR5. User manual • Name – route name. • Destination – destination host or subnet IP address, to which the route will be set. • Netmask – a subnet mask. A subnet mask for a host is set to 255.255.255.255 value, for a subnet —...
-
Page 37: Dynamic Dns» Submenu
WB-2P-LR5. User manual 5.6.2.10 «Dynamic DNS» submenu Dynamic DNS submenu is available only in router mode. In dynamic DNS submenu, you may configure the coresponding service. Dynamic DNS (D-DNS) provides information on DNS server update in real time or automatically, if necessary. It is used to assign a permanent domain name to a device (PC, router) with dynamic IP address. ... -
Page 38: Snmp» Submenu
WB-2P-LR5. User manual 5.6.2.11 «SNMP» submenu The software of WB-2P-LR5 allows to monitor device state and its sensors via SNMP. In SNMP submenu, you may configure SNMP agent parameters. The device supports SNMPv1, SNMPv2, SNMPv3. • Enable SNMP – when checked, SNMP is enabled;... -
Page 39: Iptv» Settings
WB-2P-LR5. User manual 5.6.3 «IPTV» settings The menu is available only in router mode. You may configure IPTV service in IPTV settings menu. • Enable IPTV – when checked, IPTV signals transmission via WAN interface (from provider network) to the devices connected to the LAN interface is enabled;... -
Page 40: System» Menu
WB-2P-LR5. User manual transmitted image in case of poor communication channel quality in a local network. The function is useful when IPTV is watched via wireless Wi-Fi channel. • HTTP Port – a number of HTTP Proxy port, from which video stream will be translated. Use this port to connect IPTV streams translated by the device. ... -
Page 41: Access» Submenu
WB-2P-LR5. User manual To apply a new configuration and store settings into the non-volatile memory, click «Apply» button. To discard changes, click «Cancel» button. 5.6.4.2 «Access» submenu In access submenu, you may configure access to the device via web interface, Telnet and SSH. -
Page 42: Log» Submenu
WB-2P-LR5. User manual SSH: SSH – is a secure device remote control protocol. As opposed to Telnet, SSH encrypts all traffic being transferred including passwords. To enable the device access via SSH protocol, select the corresponding checkbox. To apply a new configuration and store settings into the non-volatile memory, click «Apply» button. To discard changes, click «Cancel» button. -
Page 43: Passwords» Submenu
WB-2P-LR5. User manual Select types of messages to be output in Networkd Log: • Error – check to collect «Error» type messages; • Warnings – check to collect «Warning» type messages; • Debug – check to collect debug messages; • Info – check to collect information messages. -
Page 44: Configuration Management» Submenu
WB-2P-LR5. User manual • Administrator password – enter administrator password in the corresponding field and confirm it; • User password – enter user password in the corresponding field and confirm it; • Viewer password – enter user password in the corresponding field and confirm it. -
Page 45: Firmware Upgrade» Submenu
WB-2P-LR5. User manual Backup Configuration To save the current device configuration to a local PC, click «Download» button. Restore Configuration • Upload – to upload configuration from a PC, press «Выберите файл» (Select a file), select a configuration file stored on a local PC (in .tar.gz. format) and press «Upload» button. Uploaded configuration will be applied automatically and does not require device reboot. ... -
Page 46: Reboot» Submenu
WB-2P-LR5. User manual • Backup version – installed firmware version which can be used in case of problems with the current active firmware version; • Check for upgrade – click this button to check the availability of the latest firmware version. With this function, you may quickly check the latest firmware version and update the firmware, if necessary;... - Page 47 WB-2P-LR5. User manual DHCP-based Autoprovisioning: • Provisioning Mode – select a mode for automatic device update. The followings are available: • Disabled – automatic update of configuration and firmware is disabled; • Configuration and Firmware– periodical configuration and firmware update is permitted;...
- Page 48 WB-2P-LR5. User manual • Configuration File – full path to configuration file – set in URL format (there is an opportunity to load configuration files via TFTP and HTTP): tftp://<server address>/<full path to cfg file> http://<server address>/<full path to cfg file>...
-
Page 49: Advanced» Submenu
WB-2P-LR5. User manual When STUN mode is selected you should configure the following settings: • STUN Server Address – IP address or domain name of STUN server; • STUN Server Port – UDP port of STUN server (the value by default is 3478);... -
Page 50: System Monitoring
WB-2P-LR5. User manual 5.7 System monitoring To move to monitoring mode, select «Monitoring» on the left panel. Some pages are not updated automatically. To obtain current state of the device, press 5.7.1 «Internet» submenu In the Internet submenu, you may view main network settings of the device. ... -
Page 51: Ethernet Ports» Submenu
WB-2P-LR5. User manual You may view radiointerface settings and wireless bridge state in WDS submenu. Radio: • Channel – a channel of wireless bridge; • Channel Bandwidth – channel bandwidth used for wireless bridge; • Network mode – the current network mode of the radiointerface. -
Page 52: Dhcp» Submenu
WB-2P-LR5. User manual • Speed – speed of external network device connection to the port (10/100/1000 Mbps); • Mode – data transmission mode: • Full-duplex – full-duplex mode; • Half-duplex – half-duplex mode; • Transmitted – the quantity of bytes transmitted from the port;... -
Page 53: Pppoe Relay» Submenu
WB-2P-LR5. User manual ARP Table • IP address – device IP address; • MAC – device MAC address; • Client name – device hostname (if there is one); • Interface – interface of the device active side: WAN, LAN or Bridge. To obtain current information on Ethernet ports states, press «Refresh»... -
Page 54: Device Info» Submenu
WB-2P-LR5. User manual 5.7.7 «Device info» submenu General information on the device is given in Device submenu. Device info • Product – device model name; • Firmware Version – device firmware version; Factory MAC Address – МАС address of the device's WAN interface, defined by the manufacturer;... -
Page 55: Conntrack» Submenu
WB-2P-LR5. User manual 5.7.8 «Conntrack» submenu In the «Conntrack» submenu you may find the current active network connections of the device. Active NAT Session • Active Connections – total number of active network connections; • Shown Connections – number of connections shown in the WEB interface. In order to maintain high performance of the WEB interface, the maximum number of connections shown is limited to 1024. -
Page 56: Routes» Submenu
WB-2P-LR5. User manual 5.7.9 «Routes» submenu In Routes submenu you may view the device route table. • Destination – IP address of destination host or subnet that the route is established to; • Gateway – IP address of the gateway, through which access to the addressee is implemented;... -
Page 57: Configuration Example
WB-2P-LR5. User manual Configuration example 1. Connect PC to LAN port of injector; Enter IP address of the device to URL bar of a browser (192.168.1.1 by default, if address was not obtain via DHCP); When connection is established successfully, the window with Login and password fields will be displayed. - Page 58 WB-2P-LR5. User manual To set additional parameters and scan environment to find necessary access point, move to extended settings mode using «more» link (see section «Internet» submenu Press to save and apply settings.
-
Page 59: Device Automatic Update Algorithm Based On Dhcp
WB-2P-LR5. User manual 7 Device automatic update algorithm based on DHCP Device automatic update algorithm is defined by the «Parameters Priority from» value. If the «Static settings» value is selected, then the full path (including access protocol and server address) to configuration file and firmware file will be defined by «Configuration file»... - Page 60 WB-2P-LR5. User manual For MAC address, serial number and model name, see «Device» section on the monitoring page. URL examples: tftp://download.server.loc/firmware.file, http://192.168.25.34/configs/WB-2P-LR5//my.cfg, tftp://server.tftp/$PN/config/$SN.cfg, http://server.http/$PN/firmware/$MA.frm and etc. Some URL parameters might be omitted. For example, configuration file may be specified in the following format: http://192.168.18.6...
- Page 61 WB-2P-LR5. User manual 8 – a code of VLAN tag for management; «|» – mandatory separator used between codes and suboption values. Algorithm of identification for configuration file and firmware file URL parameters from DHCP Options 43 and 66, 67.
-
Page 62: System Recovering After Firmware Update Failure
WB-2P-LR5. User manual 8 System recovering after firmware update failure If while the firmware update (through the web interface or through autoupdate mechanism based on DHCP) a failure occured (e.g. due to power cutoff) and the device does not operate (the «Power» indicator is constantly solid red), use the following algorithm to recover the device: ... -
Page 63: Application А. Launch User Script When Starting The System
WB-2P-LR5. User manual 9 Application А. Launch user script when starting the system Sometimes you need the device to implement certain actions when starting, which cannot be implemented through settings in configuration file. In this case you may configure a user script through a configuration file that will be launched when the system starting. -
Page 64: Application B. Antenna Patterns
WB-2P-LR5. User manual 10 Application B. Antenna patterns The pattern of vertically-polarized antenna in H-plane: The pattern of vertically-polarized antenna in E-plane:... - Page 65 WB-2P-LR5. User manual The pattern of horizontally-polarized antenna in H-plane: The pattern of horizontally-polarized antenna in E-plane: ...
- Page 66 WB-2P-LR5. User manual The list of changes Document version Issue date Changes Version 2.0 31.10.2018 Added: 4.5.3 Wireless bridge 4.6.4 «WDS» submenu 4.6.5 «Radiointerface» submenu 4.7.2 «WDS» submenu Changes in chapters: 2.2 Device specifications 4.6.3 «Internet» submenu 4.6.7 «MAC addresses confinuration» submenu Version 1.0...
- Page 67 +7(383) 274-47-87 +7(383) 272-83-31 E-mail: techsupp@eltex-co.ru You are welcome to visit Eltex official website to get the relevant technical documentation and software, to use our knowledge base or consult a Service Centre Specialist in our technical forum. http://www.eltex-co.ru/en/ http://www.eltex-co.ru/en/support/downloads/...
Need help?
Do you have a question about the WB-2P-LR5 and is the answer not in the manual?
Questions and answers