
Subscribe to Our Youtube Channel
Related Manuals for Fast & Fluid Management GA450

Summary of Contents for Fast & Fluid Management GA450
- Page 1 Manual GA450 V. 2.2 Fast & Fluid Management B. V. PO Box 220 2170 AE Sassenheim The Netherlands www.fast-fluid.com...
- Page 2 © Fast & Fluid Management B.V. This manual or parts thereof may not be reproduced, stored in a retrieval system, or transmitted, in any form or by any means, electronic, mechanical, photocopying, recording, nor otherwise, without the prior written permission of Fast & Fluid Management B.V.
-
Page 3: Table Of Contents
Table of Contents Table of Contents About this manual......................5 How to work with the manual ..................5 Record of changes ......................5 Safety ..........................7 Intended use ........................7 Liability ..........................7 User qualification for installation ..................7 CE certification ....................... 7 Safety symbols on the machine .................. - Page 4 Table of Contents Installation ........................21 Unpack the machine ..................... 21 4.1.1 Remove the cardboard..................21 4.1.2 Remove the plastic protection and foil ............... 21 4.1.3 Remove the transport brackets ................22 4.1.4 Dispose of the packaging material ..............22 Put the machine in position ..................
-
Page 5: About This Manual
The GA450 and all its versions are referred to in the manual as the ’machine’. This manual contains the original instructions. The original language of the manual is English. How to work with the manual 1. - Page 6 About this manual GA450 V. 2.2...
-
Page 7: Safety
Safety GA450 V. 2.2 Safety WARNING Read the manual before you install or use the machine. Failure to do so can result in personal injury, death or property damage. Intended use The machine is designed to mix paint in a can. Any other use of the machine is strictly forbidden. -
Page 8: Safety Symbols On The Machine
Safety GA450 V. 2.2 Safety symbols on the machine Read the manual. Electrical hazard. Read the manual. Central earthing point. Pinch hazard. Electrical hazard. Rotating parts. On-Off Labels on the machine When can diameter > Ø39 cm : remove shield Upper and lower shield instruction. -
Page 9: Disposal Of The Machine
Safety GA450 V. 2.2 Disposal of the machine 1. Sort the machine, the accessories and the packaging for environmentally friendly recycling. 2. Do not dispose of the machine into domestic waste. Dispose of the machine according to local regulations. - Page 10 Safety GA450 V. 2.2...
-
Page 11: Operator Manual
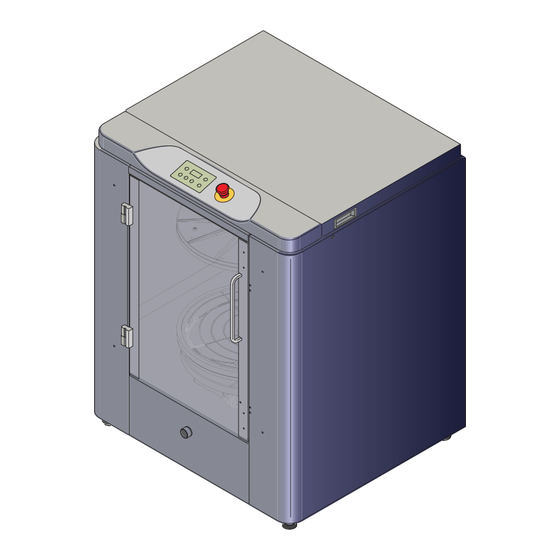
Operator manual GA450 V. 2.2 Operator manual Description 3.1.1 Overview of the machine Door Can table Casing Drain orifice Control panel. See also § 3.1.2. Can plate (top) Emergency stop Type plate. See also § 3.1.4. Wheel Net entry Adjustable foot... -
Page 12: Overview Of The Control Panel
Operator manual GA450 V. 2.2 3.1.2 Overview of the control panel Stop/Up key Program key T1 key (Time 1) T2 key (Time 2) r d y T3 key (Time 3) S-key (mix speed) Display Note The function of the T1 to T3 keys changes when you adjust the default values of the machine. -
Page 13: Operation
Operator manual GA450 V. 2.2 Operation WARNING Only push the emergency stop in the case of a safety emergency. 3.2.1 Turning on the machine 1. Connect the power cable to the grouned wall socket. 2. Make sure that the emergency stop is released. - Page 14 Operator manual GA450 V. 2.2 Place the can 1. Put one or more cans (A) in the centre of the can table, or in a pattern that has its gravitational centre in the middle of the can table. WARNING It is possible that the can is heavy. Use the correct lifting tool when appropriate.
-
Page 15: Start The Machine
Operator manual GA450 V. 2.2 Close the door 1. Pull up the handle (A) to unlock the can table. 2. Push the can table (B) inwards until you hear a ‘click’. The can table is locked. 3. Close the door. -
Page 16: Stop The Operation Manually
Operator manual GA450 V. 2.2 3.2.7 Stop the operation manually 1. Push the Stop/Up key. 2. Wait until the can plates are open. 3. If necessary, remove the can. See § 3.2.6. 3.2.8 Adjust the mix speed Note The machine controls the mix speed based on the size of the can. -
Page 17: Adjust The Mix Time
Operator manual GA450 V. 2.2 B (cm) Switch point 3 Switch point 2 Switch point 1 A: Speed (rpm) B: Can height (cm) Note The mix speed depends on the can height. 3.2.9 Adjust the mix time Key pushed Mix time [s]... -
Page 18: General Cleaning: After Every Operation
Operator manual GA450 V. 2.2 Note The table shows the default values. Note You can adjust the default mix time when the display shows ‘rdY’. 1. At the same time, push the Program key and the T1, 2 or 3 key. -
Page 19: Remove Spilled Paint
Operator manual GA450 V. 2.2 Remove spilled paint Do this procedure when paint is spilled inside the machine. 1. Make sure that the machine is stopped. See § 3.2.5 or § 3.2.7. 2. Put a reservoir (A) below the drain orifice (B). - Page 20 Operator manual GA450 V. 2.2...
-
Page 21: Installation
Installation GA450 V. 2.2 Installation Unpack the machine 4.1.1 Remove the cardboard 1. Remove the tensioning straps (A). 2. Remove the cardboard (B). 4.1.2 Remove the plastic protection and foil 1. Remove the plastic protection (A). 2. Remove the plastic foil (B). -
Page 22: Remove The Transport Brackets
Installation GA450 V. 2.2 4.1.3 Remove the transport brackets 1. Remove the screws (A). 12mm 2. Remove the transport brackets (B). 4.1.4 Dispose of the packaging material 1. Dispose of the packaging material in an environmentally friendly way, according to local regulations. -
Page 23: Move The Machine To The Final Location
Installation GA450 V. 2.2 4.2.2 Move the machine to the final location 1. Push the machine to the final location. CAUTION Do not use a fork-lift truck. Note Make sure the final location is sufficiently illuminated. 2. Connect the power cable to the net entry. - Page 24 Installation GA450 V. 2.2...
-
Page 25: Troubleshooting
Troubleshooting GA450 V. 2.2 Troubleshooting General troubleshooting procedure 1. Try to solve the problem with the information in this manual. See § 5.3.1. 2. If it is not possible to solve the problem with the information in this manual, contact service. See § 5.2. -
Page 26: Troubleshooting Guide
Troubleshooting GA450 V. 2.2 Troubleshooting guide 5.3.1 Easy-to-solve errors Problem Possible cause Possible solution The display shows ‘E00’ Emergency stop is pressed during Release the emergency stop. See § 5.4. idle state. The display shows ‘E01’ The door is open. -
Page 27: Software Errors
Troubleshooting GA450 V. 2.2 Problem Possible cause Possible solution The display shows ‘E55’ Failed to run the mixer motor Reset the machine. See § 5.4. backward. When the problem persists, contact service. See § 5.2. The display shows ‘E56’ Failed to stop the mixer motor. - Page 28 Troubleshooting GA450 V. 2.2...
-
Page 29: Technical Data
Technical data GA450 V. 2.2 Technical data General specifications Parameter Specification Materials used are suitable for Water-, universal- and solvent colorants Maximum load weight [kg] Can plate diameter [cm] Can plate bottom seating diameter [cm] Maximum can height [cm] Minimum can height [cm]... -
Page 30: Safety Classifications
Technical data GA450 V. 2.2 Safety classifications Parameter Specification IP (Ingress Protection) classification EMC (ElectroMagnetic Compliancy) classification Class B Electrical specifications Parameter Specification Power consumption, maximum [W] Voltage [V] 230 (/115 optional) Frequency [Hz] 50/60 Speed [rpm] 100 to 230... -
Page 31: Electrical Diagram
Technical data GA450 V. 2.2 Electrical diagram... - Page 32 Technical data GA450 V. 2.2...
Need help?
Do you have a question about the GA450 and is the answer not in the manual?
Questions and answers