
Summary of Contents for Hypertherm Koolant Koolers N-Series
- Page 1 Hypertherm, Inc. Part Number: 810540 Koolant Koolers N-Series Plasma Cutter Chiller User Manual Original Instructions 800.968.5665 | dimplexthermal.com...
- Page 2 Hypertherm, Inc. Part Number: 810540 ATTENTION This manual provides the user, installer and maintenance technician the technical information for installation, operation, and routine maintenance to ensure smooth and long‐lasting operation of the CHILLER. This manual has been written with general guidelines and specifications for this platform of chillers. Always refer to your CHILLER’s specific drawings that have shipped with the unit. When contacting the factory for service or replacement parts reference your CHILLER’s serial and model numbers. These can be found on the data tag on the CHILLER or on the Datapack information that shipped with the unit. Information Subject to Change While every effort has been made to ensure the accuracy and completeness of the information presented in this document, Dimplex Thermal Solutions assumes no responsibility and disclaims all liability for damages resulting from the use of this information or for any errors or omissions. Register Your Chiller See instructions in Appendix E for registering your chiller online. Registration is important to ensure accessibility to the Dimplex Thermal Solutions global service network and maximize your warranty coverage. ...
-
Page 3: Table Of Contents
Hypertherm, Inc. Part Number: 810540 Table of Contents Table of Contents List of Tables ................................ v 1 Specifications .............................. 6 2 Important Safety Instructions ........................... 7 3 Machine Label Definitions .......................... 8 4 Introduction ............................... 9 4.1 Rated Capacity ............................ 10 5 Site Planning .............................. 12 5.1 Overall Dimensions .......................... 12 5.2 Location Considerations .......................... 12 5.2.1 Environmental Requirements ...................... 12 ... - Page 4 Hypertherm, Inc. Part Number: 810540 Table of Contents 7.1 Pre‐Startup .............................. 25 7.1.1 Power‐up ............................ 25 7.1.2 Fault Check ............................ 25 7.1.3 Setting the Line Power Frequency .................... 25 7.1.4 Compressor Warm‐up ........................ 25 7.2 Initial Startup ............................ 26 7.2.1 Local Mode Start‐up ........................ 26 7.2.2 Remote Mode .......................... 27 7.3 Shutdown.............................. 27 7.4 Service .............................. 28 8 Controller ................................. 29 8.1 Navigation .............................. 29 ...
- Page 5 Hypertherm, Inc. Part Number: 810540 Table of Contents 13 Revisions .............................. 55 Appendix A (P&I Diagrams) ............................. 56 Refrigeration Schematic ............................ 56 Plumbing Schematic ............................ 57 Appendix B (Electrical Schematics) ......................... 58 Power Page ................................ 58 PLC .................................. 59 I/O Module ................................ 60 Logic .................................. 61 Electrical Panel .............................. 62 Electrical BOM .............................. 63 Appendix C (Default Controller Settings) ........................ 64 Program Settings .............................. 64 Sensor Calibration ............................... 65 Alarm Settings .............................. 66 I/O Module ................................ 67 Appendix D (Warranty) ............................ 68 Warranty Coverage .............................. 68 General Warranty Procedures .......................... 69 ...
- Page 6 Hypertherm, Inc. Part Number: 810540 List of Figures List of Figures Figure 1: Plasma Cutter Chiller (Electrical Enclosure Side) .................. 10 Figure 2: Plasma Cutter Chiller (Plumbing I/O Side) .................... 11 Figure 3: Chiller Overall Dimensions ........................ 12 Figure 4: Chiller Air Intake and Discharge Clearances .................... 14 Figure 5: Crated Chiller ............................ 16 Figure 6: Chiller Internal Access .......................... 18 Figure 7: Chiller Electrical Enclosure Side ....................... 20 Figure 8: Electrical Enclosure Bottom View (Inside Chiller) ................... 20 Figure 9: Electrical Panel (Simplified) ........................ 21 Figure 10: Chiller Plumbing & Electrical Connectivity .................... 23 Figure 11: Chiller’s Controller .......................... 29 Figure 12: Controller Main Menu ........................... 31 Figure 13: Monitoring, Temperatures ........................ 33 Figure 14: Monitoring, System Status ........................ 33 Figure 15: Monitoring, Condenser & Suction Data .................... 33 Figure 16: Monitoring, Process Fluid Circuit ...................... 34 Figure 17: Monitoring, Recirculation Circuit ...................... 34 Figure 18: Monitoring, Filter Status ........................ 34 Figure 19: Monitoring, Ambient Temperature ....................... 35 ...
- Page 7 Hypertherm, Inc. Part Number: 810540 List of Figures List of Tables Table 1: Chiller Specifications ........................... 6 Table 2: Machine Label Definitions .......................... 8 Table 3: Koolant Koolers Plasma Cutter Chiller Model Information .............. 10 Table 4: Chiller Operating Environmental Requirements.................. 12 Table 5: Chiller Electrical Supply Power Requirements .................. 18 Table 6: Chiller Plumbing Connections ........................ 22 Table 7: Recommended Compressor Warm‐up Time ..................... 26 Table 8: Chiller Statuses ............................ 31 Table 9: Alarm List .............................. 44 Table 10: Manual Revisions ............................ 55 Table 11: Electrical Panel Bill of Materials ...................... 63 Table 12: Default Program Settings ........................ 64 Table 13: Default Sensor Calibration Settings ...................... 65 Table 14: Default Alarm Settings .......................... 66 Table 15: I/O Module Default Settings ........................ 67 v ...
-
Page 8: Specifications
Hypertherm, Inc. Part Number: 810540 Specifications ‐ Rated Capacity 1 Specifications Table 1: Chiller Specifications Criterion 50Hz 60Hz Electrical 380‐415V ±10%, 460‐480V ±10%, Input power 3Phase 3Phase FLA 23A MCA 26A MOPD 40A SSCR 12kA (RMS symmetrical) Refrigeration Refrigerant R‐407C Refrigerant Oil Polyvinyl Ether (PVE) Nominal Refrigerant Charge 7lbs. (3.2kg) Number of Compressors 1 Compressor Motor Power, each 5hp (3.73kW) 1 ... -
Page 9: Important Safety Instructions
Hypertherm, Inc. Part Number: 810540 Important Safety Instructions ‐ Rated Capacity 2 Important Safety Instructions This manual contains important safety instructions that should be followed during the installation and maintenance of the 5 Ton Koolant Koolers Plasma Cutter Chiller. Read this manual thoroughly before attempting to install or operate this unit. Failure to follow the instructions in this document may damage the equipment, cause hazardous conditions and void the warranty. Only properly trained and qualified personnel should move, install, operate or service this equipment. Adhere to all warnings, cautions and safety instructions on the unit and in this manual when installing, operating or maintaining the unit. Follow all operating and user instructions. WARNING This unit may present arc flash and electric shock hazards that could cause injury or death. Open all local electric power disconnect switches and wear protective equipment before working within the chiller cabinet. Earth ground to unit must be provided, per NEC, CEC and local codes, as applicable. Adhere to all other local codes as applicable. Turning the ON/OFF switch to the OFF position does not isolate power from the unit. The only way to isolate all power from the unit is to turn the chiller’s main circuit breaker disconnect to its OFF position. This should only be performed when intending to service the unit. WARNING The chiller has automatically starting, high‐speed fans. Open all electric power disconnect switches before working in the unit. Contact with fans when the chiller is powered can cause injury or death. Do not operate this unit with any cabinet panels or air filters removed. CAUTION Fan and pump motors, compressors, and refrigeration components can become extremely hot during operation. Allow sufficient time for them to cool before working within the unit. Wear protective gloves and arm protection when working on or near hot components. Only HVAC/R qualified technicians should be working on refrigeration components. ... -
Page 10: Machine Label Definitions
Hypertherm, Inc. Part Number: 810540 Machine Label Definitions ‐ Rated Capacity 3 Machine Label Definitions Table 2: Machine Label Definitions Symbol Description Symbol Description Alarm Light Tank Drain Emergency Stop Fluid Inlet Local/Off/Remote Fluid Outlet Tank Fill, No Tap Tank Level High Water, Refer to Manual Electrical Shock ... -
Page 11: Introduction
Hypertherm, Inc. Part Number: 810540 Introduction ‐ Rated Capacity 4 Introduction The Koolant Koolers Indoor Industrial Process Chiller is a single‐circuit, single reservoir chiller designed to supply coolant to the Hypertherm Plasma Cutting System. Heat removal from the plasma cutting system to the chiller is facilitated through heat exchangers in a closed‐loop fashion using an air‐cooled refrigeration circuit. The chiller is capable of steadily supplying coolant with tight temperature tolerances over a varying and dynamic range of cooling capacity requirements. The chiller features: Scroll Compressor Proven reliability Low noise Process circuit regenerative turbine pump Highly reliable (no sliding components) Optimized for high pressure circuits Recirculation circuit centrifugal pump Moderates the return coolant temperature from the plasma cutter prior to passing through the brazed plate heat exchanger Highly reliable (no sliding components) Variable speed condenser fan Minimizes acoustic noise Improved energy efficiency ... -
Page 12: Rated Capacity
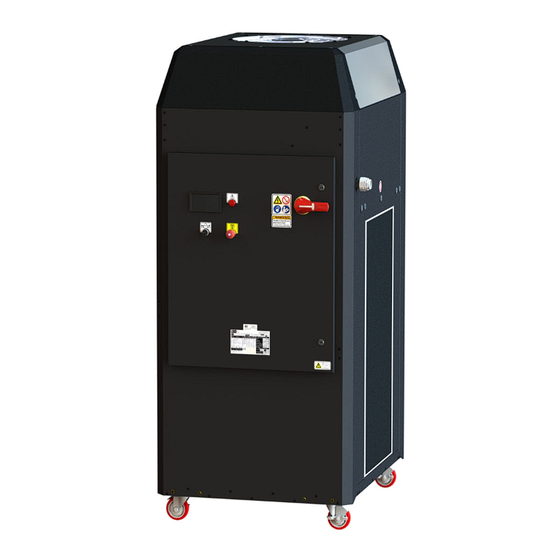
Hypertherm, Inc. Part Number: 810540 Introduction ‐ Rated Capacity 4.1 Rated Capacity Table 3: Koolant Koolers Plasma Cutter Chiller Model Information DTS Part Model Description Maximum Heat Load Number 801880 NVI‐5001‐CE‐MC‐M 5 Ton Plasma Cutter Chiller *69,800 Btu/hr (20.5kW) 802092 NVI‐5001‐NR‐CE‐MC‐M 5 Ton Plasma Cutter Chiller w/o Refrigerant *69,800 Btu/hr (20.5kW) Rated capacity based on 59°F (15°C) leaving fluid temperature and 75°F (23.9°C) ambient. CONDENSER FAN ELECTRICAL ENCLOSURE DOOR PANEL AIR INTAKE FILTER Figure 1: Plasma Cutter Chiller (Electrical Enclosure Side) 10 ... -
Page 13: Figure 2: Plasma Cutter Chiller (Plumbing I/O Side)
Hypertherm, Inc. Part Number: 810540 Introduction ‐ Rated Capacity ETHERNET CONNECTIONS INTERLOCK CONNECTIONS PLUMBING I/O TANK LEVEL SIGHT GLASS TANK DRAIN Figure 2: Plasma Cutter Chiller (Plumbing I/O Side) 11 ... -
Page 14: Site Planning
Hypertherm, Inc. Part Number: 810540 Site Planning ‐ Overall Dimensions 5 Site Planning 5.1 Overall Dimensions Figure 3: Chiller Overall Dimensions 5.2 Location Considerations 5.2.1 Environmental Requirements Table 4 defines the environmental requirements for proper chiller operation. For consideration of special applications that do not adhere to the requirements in the table below contact Glen Dimplex Thermal Solutions (GDTS) engineering for review. Table 4: Chiller Operating Environmental Requirements Criterion Value Location Indoors only Minimum Temperature 14°F (‐10°C) Maximum Temperature 104°F (40°C) Minimum Relative Humidity 10% Maximum Relative Humidity 90% Minimum Altitude At sea level Maximum Altitude 8,000ft (2,4384m) above sea level ... -
Page 15: Elevation
Hypertherm, Inc. Part Number: 810540 Site Planning ‐ Location Considerations 5.2.2 Elevation The chillers are intended to be installed on the same floor level as the plasma cutting system. Installation on a mezzanine is acceptable as long as the requirements identified in Section 5.2.3 through Section 5.2.6 are met. CAUTION The chillers are not equipped with an anti‐backflow device. Installing the chiller at a lower elevation than the plasma cutting system or installing overhead plumbing between the chiller and the plasma cutting system can cause the chiller fluid reservoir to overflow. 5.2.3 Electrical Enclosure Clearance OSHA and the NEC both mandate a minimum clearance of 36 inches on electrical enclosure doors of less than 600 volts and less than 65,000 symmetrical fault amps. 36in 5.2.4 Service Door Clearance The chillers are equipped with removable service doors on one side of the machine. At least 3 feet of clearance is required between the chiller and any other obstructions to enable service access to the internal components of the chiller. 13 ... -
Page 16: Air Intake And Exhaust Clearance
Hypertherm, Inc. Part Number: 810540 Site Planning ‐ Location Considerations 5.2.5 Air Intake and Exhaust Clearance 5.2.5.1 Supply Clearance The chillers are equipped with removable intake air filters on one side of the machine. Care must be taken to ensure that adequate clearance is provided to ensure fresh air is able to enter the intake air filters. At least 3 feet of clearance is required between the intake air filter and any obstructions. If the intake air filter is facing a facility wall at least 6 feet of clearance is required. 5.2.5.2 Exhaust Clearance At least 8 feet of vertical clearance is required from the top of the exhaust fans to the building ceiling or any other obstructions that could impede exhaust air flow. CAUTION Installing the chiller in a building corner should be avoided. Placing the chiller in a corner prevents proper dissipation of the hot exhaust air and causes the exhaust air to re‐circulate into the chiller air intake. This leads to high refrigeration head pressure, poor chiller performance, and over‐heating the exhaust fan motors. CAUTION The chiller condenser fans are not designed for ducting. Ducting creates excessive backpressure on the fans and can cause the fan motors to overheat. Figure 4: Chiller Air Intake and Discharge Clearances 14 ... -
Page 17: Proximity To The Plasma Cutting System
Hypertherm, Inc. Part Number: 810540 Installation ‐ Checking for Shipping Damage 5.2.6 Proximity to the Plasma Cutting System The Hypertherm HPR800XD plasma cutting system is supplied with a standard hose kit for connecting the process cooling circuit water from the chiller to the plasma cutting system. The chiller location must be close enough to the plasma cutting system to enable connectivity with the standard hose kit. CAUTION Exceeding the standard hose lengths can cause excessive pressure drop through plumbing systems that leads to chiller flow faults and/or premature chiller pump failures. 6 Installation 6.1 Checking for Shipping Damage Upon delivery of the chiller always verify that the shipment matches the bill of lading. Inspect the chiller immediately for signs of shipping damage both visible and concealed. Damaged crating indicates likely damage to the chiller and may require the removal of the panel and/or air filter(s) for further inspection. Refer to section 6.4 Internal Access to remove the panel or air filter(s) of the chiller. Any damage must be reported to the shipping carrier and a copy of the damage claim submitted to GDTS or your sales representative. 6.2 Transportation The chiller is shipped in a crate with protective packing and wrapping that should remain in place until the unit is transported to its final installation location. It is recommended that the chiller (crated or uncrated) be moved with a forklift. WARNING The chiller is heavy and there is risk of tilting or falling when moved. Transportation of the chiller must only be performed by trained and qualified personnel using appropriate equipment. Ensure that the chiller is securely positioned (tines of forklift spread as far as permitted along the chiller’s long edge and extend thoroughly through the opposite lifting face) before moving the chiller. ... -
Page 18: Unpacking From The Crate
Hypertherm, Inc. Part Number: 810540 Installation ‐ Unpacking from the Crate 6.3 Unpacking from the Crate The chiller is secured to the skid at the bottom of the crate with metal shipping brackets. The crate is held together with wood screws. To remove the chiller from its crate: 1. Move the crated chiller as close as practical to its installation location. 2. Start disassembly of the crate by removing the T25 Torx® head wood screws securing the top panel of the crate. 3. Continue disassembly by removing the T25 Torx® head wood screws holding the two short panels of the crate. This will allow access to the internal bracing. 4. Remove the T25 Torx® head wood screws securing the internal bracing to the two long sides. 5. Remove the 3/8‐16 bolts securing the shipping brackets to the base of the chiller using a 9/16” wrench. 6. Cut the shipping bag that the chiller was placed in. 7. Cut or unwrap the plastic shrink‐wrap from the unit. 8. Remove the desiccant bag located in the ebox, along with the desiccant bag located inside the chiller, referencing section 6.4 on how to gain internal access to the chiller. 9. Remove the lag bolts securing the shipping brackets to the skid using a 1/2” wrench. 10. Remove the shipping brackets. 11. Use a forklift to lift the chiller until its casters clear the top boards of the skid. 12. Pull the skid from under the chiller. 13. Lower the chiller onto the floor. ... -
Page 19: Internal Access
Hypertherm, Inc. Part Number: 810540 Installation ‐ Internal Access WARNING Use extreme care when lifting the chiller as it is top heavy. Tipping over the chiller during lifting could cause severe injury or death. The forklift forks should be spread as far apart as possible when positioned under the chiller. Lifting the chiller should only be performed by a trained forklift operator. 6.4 Internal Access To access the chiller’s internal components (refer to Figure 6: Chiller Internal Access): 6.4.1 From the Air Intake/Filter Side 1. Use a slotted screwdriver to turn the quarter‐turn Air Filter Latches above the Air Filters counterclockwise. 2. Gently lift the Air Filter upward by its mesh and then pull outward to remove the filter. 3. For more access: a. Use a slotted screwdriver to turn the quarter‐turn Side Blocker Latch counterclockwise. b. Lift the Side Blockers to release the guide fingers from the base and remove them from the machine. c. Use a slotted screwdriver to turn the quarter‐turn Upper Blocker Latch located on the right counterclockwise and the Upper Blocker Latch on the left clockwise. d. Grab the bottom of the Upper Blocker and pull outward to release the fingers at the top of the Upper Blocker from the machine sides and remove the Upper Blocker. ... -
Page 20: Electrical Supply Mains
Hypertherm, Inc. Part Number: 810540 Installation ‐ Electrical Supply Mains UPPER BLOCKER AIR FILTER LATCH DOOR LATCH 2X UPPER BLOCKER LATCH 2X SIDE BLOCKER LATCH DOOR HANDLE AIR FILTER DOOR SIDE BLOCKERS Figure 6: Chiller Internal Access 6.5 Electrical Supply Mains 6.5.1 Mains Power Requirements Ensure that the supply power is sufficient to meet the chiller power requirements defined in Table 5 and conforms to all local and national electrical codes: Table 5: Chiller Electrical Supply Power Requirements Criterion 50Hz 60Hz Voltage [V] 380‐415V ±10% 460‐480V ±10% ... -
Page 21: Mains Connectivity
Hypertherm, Inc. Part Number: 810540 Installation ‐ Electrical Supply Mains 6.5.2 Mains Connectivity Follow the procedure below to connect the appropriate 3‐Phase power to the chiller’s main circuit breaker disconnect. The chiller is equipped with a 1‐3/8” conduit fitting on the right side of the electrical enclosure (See Figure 7) to facilitate mains connectivity. 1. Open the electrical enclosure by turning the main circuit breaker disconnect handle to the OFF position and releasing the quarter‐turn latches using a flathead screwdriver (refer to Figure 7). 2. Remove the cap on the electrical enclosure conduit (1‐3/8”) located on the right side of the chiller. 3. Route the supply power through the conduit and into the electrical enclosure. 4. Wire mains power to the main circuit breaker disconnect according to the label located above the disconnect. 5. Wire the ground lead to the provided ground lug (refer to Figure 9). WARNING This procedure involves a risk of electric shock that could cause property damage, injury and/or death. All electrical connections should be performed only by properly trained and certified electricians wearing proper protective gear and using properly insulated tools. Before attempting to make any electrical connections or disconnections to the chiller: Verify that the chiller’s main circuit breaker disconnect handle is in the OFF position Verify that the incoming power to the chiller has been turned off Lock out and tag out the main electrical service disconnect Use a voltmeter to verify that there is no incoming power to the chiller ... -
Page 22: Figure 7: Chiller Electrical Enclosure Side
Hypertherm, Inc. Part Number: 810540 Installation ‐ Electrical Supply Mains CHILLER FAULT LIGHT QUARTER TURN LATCH (RED) SUPPLY MAINS CONDUIT CONTROLLER ON/OFF SWITCH CIRCUIT BREAKER DISCONNECT HANDLE E‐STOP BUTTON QUARTER TURN LATCH Figure 7: Chiller Electrical Enclosure Side AMBIENT TEMPERATURE ETHERNET PORT MACHINE INTERLOCK PORT PROBE Figure 8: Electrical Enclosure Bottom View (Inside Chiller) 20 ... -
Page 23: Figure 9: Electrical Panel (Simplified)
Hypertherm, Inc. Part Number: 810540 Installation ‐ Electrical Supply Mains 3‐PHASE POWER LABEL GROUNDING LUG CIRCUIT BREAKER DISCONNECT Figure 9: Electrical Panel (Simplified) 21 ... -
Page 24: Interlock Connections
Hypertherm, Inc. Part Number: 810540 Installation ‐ Interlock Connections 6.6 Interlock Connections The chiller is equipped with a standard 4‐pin male M12 Eurofast® connector for the interlocks (refer to Figure 10). The pin‐out for the interlock connector is shown on the Logic Page of the Electrical Prints in Appendix B. 6.7 Ethernet Connection The chiller is equipped with a standard RJ‐45 connector to enable Ethernet connectivity to the chiller controller. 6.8 Plumbing Connections The chiller’s plumbing connections are located on its plumbing I/O side (refer to Figure 10). The chiller has the following plumbing connections: Table 6: Chiller Plumbing Connections Connection Symbol Description Hose Size Type Process fluid inlet to the 3/4‐16 Male Please reference chiller from the plasma 37° Flare, Hypertherm, Inc. cutting system. (#8 JIC) HPR800XD manual Process fluid outlet from 3/4‐16 Male for approved hoses the chiller to the plasma 37° Flare, ... -
Page 25: Coolant Reservoir Filling
Hypertherm, Inc. Part Number: 810540 Installation ‐ Coolant Reservoir Filling ETHERNET CONNECTION INTERLOCK CONNECTION PROCESS FLUID OUTLET PROCESS FLUID INLET TANK LEVEL SIGHT GAUGE TANK DRAIN PORT Figure 10: Chiller Plumbing & Electrical Connectivity 6.9 Coolant Reservoir Filling When the chiller’s plumbing connections have been installed the reservoir must be filled with Plasma Cutting System Manufacture’s recommended coolant. Refer to Hypertherm equipment coolant requirements for proper coolant requirements. Do not use tap water. To fill the chiller’s coolant reservoir: 1. Remove the door panel, side blocker panels, and upper blocker panel as described in Section 6.4.2. 2. Remove the fill port cap from the top of the tank. 3. Fill the reservoir with the manufacturer’s recommended fluid while monitoring the Tank Level Sight Gauge (Refer to Figure 10). The reservoir should be filled until the level is near the High Tank Level label. The reservoir capacity is 10.5gal (40L). 4. Reinstall the reservoir fill port cap and hand tighten. 5. Replace the upper blocker panel, side blocker panels, and door panel as described in Section 6.4.2. ... -
Page 26: Refrigerant Filling
Hypertherm, Inc. Part Number: 810540 Installation ‐ Refrigerant Filling NOTICE The chiller will require more coolant than the volumes listed above to fill the chiller internal plumbing, plasma cutting system internal plumbing, and the connecting hoses. After the pumps have been started for the first time, additional coolant will likely be required as the internal system components are filled with coolant. When the chiller’s controller is powered, the coolant reservoir level can be monitored via the controller (refer to Section 8.5). 6.10 Refrigerant Filling If the chiller is installed in a fluorinated gas import restricted country or the European Union, it is subject to the F‐gas regulations. For these applications the DTS chiller part number 802092 is shipped with a nitrogen charge and has no refrigerant. Prior to startup the chiller is required to be charged with refrigerant. DTS can support charging the refrigeration through its certified contractor network. For DTS service information refer to Section 12. 6.11 Installation Checklist Transport and Location of Chiller Unpack and check received chiller. Sufficient clearance for intake and exhaust air has been maintained around the chiller. Sufficient clearance for service access has been maintained around the chiller. Electrical Supply voltage, current, phase, and frequency match chiller’s requirement. Incoming main power is wired correctly. ... -
Page 27: Operation
Hypertherm, Inc. Part Number: 810540 Operation ‐ Pre‐Startup 7 Operation 7.1 Pre‐Startup 7.1.1 Power‐up A. Ensure the system On/Off Switch selector is in the “O” position. B. Turn the Main Disconnect Handle to the “On” position. NOTE The PLC controller will turn on and go through an automatic self‐test. When the self‐test is complete, the controller will begin to monitor the system, but the chiller will not start. 7.1.2 Fault Check Once the chiller is powered on, any active alarms or warnings will be displayed on the controller after its start‐up and self‐test sequences are complete. To access the alarm list, press the Alarm Button on the controller. Most chiller alarms indicate a condition that prevents the chiller and/or plasma cutting system from operating safely. When this is the case the chiller controller deactivates the plasma cutting system Chiller OK interlock circuit and illuminates the “Chiller Fault” light (red) next to the controller. 7.1.2.1 Sensor Check Upon power‐up, the controller will begin monitoring the chiller system for proper operation. If any sensors read open, short, or out of range, the controller will display warning messages on the screen and the controller alarm will sound. 7.1.2.2 Phase Monitor The chiller is equipped with a phase monitor which checks for proper phasing and phase imbalance. If the incoming power line connections to the main circuit breaker disconnect are not connected properly ... -
Page 28: Initial Startup
Hypertherm, Inc. Part Number: 810540 Operation ‐ Initial Startup Table 7: Recommended Compressor Warm‐up Time Disconnect off Time Compressor Warm‐up Time < 30 min 0 min 30 min to 2 hrs 2 hrs 2 hrs to 4 hrs 4 hrs > 4 hrs 8 hrs CAUTION Starting the chiller pre‐maturely without allowing adequate time for the compressors to warm‐ up can allow the liquid refrigerant to be pumped through the compressor lubrication system and cause permanent damage to the compressor bearings and void the chiller warranty. 7.2 Initial Startup 7.2.1 Local Mode Start‐up The chiller can be operated in a Local Mode where it operates independent of the plasma cutting system, or in a Remote Mode where it starts and stops automatically based on the state of the Remote Start/Stop interlock from the plasma cutting system. Upon initial startup the chiller should be started in Local Mode to checkout chiller operation independent of the plasma cutting system. 7.2.1.1 Starting the Chiller in Local Mode To start the chiller turn the Local/Off/Remote Switch below the controller to the position. The pumps will turn on and start circulating water. ... -
Page 29: Remote Mode
Hypertherm, Inc. Part Number: 810540 Operation ‐ Shutdown 7.2.1.4 Recirculation Pump Check From the chiller controller home screen press and/or to highlight the MONITORING selection. Press to access the MONITORING menu and press until the “Recirculation Circuit” monitoring screen appears. Check the recirculation pump “Flow Rate” to make sure it exceeds 13.8gpm (52.2lpm) at 50Hz or 16.2gpm (61.3lpm) at 60Hz. If the recirculation pump flow rate is low, the flow rate can be increased by opening the globe valve at the recirculation pump outlet. 7.2.1.5 Temperature Check From the chiller controller home screen press and/or to highlight the MONITORING selection. Press to access the Monitoring menu. The first screen will be the Process Temperature Monitoring screen. Check the “Tout” on this screen. On initial startup the outlet temperature may be below the setpoint. To increase the temperature quickly the chiller will turn on the tank heater to warm up the coolant. Within a few minutes the outlet temperature should settle in close to the setpoint. 7.2.2 Remote Mode Once the chiller temperature is in the desired range, the chiller is ready to be controlled remotely by the plasma cutting system. To enable Remote Mode, turn the Local/Off/Remote Switch below the controller to the position. There should now be a “Unit on in Remote Mode” message on the home screen. The chiller will now be running in Standby Mode awaiting the Remote Start signal from the plasma cutting system. While in Standby Mode the refrigeration system will not run, but the chiller will start the pumps and heater as needed to keep the water warm. NOTICE While waiting for the Remote Start signal, the chiller water temperature may exceed the ... -
Page 30: Service
Hypertherm, Inc. Part Number: 810540 Operation ‐ Service 7.4 Service For chiller service, turn the Local/Off/Remote Switch below the controller to the “O” position and allow the chiller to complete its normal shutdown sequence. Once the shutdown sequence is complete and the controller indicates “Unit Off” turn the Main Disconnect Handle to the “Off” position. WARNING Do not service unit until power is secure. Follow standard Lockout/Tag‐out procedures. After completing service, turn the Main Disconnect Handle back to the “On” position and allow the crankcase heaters to warm‐up the compressors prior to restarting the chiller. Reference Table 7 in Section 7.1.4 for recommended warm‐up times. 28 ... -
Page 31: Controller
Hypertherm, Inc. Part Number: 810540 Controller ‐ Navigation 8 Controller ALARM BUTTON UP BUTTON PROGRAM BUTTON ENTER BUTTON BACK BUTTON DOWN BUTTON MICRO USB COVER Figure 11: Chiller’s Controller The chiller’s controller is located on the electrical enclosure door as shown in Figure 7. During normal operation, all control functions should be performed directly from the plasma system machine. The controller displays process measurement values as well as warnings and alarms due to faults from the chiller or process. Alarms are logged in the controller’s memory based on their time and date of occurrence. A USB storage device can be connected to the controller via its micro USB port to either update the controller’s program/firmware or to extract alarm logs. Open the micro USB cover to access this port (refer to Figure 11). To extract alarm logs, refer to section 8.8 Maintenance & Service. 8.1 Navigation To navigate through the controller’s screens: At the main menu level Use the and buttons to select the desired option. ... -
Page 32: Alarms
Hypertherm, Inc. Part Number: 810540 Controller ‐ Alarms 8.2 Alarms When a warning or fault is present, the Chiller Fault Light will be lit (Refer to Figure 7), the button on the controller will be lit red, and the controller buzzer will sound. 8.2.1 Turning off the Buzzer When an alarm is present the buzzer can be turned off by pressing the button. Anytime a new alarm is triggered the buzzer will resound. 8.2.2 Viewing Active Alarms If at least one alarm is active, press the button to access the alarm menu and view the alarm. If there is more than one active alarm, press the or buttons to navigate through the alarm list. 8.2.3 Resetting Alarms There are three different types of alarms used on the chiller. Table 9 in section 9.1 defines each alarm and how it is reset. 8.2.3.1 Auto Reset Alarms Auto Reset Alarms are alarms that automatically reset when the condition that is creating the alarm goes away. 8.2.3.2 Manual Reset Alarms Manual Reset Alarms are alarms that require manual intervention to reset such as the inline heater limit switch (Section 9.2) or the high pressure switch (Section 9.3). 8.2.3.3 User Reset Alarms User Reset Alarms are alarms that must be reset by the user through the controller. If the condition that ... -
Page 33: Main Menu
Hypertherm, Inc. Part Number: 810540 Controller ‐ Main Menu 8.3 Main Menu This screen displays the main menu options, date, day and time, chiller status and submenu options. DATE CHILLER STATUS SUBMENU OPTIONS TIME Figure 12: Controller Main Menu 8.4 Chiller Status The controller main menu displays a Chiller Status field that provides the operator with information regarding the operational mode the chiller is currently in. Table 8 defines each Chiller Status. Table 8: Chiller Statuses Unit Status Description Action/Response The chiller can be turned on by switching The Local/Off/Remote switch is either in the Local/Off/Remote switch from the O the O position or the position and is to position, or if the switch is in the UNIT OFF receiving a “stop” signal from the plasma position the chiller will start when it ... - Page 34 Hypertherm, Inc. Part Number: 810540 Controller ‐ Chiller Status Unit Status Description Action/Response (pumps, valves, etc.) are still functional. Refer to the alarm codes in section 9.1 Alarm List for more information. UNIT OFF DUE TO The chiller has turned off due to one or Refer to the alarm codes in section 9.1 FAULT! more faults. Alarm List for more information. SHUTDOWN IN A shutdown has been requested from The chiller is in the process of shutting PROGRESS… either the plasma system or Local Mode. down (typically between 2 to 5 minutes). 32 ...
-
Page 35: Monitoring
Hypertherm, Inc. Part Number: 810540 Controller ‐ Monitoring 8.5 Monitoring These screens display information regarding the chiller and process. Setpoint: Coolant supply setpoint temperature (this is adjusted in SETPOINTS under the main menu). Tout: Measured coolant supply temperature. Tin: Measured coolant return temperature. Figure 13: Monitoring, Temperatures HeatLoad: Calculated process heat load based on measured flow rate, outlet temperature, and inlet temperature. Comp Cap: Cooling capacity of the compressors at current operating conditions. Delta Temp: Difference between Inlet and Outlet Temperature. Cool Dem: Percentage ratio of combined cold and Coolant heat loads to cooling capacity of compressor at current operating conditions. Hotgas Req: Percentage of bypassed cooling capacity. Figure 14: Monitoring, System Status Cond Press: Measured pressure of refrigerant at condenser outlet. Cond Temp: Measured temperature of refrigerant at condenser outlet. Subcool: Calculated sub cooling value of refrigerant at condenser outlet. ... -
Page 36: Figure 16: Monitoring, Process Fluid Circuit
Hypertherm, Inc. Part Number: 810540 Controller ‐ Monitoring Dis Press: Measured supply pressure of cold water circuit from chiller. Flow Rate: Total process pump flow rate = Plasma system flow rate + bypass flow rate. Tank Level: Measured coolant reservoir level. Figure 16: Monitoring, Process Fluid Circuit Flow Rate: Measured Inlet Fluid flow rate. Tank Temp: Measured fluid temperature in tank. Tank Level: Measured coolant reservoir level. Figure 17: Monitoring, Recirculation Circuit In Press: Inlet pressure to the Fluid filter on the facility fluid circuit. Out Press: Outlet pressure form the fluid filter on the facility fluid circuit. Delta Press: Difference between the Fluid pressure on the inlet and outlet of the Fluid filter on the facility fluid loop. Max Delta: Maximum delta pressure threshold allowed between the inlet and outlet of the fluid filter on the facility fluid loop. Flow Rate: Measured cold water circuit supply flow rate through the filter. Figure 18: Monitoring, Filter Status 34 ... -
Page 37: Figure 19: Monitoring, Ambient Temperature
Hypertherm, Inc. Part Number: 810540 Controller ‐ Monitoring Ambient Temperature: Measure temperature of air entering the condenser coil. Specific Heat: Specific heat Constant of the Process Fluid, refer to set‐points for fluid type selection. Modbus Master Status: If the heater is connected to a MODBUS Master Controller. Figure 19: Monitoring, Ambient Temperature 35 ... -
Page 38: Devices
Hypertherm, Inc. Part Number: 810540 Controller ‐ Devices 8.6 Devices These screens display information regarding the chiller’s components. DEVICES: The screens in this menu display information regarding the chiller’s components. Figure 20: Devices Status: Status of compressor (On = running, Off = not running). Comp Required: Indicates whether or not the compressor is needed for the current operating condition (Off = Not required, On = Required). Able to on (off) in: Number of seconds before the compressor is able to start or stop. Run Time: Total time (in hours) the compressor has been operating. Hotgas: Percentage of hot gas valve open. EEV: Percentage of electronic expansion valve Figure 21: Devices, Compressor Status open. Status: Status of process pump (On = running, Off = not running). Overload: Status of pump overload (Ok = overload is functioning normally, Fault = overload has tripped). Runtime: Total time (in hours) the pump has been operating. ... -
Page 39: Figure 23: Devices, Recirculation Pump Status
Hypertherm, Inc. Part Number: 810540 Controller ‐ Devices Status: Status of process pump (On = running, Off = not running). Overload: Status of pump overload (Ok = overload is functioning normally, Fault = overload has tripped). Runtime: Total time (in hours) the pump has been operating. Figure 23: Devices, Recirculation Pump Status Status: Status of Heater (On = heating, Off = not heating). Overload: Status of pump overload (Ok = overload is functioning normally, Fault = overload has tripped). Out Temp: Process fluid supply temperature. In Temp: Process fluid return temperature. Figure 24: Devices, Heater Status Cond Press: Pressure of refrigerant for vapor to liquid phase change. Fan Enable Signal: Status of fan (On = running, Off = not running). Fan On: Percentage of full fan speed. Overload: Status of fan overload (Ok = overload is functioning normally, Fault = overload has tripped). Figure 25: Devices, Fan Status 37 ... -
Page 40: Figure 26: Devices, Motorized Hot Gas, Lop Protection
Hypertherm, Inc. Part Number: 810540 Controller ‐ Devices No. of Steps: Opening (in steps) of the motorized hot gas valve. Valve Open %: Opening (in percentage) of the motorized hot gas valve. Hot gas Required %: Percentage of hot gas required for cooling condition. Status: Status of LOP (On = running, Off = not running). Valve Open %: Opening (in percentage) of the hot gas valve to the full open position. Figure 26: Devices, Motorized Hot Gas, LOP Protection Steps: Opening (in Steps) of the expansion valve. Open %: Opening (in percentage) of expansion valve to the full open position. Figure 27: Devices, Expansion Valve 1 Evap Press: Pressure of refrigerant for liquid to vapor phase change. Evap Temp: Temperature at which the refrigerant evaporates from liquid to vapor. MOP Protect: Enable Loop protection control (reducing refrigerant). LOP Protect: Enable Loop protection control (increase refrigerant). SH Protect: Enable Loop protection for compressor suction. Superheat: Calculated superheat value of refrigerant at compressor suction. ... -
Page 41: Figure 29: Devices, I/O Module
Hypertherm, Inc. Part Number: 810540 Controller ‐ Devices Status: Status for the controller’s I/O module. Address: Modbus address of the I/O module. Figure 29: Devices, I/O Module 39 ... -
Page 42: Setpoints
Hypertherm, Inc. Part Number: 810540 Controller ‐ Setpoints 8.7 Setpoints These screens display the user settable setpoints for the chiller. Temperature Setpoint: Outlet temperature setpoint for the process cooling water. Units of Measure: Select the units of measure to be displayed on the user interface. Figure 30: Setpoints, Temperature Fluid: Heat Transfer Fluid type. Concentration: Percentage of Heat Transfer Fluid vs. water. Operating Frequency: Frequency of mains power. Figure 31: Setpoints, Plasma system Outlet Flow Enable: Status of Standby Mode operation (YES = enabled, NO = disabled). Standby Mode Setpoint: Minimum allowable process coolant temperature when Standby Mode is enabled. Figure 32: Setpoints, Standby Mode 40 ... -
Page 43: Maintenance & Service
Hypertherm, Inc. Part Number: 810540 Controller ‐ Maintenance & Service 8.8 Maintenance & Service This screen and its submenus contain information regarding the total operational hours of the chiller’s components as well as contact information of the factory. The Local Mode is also enabled or disabled in this section. MAINTENANCE & SERVICE: This is the main menu under the Maintenance & Service option. Figure 33: Maintenance & Service, Main Menu Under the ABOUT option: OS Version: Current Operating system version of the controller. Boot Version: Current Boot version of the controller. Core Version: Current Core (CPU) version of the controller. Program No: Current program number loaded onto the controller. Program Version: Current program version. Figure 34: Maintenance & Service, About Under the CONTACT SERVICE option: Contact information for the factory’s service department is displayed here. Figure 35: Maintenance & Service, Contact Service 41 ... -
Page 44: Figure 36: Maintenance & Service, Contact Parts
Hypertherm, Inc. Part Number: 810540 Controller ‐ Maintenance & Service Under the CONTACT PARTS option: Contact information for the factory’s replacement parts department is displayed here. Figure 36: Maintenance & Service, Contact Parts Under the RUN TIMERS option (page 1): Comp: Total operating time (in hours) of the compressor. Fan: Total operating time (in hours) of the Fan. Note: These timers are also available in the DEVICES menu (refer to Figure 21) Figure 37: Maintenance & Service, Compressor and Fan Run Time Under the RUN TIMERS option (page 2): Process Pump: Total operating time (in hours) of the process pumps. Recirc Pump: Total operating time (in hours) of the recirculation pump. Note: These timers are also available in the DEVICES menu (refer to Figure 23) Figure 38: Maintenance & Service, Pump Run Time 42 ... -
Page 45: Figure 40: Maintenance & Service, Alarm Log Export
Hypertherm, Inc. Part Number: 810540 Controller ‐ Maintenance & Service Under the RUN TIMERS option (page 2): Heater Hours: Total operating time (in hours) of the heater. Unit Life: Total operating time (in hours) of the chiller. Note: These timers are also available in the DEVICES menu (refer to Figure 24) Figure 39: Maintenance & Service, Heater and Unit Run Time Under the RUN TIMERS option (page 4): Memory type: INTERNAL = Alarm log will be saved to internal controller memory. USB = Alarm log will be saved to a micro USB memory stick in the micro USB port. File name: File name for the alarm log file (00 – 99). Export Logs: NO = alarm log not exported, YES = alarm log exported to Memory type location and saved as File name. Figure 40: Maintenance & Service, Alarm Log Export To export the most recent alarm log: 1. Press the button when in this screen. 2. Under Memory Type press the or arrow to toggle the export location (INTERNAL will export the log ... -
Page 46: Troubleshooting
Hypertherm, Inc. Part Number: 810540 Troubleshooting ‐ Alarm List 9 Troubleshooting 9.1 Alarm List If the chiller has encountered a warning or fault it will be displayed in the alarm menu (refer to section 8.1 Navigation to access this menu). Table 9: Alarm List Alarm Alarm Name Type Description Corrective Action Code Verify that the I/O module (301PLC) is connected. The controller’s I/O module has Auto Verify that the I/O module DIP switch settings are AL*02 cPCOe offline alarm been disconnected or has the reset incorrect DIP switch settings. correct (refer to Table 15 in Appendix C). Verify that fluid circuits are clear from The manual motor protector for obstructions (debris, hose kinks, clogged filters, Pump Overload Auto AL*017 ... - Page 47 Hypertherm, Inc. Part Number: 810540 Troubleshooting ‐ Alarm List Alarm Alarm Name Type Description Corrective Action Code Verify the chiller is operating within the specified environment conditions (refer to Section 5.2.1). Verify that air intake and exhaust clearances have been adhered to (refer to Section 5.2.5). Verify the compressor status is “ON” (refer to Figure 21). Verify the motorized hot gas valve is fully closed (0%) (refer to Figure 21). Verify the Superheat is < 20°F (refer to Figure 15). If the Superheat is > 20°F the refrigerant charge may be low. Contact DTS Service. Verify the tank heater status is “ON” (refer to Figure 24). Verify the compressor status is “OFF” (refer to Fluid Under Temp Auto Process water outlet temperature ...
- Page 48 Hypertherm, Inc. Part Number: 810540 Troubleshooting ‐ Alarm List Alarm Alarm Name Type Description Corrective Action Code Check the M12 Eurofast electrical connector on The flow signal from the flow Auto meter in the recirculation circuit is the flow meter to ensure it is fully tightened. AL*032 Recirc Flow Prb Err If the fault persists contact DTS Service. reset reading open, short, or out of range. The temperature signal from the Check the M12 Eurofast electrical connector on Auto flow meter in the recirculation AL*033 Recirc Temp Prb Err the flow meter to ensure it is fully tightened. reset circuit is reading open, short, or If the fault persists contact DTS Service. ...
- Page 49 Hypertherm, Inc. Part Number: 810540 Troubleshooting ‐ Alarm List Alarm Alarm Name Type Description Corrective Action Code The ambient temperature is below Wait for the ambient temperature to increase to Ambient Temp Very Auto the chiller’s approved AL*046 within the approved environmental conditions Low reset environmental conditions defined defined in Table 4. in Table 4. The ambient temperature has Wait for the ambient temperature to decrease to Ambient Temp Very Auto exceeded the chiller’s approved AL*047 within the approved environmental conditions High reset environmental conditions defined defined in Table 4. in Table 4. ...
-
Page 50: Inline Heater Temperature Limit Switch
Hypertherm, Inc. Part Number: 810540 Troubleshooting ‐ Inline Heater Temperature Limit Switch 9.2 Inline Heater Temperature Limit Switch The chiller is equipped with a mechanical, temperature limit switch that disengages (trips) the heater in the event of a malfunction to prevent excessive fluid temperatures that could result in fire hazards. If the switch has tripped it can be reset by performing the following steps: 1. Access the chiller’s air intake/filter side (refer to section 6.4 Internal Access). 2. Locate the temperature limit switch (refer to 3. Figure 41). 4. Unscrew the cap on the temperature limit switch to access the green reset button. 5. Press the reset button with a screwdriver of appropriate size until a tactile click is felt. If the button is loose and there is no click then the switch is already closed. If the button will not remain closed (engaged) after attempting to press, then the temperature of the pipe, in which the inline heater is located, is still too hot. Allow the pipe surface to cool before attempting to reset the switch. 6. Reinstall the cap on the temperature limit switch. 7. Reinstall the air intake filter(s) before restarting chiller. 9.3 Refrigeration High Pressure Switch WARNING The refrigeration discharge lines may be extremely hot – avoid contact. Resetting of the refrigeration high pressure switch should only be performed by qualified personnel equipped with proper safety gear and tools. The chiller’s refrigeration circuit is equipped with a mechanical, high pressure switch that disengages (trips) the refrigeration circuit when dangerously high pressures occur to prevent damage to the refrigeration system. If ... -
Page 51: Maintenance
Hypertherm, Inc. Part Number: 810540 Maintenance ‐ Suggested Maintenance Checklist 10 Maintenance Establishing and following a proper maintenance schedule will substantially reduce down time, reduce repair costs and extend lifetime of the chiller. A suggested checklist has been provided in section 10.1 Suggested Maintenance Checklist. 10.1 Suggested Maintenance Checklist Items in this list should be initially performed on a weekly basis to determine their respective maintenance frequencies. For example, if a component requires cleaning or replacement after 12 weeks of operation then the maintenance frequency of that component is 12 weeks. Maintenance frequencies must be re‐established when operating environments or conditions have changed. 1. Inspect and clean the condenser coil and air intake filter Excessive buildup of dirt, oil and/or other debris on the condenser coil and air intake filters will cause reduced air flow rates for heat dissipation leading to lower cooling capacities. Ensure that the fins of the condenser coil are clean and undamaged. Use compressed air at no more than 30psi (2.0bar) to blow out the condenser coil and air intake filters in the direction opposite to normal air flow. For the condenser coil the cleaning air should enter the discharge side and exit from the intake side (refer to Figure 41 and Figure 42). The air intake filters show the direction of cleaning and installation. If the air filters cannot be cleaned then they must be replaced. Contact the factory for replacement parts if required. 2. Inspect the supply pressures. Record the supply pressure of both circuits after the initial startup and then periodically. If plumbing connections between the chiller and plasma system (hose lengths, fittings, valve positions, etc.) have remain unchanged it is expected that the supply pressures should remain relatively constant over time. An increase in pressure is indicative of a clogged filter/strainer or buildup of debris in the coolant circuits. 3. Inspect the cold water particulate filter. Inspect the particulate filter to determine if it needs to be replaced. Refer to Figure 41 for the location. ... -
Page 52: Replacing The Particulate Filter Cartridge
Hypertherm, Inc. Part Number: 810540 Maintenance ‐ Replacing the Particulate Filter Cartridge 6. Schedule planned maintenance services. Consult the factory to schedule and perform planned maintenance services on the chiller by qualified refrigeration technicians. 10.2 Replacing the Particulate Filter Cartridge The chiller’s process circuit is equipped with a particulate filter. Although this prolongs the lifespan of the Chiller, the filter cartridge will eventually deplete. The chiller monitors when the cartridge is no longer functional and will display a warning on the controller. If this warning occurs the cartridge must be replaced according to the following steps: 1. Shut the chiller down by turning the Local/Off/Remote Switch below the controller to the “O” position. 2. Access the chiller’s air intake/filter side (refer to section 6.4 Internal Access). 3. Locate the particulate filter refer to Figure 41. 4. Carefully unscrew the sump of the filter using the provided filter wrench (typically stored in the inside door pocket of the electrical enclosure when shipped). The sump will be full of coolant when removed. 5. Remove and discard the depleted filter cartridge and empty the sump of coolant. 6. Reinstall a new filter cartridge into the sump. 7. Reinstall the sump with the new filter cartridge taking care to ensure the sump o‐ring is properly seated. 8. Tighten the filter sump using the filter wrench. 9. Reinstall the air intake filter(s) before restarting chiller. 50 ... -
Page 53: Figure 41: Chiller Internal Components (Air Filter/Intake Side)
Hypertherm, Inc. Part Number: 810540 Maintenance ‐ Replacing the Particulate Filter Cartridge HIGH PRESSURE SWITCH RECIRCULATION CIRCUIT FLOW METER Y‐STRAINER HEATER LIMIT SWITCH FLUID FILTER DRAIN VALVE TANK HEATER Figure 41: Chiller Internal Components (Air Filter/Intake Side) 51 ... -
Page 54: Figure 42: Chiller Internal Components (Panel Side)
Hypertherm, Inc. Part Number: 810540 Maintenance ‐ Replacing the Particulate Filter Cartridge RESERVOIR FILL CAP RESERVOIR PROCESS PUMP RECIRCULATION PUMP Figure 42: Chiller Internal Components (Panel Side) 52 ... -
Page 55: Chiller Data Tag
Hypertherm, Inc. Part Number: 810540 Chiller Data Tag ‐ Replacing the Particulate Filter Cartridge 11 Chiller Data Tag Figure 43: Chiller Data Tag 53 ... -
Page 56: Factory Contact
Hypertherm, Inc. Part Number: 810540 Factory Contact ‐ Service Support Team 12 Factory Contact Hours of operation are 8:00 a.m. to 5 p.m. EST, Monday to Friday. Website: https://www.dimplexthermal.com 12.1 Service Support Team serviceteam@dimplexthermal.com (800) 968‐5665 ext. 709 (269) 349‐6800 12.2 Parts Department partsdept@dimplexthermal.com (800) 968‐5665 ext. 709 (269) 349‐6800 54 ... -
Page 57: Revisions
Hypertherm, Inc. Part Number: 810540 Revisions ‐ Parts Department 13 Revisions Table 10: Manual Revisions Rev Description By Date A J. Roby 10/08/2018 Initial Release B J. Roby 11/1/2018 Multiple updates based on Hypertherm review C J. Roby 11/3/2018 Added SI units to Tables 13 & 14, Added SI units to AL021 in Table 9 D S. Kadosh 12/14/2018 Updated warranty period from 18 mo. Added DoC to Appendix E. Changed Original Translation (English) to Original Instructions on E J. Roby 12/18/2018 title page. F s S. Kadosh 01/14/2019 ... -
Page 58: Appendix A (P&I Diagrams)
Hypertherm, Inc. Part Number: 810540 Appendix A (P&I Diagrams) ‐ Refrigeration Schematic Appendix A (P&I Diagrams) Refrigeration Schematic 56 ... -
Page 59: Plumbing Schematic
Hypertherm, Inc. Part Number: 810540 Appendix A (P&I Diagrams) ‐ Plumbing Schematic Plumbing Schematic 57 ... -
Page 60: Appendix B (Electrical Schematics)
Hypertherm, Inc. Part Number: 810540 Appendix B (Electrical Schematics) ‐ Power Page Appendix B (Electrical Schematics) Power Page 58 ... -
Page 61: Plc
Hypertherm, Inc. Part Number: 810540 Appendix B (Electrical Schematics) ‐ PLC PLC 59 ... -
Page 62: I/O Module
Hypertherm, Inc. Part Number: 810540 Appendix B (Electrical Schematics) ‐ I/O Module I/O Module 60 ... -
Page 63: Logic
Hypertherm, Inc. Part Number: 810540 Appendix B (Electrical Schematics) ‐ Logic Logic 61 ... -
Page 64: Electrical Panel
Hypertherm, Inc. Part Number: 810540 Appendix B (Electrical Schematics) ‐ Electrical Panel Electrical Panel 62 ... -
Page 65: Electrical Bom
Hypertherm, Inc. Part Number: 810540 Appendix B (Electrical Schematics) Electrical BOM Table 11: Electrical Panel Bill of Materials ITEM PART DESCRIPTION QTY. NO. NUMBER 1 204042 PANEL ‐ EBOX, 30" X 36" 1 2 5002086 30A,MOLDED CASE CB, E FRAME,TYPE H 1 3 5001779 EG HANDLE KIT 1 4 5001786 3 TERMINAL LUGS EG FRAM MCCB 2‐14AWG 1 5 5000472 PHASE MONITOR 3PH 1.8VA 1 6 5001600 400‐500VAC 240W 24VDC PSU 1 ... -
Page 66: Appendix C (Default Controller Settings)
Hypertherm, Inc. Part Number: 810540 Appendix C (Default Controller Settings) Appendix C (Default Controller Settings) Program Settings Table 12: Default Program Settings Category Parameter Values UOM °F (°C) On Devn Setpoint +1.0 (0.56) Compressor Settings °F (°C) Off Devn Setpoint ‐3.0 (‐1.67) °F (°C) On Devn Setpoint ‐3.0 (‐1.67) Heater Settings °F (°C) Off Devn Setpoint +0.0 (0.0) Deadband 2 (0.14) PSI (bar) Gain 10.0 ‐‐‐‐ PID Regulation For Fan Integral Time 25.0 s Derivative Time ... -
Page 67: Sensor Calibration
Hypertherm, Inc. Part Number: 810540 Appendix C (Default Controller Settings) Sensor Calibration Table 13: Default Sensor Calibration Settings Category Parameter Values UOM 0.5V 0.0 (0.00) PSI (bar) Compressor Discharge Pressure Transducer 4.5V 500.0 (34.47) PSI (bar) 0.5V ‐15.0 (‐1.03) PSI (bar) Compressor Suction Pressure Transducer 4.5V 185.0 (12.76) PSI (bar) 4mA 0.0 (0.00) PSI (bar) Process Outlet Pressure Transducer 20mA 300.0 (20.68) PSI (bar) 4mA 0.0 (0.00) ... -
Page 68: Alarm Settings
Hypertherm, Inc. Part Number: 810540 Appendix C (Default Controller Settings) Alarm Settings Table 14: Default Alarm Settings Category Parameter Values UOM Deviation 10.0 (5.6) °F (°C) Min Temperature Alarms Otemp Inhibit 10 Min Utemp Inhibit 10 Setpoint 0.4 (1.5) GPM (LPM) Process Flow Alarms Inhibit Time 20 s Setpoint 6 (22.7) GPM (LPM) Recirc Flow Alarms Inhibit Time 20 s Setpoint 240 (16.54) ... -
Page 69: I/O Module
Hypertherm, Inc. Part Number: 810540 Appendix C (Default Controller Settings) I/O Module Table 15: I/O Module Default Settings Address 5 DIP Switch Settings 67 ... -
Page 70: Appendix D (Warranty)
Hypertherm, Inc. Part Number: 810540 Appendix D (Warranty) Appendix D (Warranty) Warranty Coverage WARRANTY OF WORKMANSHIP AND MATERIALS THE IMPLIED WARRANTIES OF MERCHANTABILITY AND OF FITNESS FOR A PARTICULAR PURPOSE AND, EXCEPT AS SPECIFICALLY SET FORTH HEREIN, ALL OTHER WARRANTIES AND REPRESENTATIONS, EXPRESSED OR IMPLIED, ARE HEREBY DISCLAIMED AND EXCLUDED BY THIS AGREEMENT. THERE ARE NO WARRANTIES THAT EXTEND BEYOND THE DESCRIPTION HEREOF. SELLER’S WARRANTIES HEREIN APPLY ONLY TO THE ORIGINAL PURCHASER AND DO NOT EXTEND, EXPRESSLY OR BY IMPLICATION, TO ANY OTHER PERSON OR PERSONS. Seller guarantees all North American installed equipment and materials of its manufacture or start‐up services performed by Seller against defects in workmanship and material—under normal and intended use, service, maintenance and proper installation—for a period of twenty‐four (24) months for Koolant Kooler Brand Chillers from date of shipment. Equipment installed outside of North America will be warranted for parts only, standard delivery shipment. The Seller obligation under this agreement is limited solely to repair or replacement at Seller’s option, in Seller’s factory or in the field, with Seller approval, within said warranty period. If the equipment is returned to Seller’s factory, the unit must be returned freight prepaid, with prior approval from Seller, with Buyer having obtained a returned goods authorization (RGA) number from Seller. Seller will make any needed repairs at no charge to Buyer if the damage is determined not to be the fault of the Buyer. Seller will then return the equipment to Buyer freight prepaid; in other words, Seller will be responsible for one leg of the transportation costs. The above warranty shall not apply to any equipment, or components thereof, which have been subject to abnormal or improper use, negligence (including failure to maintain the equipment as recommended in writing by Seller) or accident or which have been altered or repaired by other than Seller or Seller’s authorized representative. Nothing shall be construed as an additional warranty unless specifically designated as such in writing and signed by Seller (“Additional Warranty”). The Additional Warranty shall be subject to the provision of this document as to duration and limitation of remedy, unless the Additional Warranty expressly amends such provisions. The above warranty shall not apply to any parts sold independently of the unit sold. All parts sales are subject to a ninety (90) day warranty. 68 ... -
Page 71: General Warranty Procedures
Hypertherm, Inc. Part Number: 810540 Appendix D (Warranty) General Warranty Procedures Warranty Work Before doing any work on a chiller covered under warranty, call Dimplex Thermal Solutions (DTS) and explain the problem to one of our service technicians who can then determine the best course of action. DTS will not be obligated to pay for warranty service performed without our prior approval. Please Note: It is the service contractor’s responsibility to enclose a service report/work order with each invoice. Unless pre‐authorized for special circumstances, DTS will not honor invoices for work done by two or more people at a time, or for overtime labor charges. If the customer requests work that falls into either of these categories, the customer is responsible for the extra charges incurred. Warranty Parts All replacement parts under warranty must come from Dimplex Thermal Solutions. When it is necessary for DTS to replace parts which are under warranty, we will issue a Returned Goods Authorization (RGA) for all parts we wish to have shipped back to our factory, freight prepaid. RGAs are valid for a period of thirty (30) days. If DTS has not received the requested parts by the expiration date, the customer will be invoiced for the replacement cost at that time. Please Note: While DTS is willing to pay freight charges one way for replacement parts, special freight charges, such as next day service, Saturday delivery, etc., are not included. If the customer requests one of these special services, they are responsible for the charges incurred. Please note DTS standard warranty terms can change and be updated at any time. Please view our website for the most recent version. 69 ... -
Page 72: Appendix E (Declaration Of Conformity)
Hypertherm, Inc. Part Number: 810540 Appendix E (Declaration of Conformity) Appendix E (Declaration of Conformity) 70 ... - Page 73 Hypertherm, Inc. Part Number: 810540 Appendix E (Declaration of Conformity) 71 ...
- Page 74 Hypertherm, Inc. Part Number: 810540 Appendix E (Declaration of Conformity) 72 ...
- Page 75 Hypertherm, Inc. Part Number: 810540 Appendix E (Declaration of Conformity) 73 ...
-
Page 76: Appendix F (Chiller Registration)
Hypertherm, Inc. Part Number: 810540 Appendix F (Chiller Registration) Appendix F (Chiller Registration) The registration form must be submitted within 30 days of installation date or warranty coverage will be calculated from the date the chiller was shipped from the factory. http://www.dimplexthermal.com/service/register‐chiller‐location Register Your Chiller’s Site Location Why register your chiller? Dimplex Thermal Solutions chillers are sold across the globe, and often bundled with other manufacturers’ equipment. In order to provide a reliable chiller service network across North America, please register the chiller’s site location with our inside service team. The team will map your location and make efforts to provide a reliable service experience in your area for years to come. Serial Number of Chiller Model Number of Chiller Purchase Information OEM/Reseller Company Name Contact Name Contact Position Email Address Phone Number Fax Number Chiller Location Information Installation/Startup Date Position Company Name Street Address Address 2 (Suite/Apt) City State/Province/Region Country ZIP/Postal Code Primary Contact Name Contact Position ... -
Page 77: Hypertherm, Inc. Part Number
Hypertherm, Inc. Part Number: 810540 Service and Parts: partsdept@dimplexthermal.com Technical Support: serviceteam@dimplexthermal.com Sales Department: salesdept@dimplexthermal.com Assembled in USA. | ISO 9001 Certified 2625 Emerald Drive | Kalamazoo, Michigan 49001 800.968.5665 | 269.349.6800 | dimplexthermal.com ENG-MAN-0013 75 ...
Need help?
Do you have a question about the Koolant Koolers N-Series and is the answer not in the manual?
Questions and answers