Myray RX DC Operating Instructions Manual
Hide thumbs
Also See for RX DC:
- Installation manual (25 pages) ,
- Manual (309 pages) ,
- Technical manual (34 pages)
Chapters
Table of Contents

Related Manuals for Myray RX DC


Summary of Contents for Myray RX DC
- Page 1 97050096 r e v. 0 0 0 0 0 / 2 0 0 7 TALIANO ............2 ENGLISH ............23...
-
Page 3: Table Of Contents
ISTRUZIONI PER L'USO Indice 1. Avvertenze generali ..............................4 1.1. Simbologia ..............................4 1.2. Uso previsto e modalità di impiego .........................5 1.2.1. Classifi cazione ............................5 1.2.2. Condizioni ambientali .........................5 1.2.3. Garanzia .............................5 2. Descrizione apparecchiatura ............................6 2.1. Descrizione del radiografi co ..........................6 3. -
Page 4: Avvertenze Generali
1. Avvertenze generali Queste istruzioni descrivono come utilizzare correttamente il radiografi co DC. Si prega di leggere attentamente questo manuale prima di utilizzare l'apparecchiatura. NOTA In questo manuale non vengono riportate tutte le raccomandazioni e gli obblighi per detenere una sorgente di radiazioni ionizzanti in quanto varianti da Stato a Stato. -
Page 5: Uso Previsto E Modalità Di Impiego
1.2. Uso previsto e modalità di impiego Questo apparecchio radiologico è un apparecchio ad uso medico destinato alla diagnosi radiologica endorale nello studio odontoiatrico. Può essere utilizzato con le tradizionali lastre a sviluppo chimico e con i sensori digitali a raggi X. 1.2.1. -
Page 6: Descrizione Apparecchiatura
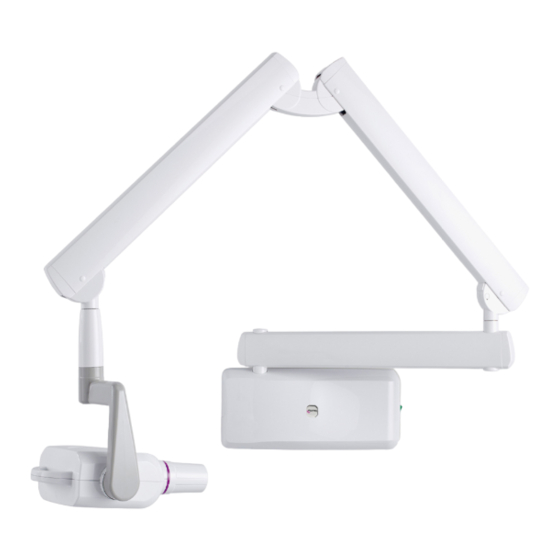
2. Descrizione apparecchiatura 2.1. Descrizione del radiografi co L'apparecchiatura è cosi composta: Braccio a doppio pantografo Braccio prolunga Piastra murale Palmare di Macchia focale comando Supporto per palmare Generatore di raggi X Collimatore (cono) - Braccio a doppio pantografo: E' un braccio a doppia articolazione applicato su un ulteriore braccio di prolunga che può essere di tre diverse misure (40 cm, 60 cm e 90 cm). -
Page 7: Accensione Del Palmare Di Comando
3.1.2. Accensione del palmare di comando Il palmare di comando si accende premendo un qualsiasi tasto della pulsantiera, fatta eccezione del pulsante dedicato all'emissione dei raggi. Un segnale acustico confermerà l'avvenuta accensione dell'apparato, che si posizionerà nella confi gurazione standard descritta nel dettaglio al capitolo 3.1.3 per poi ricercare il radiografi... -
Page 8: Pulsantiera Di Comando
3.1.3. Pulsantiera di comando La pulsantiera di comando del palmare, come si può vedere nelle fi gura sottostante, è composta da quattro tasti funzione e dal tasto esclusivamente dedicato allo sparo. Selezione per zone della Selezione dentizione Corporatura Tasto "Decrementa" Spia emissione raggi x... -
Page 9: Spegnimento Automatico Del Palmare
3.1.5. Spegnimento automatico del palmare A seguito dello spegnimento del base, dopo circa un minuto il palmare si spegne automaticamente. Allo stesso modo quindi, nel caso il palmare si spegnerà in automatico se lo stesso dovesse trovarsi distante e comunque fuori dalla zona di campo utile per l'interfacciamento con il base. 3.1.6. -
Page 10: Batterie E Indicazione Dello Stato Di Carica
Esame degli incisivi inferiori Esame dei premolari/canini inferiori Esame dei molari inferiori 3.3. Batterie e indicazione dello stato di carica Per garantire una suffi ciente autonomia del palmare, la sua alimentazione è data da due batterie alcaline standard di tipo AA di facile reperibilità. Lo stato di carica delle batterie è... -
Page 11: Posizionamento Della Lastra O Sensore
3.6. Posizionamento della lastra o sensore La tecnica del parallelismo, ove applicabile, fornisce immagini più accurate in termini di dimensioni rispetto alla tecnica della bisettrice. L'uso del collimatore rettangolare, con distanza fuoco-pelle di 30cm, è sempre raccomandato, al fi ne di ottenere immagini radiografi che di qualità superiore. Per evitare di esporre solo parzialmente il recettore d'immagine (sia esso un sensore o una lastra ai fosfori fotostimolabili) si consiglia l'uso di un centratore che disponga delle linee guida per collimatori rettangolari, linee tipicamente riportate sull'anello di centratura. -
Page 12: Verifi Ca Del Tempo Sul Display
3.7. Verifi ca del tempo sul display Prima di eseguire l’esposizione verifi care sul display del palmare il tempo impostato (vedi tabelle dei valori di esposizione di origine, paragrafo 3.1.4). Per modifi care la selezione premere gli appositi pulsanti "+" e "-". NOTA: La modifi... -
Page 13: Programmazione Del Tempo Di Esposizione Ai Raggi
3.9. Programmazione del tempo di esposizione ai raggi In questo radiografi co i tempi di esposizione di origine programmati non possono essere modifi cati. ATTENZIONE! Dopo la personalizzazione le “Tabelle dei valori di esposizione di origine” non sono più valide. Per programmare i nuovi valori di esposizione agire come segue: •... - Page 14 - Livelli di sensibilità NOTA: Per eventuali messaggi di errore che possono apparire a display, vedi tabella a paragrafo 9.2. ISTRUZIONI PER L'USO...
-
Page 15: Manutenzione Periodica
5. Manutenzione periodica ATTENZIONE! Qualsiasi intervento tecnico si rendesse necessario deve essere eseguito da personale qualifi cato o dal tecnico autorizzato dal produttore. È responsabilità dell’utilizzatore far eseguire dal tecnico autorizzato un intervento di manutenzione periodica preventiva almeno ogni 2 anni. Le modalità... -
Page 16: Dati Tecnici
• Riproducibilità: 0,05. • Classifi cazione elettrica: Classe I - Tipo B, servizio intermittente. • Tempo di esposizione impostato: ± 0,010 a 1,000 secondi. • Precisione dei tempi indicati: ±10% (massimo). PESI • Peso della confezione imballata: 25 Kg. • Peso del palmare: 0,3 Kg. - Page 17 725 - 925 - 1225 950 - 1150 - 1450 400-600-900 155 0 - 17 50 - 2 05 0 2 040 - 2240 - 25 40 ISTRUZIONI PER L'USO...
-
Page 18: Targhette Di Identifi Cazione
9.2. Targhette di identifi cazione ATTENZIONE! Non rimuovere le targhette di identifi cazione presenti su generatore, centralina e cono di collimazione. Centralina (TARGHETTA PRINCIPALE) La targhetta si trova a fi anco dell’interruttore generale. NB: Questa targhetta indicherà una tensione diversa a seconda del modello di radiografi co utilizzato (230 Vac oppure 115 Vac). Dati riportati sulla targhetta: •... - Page 19 Collimatore La targhetta del collimatore quadro si trova all’esterno dello stesso. Dati riportati sulla targhette: • Nome del costruttore. • Tipo di cono. • Numero di serie. • Data di fabbricazione. Palmare di comando La targhetta del palmare di comando si trova all'interno dello spazio dedicato alle batterie. Dati riportati sulla targhetta: •...
-
Page 20: Tabella Degli Errori
9.3 Tabella degli errori ERRORE CAUSA SOLUZIONE MANTENERE PREMUTO IL PULSANTE FINO AL TERMI- PULSANTE RAGGI RILASCIATO ANTICIPATAMENTE NE DEL CICLO DI SCATTO. DOPO AVERE INSERITO O DISINSERITO IL COLLIMA- SELEZIONE DEL COLLIMATORE NON CONGRUENTE TORE RETTANGOLARE ATTENDERE ALCUNI SECONDI AFFINCHÉ... - Page 21 Stabilimento / Plant Cefl a Dental Group Via Bicocca 14/c – 40026 Imola (BO) Italy Tel. (+39) 0542 653441 – Fax (+39) 0542 653555 www.cefl adentale.it - cefl adentale@cefl a.it DICHIARAZIONE “CE” DI CONFORMITÀ “CE” CONFORMITY DECLARATION DECLARATION DE CONFORMITÉ “CE” ERKLÄRUNG VON “CE”...
- Page 23 OPERATING INSTRUCTIONS Contents 1. General precautions ..............................24 1.1. Description of the symbols used ..........................24 1.2. Purpose and use of the equipment ..........................25 1.2.1. Classifi cation ..............................25 1.2.2. Environmental conditions .........................25 1.2.3. Guarantee ............................25 2. Description of the equipment ..........................26 2.1. Description of the x-ray unit ..........................26 3.
-
Page 24: General Precautions
1. General precautions These instructions describe how to use the DC x-ray unit correctly. Please read this manual carefully before using the equipment. NOTE: This manual does not contain all the recommendations and rules on holding a source of ionogenic radiation as these vary from place to place. Only the most common ones shall be mentioned and this means that it is the user’s responsibility to check local standards and observe the relevant laws. -
Page 25: Purpose And Use Of The Equipment
1.2. Purpose and use of the equipment This x-ray unit is designed for use in the dental surgery to make endo-oral x-rays for diagnostic purposes. This equipment can be used to produce traditional x-rays developed using chemicals or, alternatively, it can be used with digital x-ray sensors. 1.2.1. -
Page 26: Description Of The Equipment
2. Description of the equipment 2.1. Description of the x-ray unit Description of the equipment: Double pantograph Extension arm w a l l - m o u n t i n g plate handheld Focal spot handheld hol- X-ray generator Collimator (cone) Double pantograph arm: This is a double-jointed arm to which a further extension arm can be added. -
Page 27: Turning On The Handheld
3.1.2. Turning on the handheld The handheld is turned on by pressing any key, except for the one for x-ray emission. A buzzer rings to confi rm the apparatus has been turned on. The unit will be in the standard confi guration described in detail in paragraph 3.1.3 and then search for the base it works with. If the base is off, the handheld will not indicate the fi... -
Page 28: Control Panel
3.1.3. Control panel As illustrated in the fi gure below, the handheld has four function keys and the exposure key. Selection Patient bui- teeth zones ld selection “Decrease” key X-ray expo- sure indicator light X-ray expo- sure” key “ I n c r e a s e ” The main functions of the keys on the handheld vary according to how they are pressed: BRIEFLY PRESSED (less than 3 sec.) PRESSED LONGER (more than 3 sec.) -
Page 29: Automatic Handheld Shut Off
3.1.5. Automatic handheld shut off About one minute after the base is turned off the handheld automatically shuts off. Similarly, the handheld will automatically shut off if it is far away or in any case outside the operating range for interfacing with the base. Hand-held stand-by time 3.1.6. -
Page 30: Batteries And Charge Level Status
Examination of lower incisors Examination of lower premolars/canine Examination of lower molars 3.3. Batteries and charge level status The handheld runs on two widely available AA alkaline batteries to assure siffi cient stand-alone operation. The charge level of the batteries is given on the screen as follows: Battery fully charged (a symbol does not appear in the area that shows the battery charge level). -
Page 31: Position Of The X-Ray Plate Or Sensor
3.6. Position of the X-ray plate or sensor The parallel technique, where applicable, provides more accurate images in terms of size compared to the bisecting technique. A rectangular collima- tor, with 30 cm focus-skin distance, is always preferable to obtain better quality pictures. To avoid exposing the image receiver only partly (whether it is a sensor or photostimulable phosphorus plate system) an alignment device that gives rectangular collimators guidelines should be used. -
Page 32: Checking The Exposure Time On The Display
3.7. Checking the exposure time on the display Before starting exposure, check the time setting on the handheld’s screen (see the tables with the original exposure times, paragraph 3.1.4). To change the value, use keys “+” and “-”. NOTE: Changing the exposure time is only temporary: if the new time is not stored in the memory it will be lost (see paragraph 3.8). 3.8. -
Page 33: Setting The Exposure Time
3.9. Setting the exposure time The factory set exposure time limits cannot be changed in this x-ray unit. WARNING! Once this customisation has been made, the values indicated in the “Chart indicating original exposure times” no longer apply. Proceed as follows to set the new exposure times: •... - Page 34 - Sensitivity levels NOTE: For further information regarding any fault messages that may be displayed, see the table in paragraph 9.2. OPERATING INSTRUCTIONS...
-
Page 35: Routine Maintenance
Routine maintenance ATTENTION! Any technical maintenance work required must be carried out by qualifi ed personnel or by a specialised technician authorised by the manufacturer. It is the user’s responsibility to check that routine maintenance is carried out by an authorised technician at least every 2 years. The maintenance methods are specifi... -
Page 36: Specifi Cations
• Ability to be reproduced: 0,05. • Electrical classifi cation: Class I - Type B, intermittent service. • Set exposure time: ± 0,010 a 1,000 se. • Accuracy of times indicated: ±10% (maximum). WEIGHTS • Weight of the unit with packaging: 25 Kg. •... - Page 37 725 - 925 - 1225 950 - 1150 - 1450 400-600-900 155 0 - 17 50 - 2 05 0 2 040 - 2240 - 25 40 OPERATING INSTRUCTIONS...
-
Page 38: Identifi Cation Nameplates
9.2. Identifi cation nameplates WARNING! Never remove the identifi cation nameplates provided on the generator, central control unit and collimator cone. Central control unit (NAMEPLATE) The nameplate is found next to the main switch. NOTE: The voltage given on this nameplate will vary depending on the model of x-ray unit used (230 Vac or 115 Vac). Details shown on the nameplate: •... - Page 39 Collimator The nameplate for the rectangular collimator is found outside it. Details shown on the nameplate: • Name of the manufacturer • Type of cone • Serial number • Date of manufacture. Handheld The nameplate for the handheld is found in the battery compartment. Details shown on the nameplate: •...
-
Page 40: Fault Table
9.3 Fault table FAULT C A U SE S OLU TION EXPOSURE KEY RELEASED TOO SOON. HOLD DOWN THE KEY UNTIL THE EXPOSURE CYCLE HAS FINISHED. AFTER TURNING THE RECTANGULAR COLLIMATOR COLLIMATOR SELECTION INCONSISTENT. ON OR OFF WAIT A FEW SECONDS FOR THE ICON ON THE HANDHELD TO BE REFRESHED. - Page 41 Stabilimento / Plant Cefl a Dental Group Via Bicocca 14/c – 40026 Imola (BO) Italy Tel. (+39) 0542 653441 – Fax (+39) 0542 653555 www.cefl adentale.it - cefl adentale@cefl a.it DICHIARAZIONE “CE” DI CONFORMITÀ “CE” CONFORMITY DECLARATION DECLARATION DE CONFORMITÉ “CE” ERKLÄRUNG VON “CE”...
Need help?
Do you have a question about the RX DC and is the answer not in the manual?
Questions and answers