Myray RX DC Installation Manual
Hide thumbs
Also See for RX DC:
- Operating instructions manual (41 pages) ,
- Manual (309 pages) ,
- Technical manual (34 pages)
Chapters
Table of Contents

Related Manuals for Myray RX DC


Summary of Contents for Myray RX DC
- Page 1 97070012 r e v. 0 0 1 0 7 / 2 0 0 7 ITALIANO ..............3 ENGLISH ..............15...
-
Page 3: Table Of Contents
INSTALLAZIONE Indice 1. Avvertenze generali ..............................4 2. Imballo ..................................4 2.1. Dimensioni e contenuto ..........................4 2.2. Trasporto e immagazzinamento ........................4 3. Preinstallazione ...............................5 3.1. Caratteristiche meccaniche richieste ......................5 3.2. Alimentazione della centralina ........................5 3.3. Collegamento elettrico centralina/lampada di generatore acceso ..............5 4. -
Page 4: Avvertenze Generali
1. Avvertenze generali La Cefl a Sc - Cefl a Dental Group si assume la responsabilità per la sicurezza, affi dabilità e le prestazioni dell’apparecchio, nel caso in cui: - Il montaggio e l’assistenza tecnica vengano effettuate da personale tecnico autorizzato, impiegando particolari originali Cefl... -
Page 5: Preinstallazione
3. Preinstallazione 3.1. Caratteristiche meccaniche richieste Se il muro è sottile (laterizi forati o simili), utilizzare l’apposita contropiastra (cod.99930887) da murare nella parete o da disporre sul lato del muro opposto a quello di installazione. La piastra murale che sostiene l’unità radiologica deve essere fi ssata solidamente sulla parete. Scegliere un sistema di fi... -
Page 6: Installazione
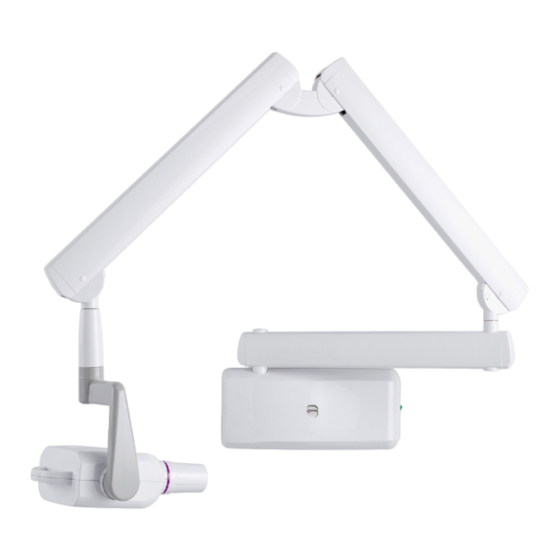
4. Installazione L’installazione dell’unità radiologica va eseguita unicamente da un tecnico qualifi cato, in conformità con le istruzioni di montaggio meccanico ed elettrico defi nite di seguito. ATTENZIONE! Verifi care che la tensione indicata sulla targhetta del generatore corrisponda a quella dell’impianto elettrico. 4.1. -
Page 7: Braccio Prolunga
4.3. Braccio prolunga ATTENZIONE! Non lubrifi care il perno del braccio di prolunga: la piastra murale è munita di boccole autolubrifi canti. Figura B • Inserire il perno (b) del braccio (c) prolunga nell’apposito foro della piastra murale. • Prelevare dal corredo la frizione (a), montarla sulla piastra con le viti relative e regolare il frizionamento del braccio (c). Figura B Figura C •... -
Page 8: Montaggio Del Braccio A Doppio Pantografo
4.4. Montaggio del braccio a doppio pantografo ATTENZIONE! I bracci vengono forniti bloccati fra loro da una cinghia. Quest’ultima non deve essere rimossa fi no a quando le due estremità libere dei bracci non sono state collegate ai rispettivi vincoli: brac- cio prolunga (già... - Page 9 Figura F • Prelevare il grano di fermo rotazione (o) dal corredo del radiografi co e avvitarlo nel punto H (portarlo a fi necorsa e poi svitarlo di ½ giro). NOTA: Ruotare il braccio pantografo per verifi care che la regolazione sia stata eseguita correttamente. •...
-
Page 10: Montaggio Del Generatore
4.5. Montaggio del generatore Figura I • Prelevare dall’imballo il generatore. • Effettuare l’inserimento del perno (a) nel canotto facendo corrispondere le rispettive aperture e bloccarlo con le viti (b) fornite a corredo. • Inserire il cavo di alimentazione nel perno del generatore e farlo fuoriuscire dall'apposita foratura (c). •... -
Page 11: Equilibratura Braccio A Doppio Pantografo
4.7. Equilibratura braccio a doppio pantografo Figura M Se il braccio a doppio pantografo non resta in posizione stabile, regolare la tensione della molla con chiave a brugola di 8 mm lunga circa 20cm. • Per regolare il braccio (a) collegato alla prolunga: posizionarlo come in fi gura ed inserire la chiave nel punto A. NOTA: AVVITARE (senso orario) se il braccio tende a scendere. -
Page 12: Collegamento Elettrico Della Piastra Murale
4.9. Collegamento elettrico della piastra murale Figura O • Collegare il cavo di alimentazione (LINE) al morsetto K2, rispettando le seguenti posizioni: L - LINEA (fi lo marrone) - TERRA (fi lo giallo/verde) N - NEUTRO (fi lo blu) • Collegare il cavo di alimentazione del generatore ai rispettivi connettori, rispettando le seguenti posizioni: K6 - fi... -
Page 13: Completamento Piastra Murale E Supporto Per Palmare Di Comando
4.10. Completamento piastra murale e supporto per palmare di comando Figura P e Figura Q • Prendere il cofano (a) e montarlo alla piastra murale stringendo i grani (b) forniti e già pre-avvitati sulla piastra. • Inserire il carter (c) nel punto indicato in fi gura, mentre lo sportellino (d) si chiuderà automaticamente al momento della chiusura della centralina. •... - Page 15 INSTALLATION Table of contents 1. General safety precautions ............................4 2. Packaging .................................4 2.1. Dimensions and contents ..........................4 2.2. Handling and storage ............................4 3. Before installation ..............................5 3.1. Mechanical specifi cations required .........................5 3.2. Central control unit power supply ........................5 3.3. wiring connection between central control unit and generator light ...............5 4.
-
Page 16: General Safety Precautions
INSTALLATION 1. General safety precautions Cefl a Sc - Cefl a Dental Group guarantees the safety, reliability and performance of the equipment under the following conditions: • Installation and technical service is performed by authorized technicians using Cefl a Sc - Cefl a Dental Group original spare parts. -
Page 17: Before Installation
3. Before installation 3.1. Mechanical specifi cations required If the wall is thin (hollow bricks or similar), use the backplate (part no. 99930887) to be mounted on the wall or placed on the side of the wall opposite the wall where the unit is to be installed. Decide on a suitable system for fi... -
Page 18: Installation
4. Installation The x-ray unit must be installed by a qualifi ed technician in compliance with the installation instructions given below as regards both the mechanical and electrical parts. WARNING! Always check that the voltage indicated on the generator’s nameplate corresponds to that for the electrical system. 4.1. -
Page 19: Extension Arm
4.3. Extension arm WARNING! Do not lubricate the pin of the extension arm: the wall-mounted plate is provided with self-lubricating bushings. Figure B • Insert the pin (b) of the extension arm (c) in the hole provided in the wall-mounted plate. •... -
Page 20: Installing The Double Pantograph Arm
4.4. Installing the double pantograph arm WARNING! The arms are supplied secured together by a belt. This belt should not be removed until the two free ends of the arms have been connected to their corresponding attachments: the extension arm (already secured to the wall) and x-ray head. If the belt is loosened before fi... - Page 21 Figure F • Take the grubscrew used to stop rotation (o) from the x-ray unit kit and tighten it at point H (tighten it fully and then loosen by ½ turn). NOTE: Turn the pantograph arm to check that the adjustment has been made properly. •...
-
Page 22: Installing The Generator
4.5. Installing the generator Figure I • Take the generator out of the packaging. • Insert the pin (a) in the sleeve making sure the respective openings match and secure with the screws (b) provided. • Insert the power cable in the generator’s pin and run it out of the opening (c) provided. •... -
Page 23: Balancing The Double Pantograph Arm
4.7. Balancing the double pantograph arm Figure M If the double pantograph arm does not stay in a stable position, adjust the spring tension by using an 8mm Allen wrench about 20cm long. • To adjust the arm (a) connected to the extension: position it as shown in the fi gure and place the wrench at point A. NOTE: TIGHTEN (clockwise) if the arm tends to move down. -
Page 24: Wall-Mounted Plate Wiring Connections
4.9. Wall-mounted plate wiring connections Figure O • Connect the power cable (LINE) to terminal K2, observing the following positions: L - SUPPLY (BROWN WIRE) - GROUND (YELLOW/GREEN wire) N - NEUTRAL (BLUE wire) • Connect the generator’s power cable to the respective connectors, observing the following positions: K6 - brown wire and yellow/green wire. -
Page 25: Completion Of Wall-Mounting Plate And Holder For Hand-Held
4.10. Completion of wall-mounting plate and holder for hand-held. Figure P and Figure Q • Pick up the cover (a) and place it on the wall-mounting plate fully tightening the grub screws (b) provided and pre-screwed on the plate. • Place the cover (c) in the area shown in the fi...
Need help?
Do you have a question about the RX DC and is the answer not in the manual?
Questions and answers