Table of Contents
Advertisement
Advertisement
Table of Contents
Troubleshooting

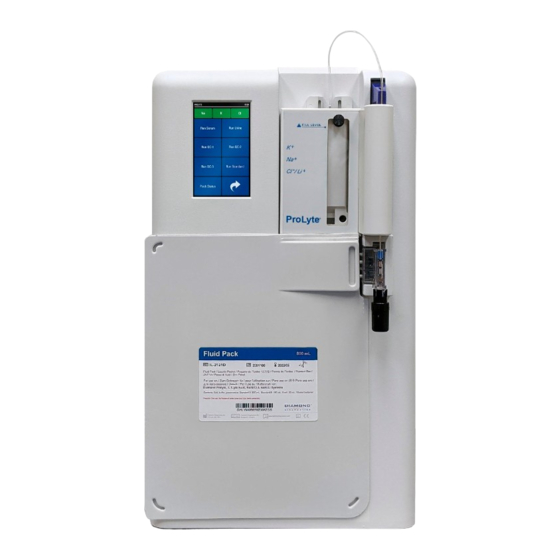
Summary of Contents for Diamond Diagnostics Prolyte
- Page 2 D I A M O N D D I A G N O S T I C S Service Manual Diamond Diagnostics Inc Holliston, MA. USA www.diamonddiagnostics.com...
-
Page 3: Table Of Contents
Service Manual Contents Chapter 1................................1 Product Description ..........................1 System Overview ..........................1 Front and Rear Assembly Components ....................4 Electrode Housing Assembly Components ..................8 Replacement List ..........................10 Chapter 2..............................11 Troubleshooting............................11 Troubleshooting Overview.........................11 Troubleshooting Guide ........................12 DC Power Verification ........................13 Display Verification ..........................13 Probe Motor Verification ........................14 Printer Verification ..........................15 Sample Detector Verification ......................16... -
Page 4: Chapter 1
Product Description System Overview The proLYTE analyzer is designed to make service and repair quick and easy. Modular construction is used throughout the design. The basic operating system consists of a motor which drives the peristaltic pump. The peristaltic pump draws the desired fluid through the system. A second motor drives the sample probe through the solutions valve to aspirate the appropriate fluid for pumping: sample;... - Page 5 P R O L Y T E A N A L Y Z E R RUN CALIBRT’N ANALYZE BLOOD? Whole Blood, Serum, or Plasma Analysis DAILY CLEANER? End/Beginning of Day Cleaning STANDBY MODE? Fluid Conservation, Maintenance *SECOND MENU?* *ANALYZE URINE?* Urine Analysis *SEE RESULTS?* Results Displayed, Printed, Deleted...
- Page 6 P R O L Y T E A N A L Y Z E R Table of Symbols ▲ NOTES Helpful information or references to other related sections of the manual. KEY INFORMATION Could take the proLYTE analyzer out of operation. Back to Table of Contents...
-
Page 7: Front And Rear Assembly Components
A N A L Y Z E R Front and Rear Assembly Components This section describes the main assemblies of the proLYTE front and rear assemblies. Refer to Figures P1, P2, and P3 for the location of each component. Front Housing front case of the analyzer... - Page 8 P R O L Y T E A N A L Y Z E R Paper Feed Button Printer Front Housing Rear Housing Probe Sample Probe Display Screen Electrode Jacks Yes/No Touchpad Solutions Valve Peristaltic Pump Figure P1 Front Assembly Back to Table of Contents...
- Page 9 P R O L Y T E A N A L Y Z E R Probe Display Position Cable Locator Board Serial Port Linear Actuator Auto-Sampler Port Power Optical Supply Switch Cable Connection Printer Cable Linear Actuator Voltage Connection Selector Peristaltic Entry Pump...
- Page 10 P R O L Y T E A N A L Y Z E R Electrode Jacks Mounts Probe Motor Support Optical Switch Peristaltic Peristaltic Pump Pump Motor Assembly Figure P3 – Rear Assembly Back to Table of Contents...
-
Page 11: Electrode Housing Assembly Components
P R O L Y T E A N A L Y Z E R Electrode Housing Assembly Components This section describes the components of the proLYTE electrode assembly. Refer to Figure P4 for the location of each component. Electrodes sodium, potassium, chloride, and reference Sample Detector detects presence of air/liquid, sets sample position inside electrodes Internal Filling Solution 2 molar KCL solution, acts as a “salt bridge”... - Page 12 P R O L Y T E A N A L Y Z E R Membrane Assembly Fill Plug Fill Solution Electrode Housing Sample Detector Potassium Electrode Sodium Electrode Chloride Electrode Locating Pins Reference Electrode Figure P4– Electrode Housing Assembly Back to Table of Contents...
-
Page 13: Replacement List
ME-1901D Pump ME-1271D Probe Motor Assembly ME-1392D Sample Probe Position Sensor ME-1306D Stepper Motor Daughter Board ME-1148D Printer ME-1296D Electrode Jack ME-0173D The CPU Board is supplied with the software installed to operate the proLYTE. Back to Table of Contents... -
Page 14: Chapter 2
Troubleshooting Troubleshooting Overview This section describes troubleshooting of the mechanical and electrical functions of the proLYTE analyzer. This section is based on the principle of replacing suspected faulty assemblies with new assemblies. Diamond Diagnostics recommends keeping an inventory of functioning test assemblies for... -
Page 15: Troubleshooting Guide
P R O L Y T E A N A L Y Z E R Troubleshooting Guide Refer to the chart below to help determine the problem and corrective action needed. Problem Problem Corrective Action Steps Description Source Blank Display Power Malfunction or AC Power Verification Defective Display... -
Page 16: Dc Power Verification
P R O L Y T E A N A L Y Z E R DC Power Verification 1. Remove the rear housing. See Rear Housing Removal in the REPAIR SECTION for details. 2. Connect the power cord first to an outlet, then to the entry module. 3. -
Page 17: Probe Motor Verification
If there are no error messages, resume normal operation. If a “PRB” error occurs, proceed to STEP 2. 2. Remove the sample probe from the probe arm. For details refer to proLYTE Operator’s Manual. Remove and reinstall the power cord. The probe arm should move down and back up. -
Page 18: Printer Verification
The printer head should move across the paper and the paper should advance forward printing “proLYTE”. If the printer is still not working, remove the printer cover and check for any paper obstruction in the printer head area. -
Page 19: Sample Detector Verification
P R O L Y T E A N A L Y Z E R Sample Detector Verification 1. Remove the electrode housing from the analyzer. See the proLYTE Operator’s Manual for further details. 2. Remove the sample detector from the front housing. -
Page 20: Serial Communication Verification
A N A L Y Z E R Serial Communication Verification Connect the proLYTE analyzer to a device with a known working serial port. Use a known good proLYTE serial cable, part no. ME-1334D. Make cross connections as required (e.g. 2 to 3; 4 to 5). -
Page 21: Chapter 3
Consult the list to determine the appropriate replacement item and part number. Recommended Tools The following is a list of the tools required to perform repairs on the proLYTE analyzer. Please refer to this list to determine the appropriate tool and size needed. -
Page 22: Rear Housing Removal
P R O L Y T E A N A L Y Z E R Rear Housing Removal 1. Disconnect the power cord from the entry module, see figure below. 2. Detach the four screws from the rear housing using a Phillips head screw driver, as shown below. - Page 23 P R O L Y T E A N A L Y Z E R Figure P5 – Rear Housing Removal (Cont) Back to Table of Contents...
-
Page 24: Power Supply Removal
P R O L Y T E A N A L Y Z E R Power Supply Removal 1. Disconnect the power supply cable from the CPU board, see Figure P6. 2. Detach the four screws from front housing, using a Phillips head screw driver. 3. -
Page 25: Printer Removal
P R O L Y T E A N A L Y Z E R Printer Removal 1. Remove the printer lid from the printer. 2. Remove the paper roll from the printer bay. 3. Remove the rear housing. 4. Detach the printer cable from the retaining clamps located along the right side of the CPU board. - Page 26 P R O L Y T E A N A L Y Z E R Printer Bay Figure P7 – Printer Removal/Installation Back to Table of Contents...
- Page 27 P R O L Y T E A N A L Y Z E R Printer Connection Figure P8 – Printer Removal/Installation Back to Table of Contents...
-
Page 28: Cpu Board Removal
P R O L Y T E A N A L Y Z E R CPU Board Removal Remove the display cable from the top of the CPU board shown in Figure P9. 2. Disconnect the electrode jacks from behind the CPU board. See figure below for the location of the electrode jacks. - Page 29 P R O L Y T E A N A L Y Z E R Figure P9 – CPU Board Removal/Installation Back to Table of Contents...
-
Page 30: Display Removal
P R O L Y T E A N A L Y Z E R Display Removal 1. Detach the two screws from the sample detector board using a Phillips head screw driver. 2. Move and hold the display cable to expose the three display assembly screws. Detach the three screws from the display assembly using a Phillips head screw driver. - Page 31 P R O L Y T E A N A L Y Z E R Figure P10 – Display Removal/Installation Back to Table of Contents...
- Page 32 P R O L Y T E A N A L Y Z E R Figure P11 – Display Removal/Installation Back to Table of Contents...
-
Page 33: Pump Motor Removal
P R O L Y T E A N A L Y Z E R Pump Motor Removal 1. Remove the pump tubing from the front of the analyzer. 2. Detach the four screws from the front of the analyzer, using a Phillips head screw driver or 1.5 Hex as applicable. - Page 34 P R O L Y T E A N A L Y Z E R Figure P12 – Display Removal/Installation Figure P13 – Display Removal/Installation Back to Table of Contents...
-
Page 35: Probe Motor Assembly Removal
6. Remove the black thumb grip from the solutions valve. Install the sample probe as normal. Refer to Figure P14 for details. A. With the probe hole facing to the left, toward the inside body of the proLYTE, align the probe collar with the notch on the top of the probe arm. When aligned, snap the probe into the probe arm. - Page 36 P R O L Y T E A N A L Y Z E R B. Manually move the probe arm until the sample probe hole is aligned with the top chamber on the solutions valve. ▲ When the sample probe is aligned, DO NOT move the probe arm until the probe motor installation is complete.
- Page 37 P R O L Y T E A N A L Y Z E R Figure P14 – Probe Motor Removal/Installation Back to Table of Contents...
-
Page 38: Guide Rod Removal
P R O L Y T E A N A L Y Z E R Guide Rod Removal 1. Remove the sample probe from the probe arm and the solutions valve. Remove the solutions valve. 2. Detach the screw from the bottom of the guide rod, using a Phillips head screw driver. Remove the washer. - Page 39 P R O L Y T E A N A L Y Z E R Figure P15 – Guide Rod Removal/Installation Back to Table of Contents...
-
Page 40: Electrode Jack Removal
P R O L Y T E A N A L Y Z E R Electrode Jack Removal 1. Insert the electrode jack wires into the supplied 11/32 inch nut driver. 2. Remove the hex nuts using the nut driver. Pull the electrode jacks from the front housing of the analyzer, as shown in Figure P16. - Page 41 P R O L Y T E A N A L Y Z E R Figure P16 – Electrode Jack Removal/Installation Back to Table of Contents...
Need help?
Do you have a question about the Prolyte and is the answer not in the manual?
Questions and answers