
Related Manuals for InfoTronics IDpunch 7

Summary of Contents for InfoTronics IDpunch 7
- Page 1 IDpunch 7 User Guide for Attendance Enterprise 2 (Latest update: http://www.infotronics.com/IDpunch7_userguide.pdf...
- Page 2 © InfoTronics, Inc. 2019 All Rights Reserved InfoTronics is a registered trademark of InfoTronics, Inc. Attendance Enterprise is a trademark of InfoTronics, Inc. All other company and product names are registered trademarks or trademarks of their respective holders. Information in this document is subject to change without notice.
- Page 3 Badges on page 11. 10/26/11 The following information is updated: The clock menu structure. See Appendix A: IDpunch 7 Menu Structure on page 14. Employee Menu is updated. See Appendix D: Employee Menu on page 25. 01/14/10 The following information is updated: ...
-
Page 4: Table Of Contents
When an Employee Loses a Badge ....................13 When a Badge Label Becomes Damaged ..................13 Appendix A: IDpunch 7 Menu Structure ................14 Appendix B: IDpunch 7 Station Properties in MSS2 ............. 19 Basic Tab ............................19 Recent Activity Tab ........................20 Appendix C: Supervisor Menu .................... - Page 5 Appendix E: Printing Badge Labels ..................30 Configuring Badge Label Printing ....................... 30 Printing Badge Labels Using a Template ..................... 32 Appendix F: Issuing a Badge to an Employee ..............33 ® ©2019, InfoTronics , Inc. Information in this document is subject to change without notice.
-
Page 6: Introduction
Introduction The IDpunch 7 time recorder is a simple, low-cost way to gather employee In and Out punches and perform many comprehensive functions using a badge and PIN entry. This manual covers installation and daily use IDpunch 7 time recorders, as well as maintenance. -
Page 7: Meet The Idpunch 7
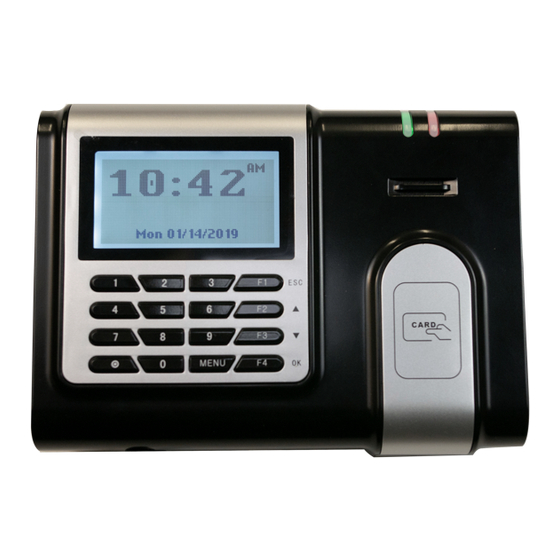
Meet the IDpunch 7 The IDpunch 7 is a time recorder with streamlined technology that is easy to use and easy to configure. Let’s review the basic parts of the time recorder. Clock Face Display Badge Reader Up arrow Down arrow... -
Page 8: Clock Bottom
RS232, half-duplex RS485 port. It is not in use. Maintenance of the IDpunch 7 The IDpunch 7 works well in any temperature-controlled environment. No special care is required for badges. The keypad and LCD screen should maintain their new appearance with proper use. We recommend using a small amount of hexane or 90% alcohol on a piece of cotton to clean the LCD or keypad, if necessary. -
Page 9: Idpunch 7 Lifecycle
IDpunch 7 Lifecycle Several steps are required in order to use the IDpunch 7. Understanding the steps helps you to have a great experience with the clock. Customer Steps You must complete some steps before supervisors and employees can use the clock. -
Page 10: Using The Idpunch 7
IDpunch 7. QuickStart Guide for Using IDpunch 7 To use IDpunch 7 clocks in HTTP mode with the hosted system, a few steps are required. This section gives an overview of the process. 1. Scan employee badges at the clock. See Registering Badges in the System on page 11. -
Page 11: Working With Proximity Badges
Badges must be registered in the system so employees can easily be assigned an appropriate badge number. This operation is performed at the IDpunch 7. 1. Press MENU on the IDpunch 7. If needed, identify an administrator at the clock with a PIN. 2. Use the arrow keys to navigate to Settings and press OK. -
Page 12: Issuing Badges To Employees
Use Add New Employee Wizard to issue a badge to a new employee when he/she is added in MSS2 with Attendance Enterprise 2. Printing Badge Labels The IDpunch 7 comes packaged with label sheets. To print labels from MSS with Attendance Enterprise 2, see Appendix E: Printing Badge Labels on page 30. Changing Badge Assignments Badge assignments must occasionally be changed when an employee leaves the company, no longer punches, or loses or damages a badge. -
Page 13: When An Employee Loses A Badge
Information in 22 with Attendance Enterprise 2. See Appendix F: Issuing a Badge to an Employee on page 33. When a Badge Label Becomes Damaged If a badge label becomes damaged, see Appendix E: Printing Badge Labels on page 30. ® ©2019, InfoTronics , Inc. Information in this document is subject to change without notice. -
Page 14: Appendix A: Idpunch 7 Menu Structure
Appendix A: IDpunch 7 Menu Structure This appendix describes the IDpunch 7 menu structure, menu items and operations. Volume Hourly Chime Audio Minute Tick Restrict Employees Restrictions Restrict Transactions Polling Type Polling DHCP Polling Server IP Address IP Network Settings... - Page 15 Yes. If DHCP is used, select Yes. No. If a static IP is used, select No. Press OK to confirm. Press ESC to cancel. ® ©2019, InfoTronics , Inc. Information in this document is subject to change without notice.
- Page 16 Enter a number with a range of 1 to 999. This number combined with host name (idpunch7) is used to differentiate multiple terminals on the same network. For example, an IDpunch 7 with a terminal id of "86" has a host name of "idpunch7-86".
- Page 17 Configuration that in the Settings, Device, then Device Info menu. When the clock communicates next time, application settings from the software are restored to the clock. Operations menu ® ©2019, InfoTronics , Inc. Information in this document is subject to change without notice.
- Page 18 Yes to ensure changes are saved correctly and take effect after the terminal is restarted. Otherwise, select No. Version menu Firmware Version Displays the clock Flash version. Application Displays the clock Application version. Version ® ©2019, InfoTronics , Inc. Information in this document is subject to change without notice.
-
Page 19: Appendix B: Idpunch 7 Station Properties In Mss2
Attendance Enterprise 2: 1. Click System Maintenance in the left-hand menu. 2. Click Time Clock Stations. 3. Click the IDpunch 7 station. See the following tabs to help them define the clock properties and view station activities. Basic Tab Property... -
Page 20: Recent Activity Tab
Savings Recent Activity Tab The Recent Activity tab shows the Station Activity Log. The Station Activity Log records activity between the IDpunch 7 and the hosted system. ® ©2019, InfoTronics , Inc. Information in this document is subject to change without notice. -
Page 21: Appendix C: Supervisor Menu
The Add Schedule operation allows the supervisor to add a standard schedule for an employee. The new schedule replaces any previous schedules the employee had on the selected date. See Add Schedule on page 23. Overrides Menu ® ©2019, InfoTronics , Inc. Information in this document is subject to change without notice. -
Page 22: Add Punch
4. In the Choose a Date prompt, use the Up and Down arrows to change the day on which to credit the ® ©2019, InfoTronics , Inc. Information in this document is subject to change without notice. -
Page 23: Credit Dollars
6. In the Schedule End prompt, enter the scheduled end time. To correct the time, type numbers to represent the hours and times in order. Press the synchronization button to erase the number and re- enter it. ® ©2019, InfoTronics , Inc. Information in this document is subject to change without notice. -
Page 24: Lift Restriction
Press the synchronization button to erase the number and re-enter it. Use the MENU key to navigate among OK, Cancel and the edit field. ® ©2019, InfoTronics , Inc. Information in this document is subject to change without notice. -
Page 25: Appendix D: Employee Menu
$999.99. To correct the amount, type numbers to represent the dollars and cents in order. Press the synchronization button to erase the number and re-enter it. ® ©2019, InfoTronics , Inc. Information in this document is subject to change without notice. -
Page 26: Simple Workgroup Entry
MENU key to navigate among OK, Cancel and the edit field. 3. The specified workgroups are displayed and scrolled line by line on the screen. Select the workgroup to transfer to. ® ©2019, InfoTronics , Inc. Information in this document is subject to change without notice. -
Page 27: Callback Transaction
Use the MENU key to navigate among OK, Cancel and the edit field. A Single Day Leave Request Supervisors can perform a single day leave request for an employee; employees can also request to take a ® ©2019, InfoTronics , Inc. Information in this document is subject to change without notice. -
Page 28: Several Days Leave Request
2. At the Enter Badge/ID number prompt, you can wave the employee’s badge in front of the reader or type the employee’s badge number. Press the synchronization button to erase the number and re-enter ® ©2019, InfoTronics , Inc. Information in this document is subject to change without notice. -
Page 29: Pass Through Operation
1. Press the function key for the pass through operation. 2. The splash message maybe displayed or the relay is triggered based on the configuration. 3. The message “Completed. Thank You.” is displayed. ® ©2019, InfoTronics , Inc. Information in this document is subject to change without notice. -
Page 30: Appendix E: Printing Badge Labels
2. Click the Badge Printing tab. You can click Add Badge Report Template link to add a new badge report template or click Revert to Defaults link to use/modify existing badge report template. ® ©2019, InfoTronics , Inc. Information in this document is subject to change without notice. - Page 31 Column Separator Spacing The distance (horizontally) from the right border of an individual label to the left edge of the label to its immediate right. ® ©2019, InfoTronics , Inc. Information in this document is subject to change without notice.
-
Page 32: Printing Badge Labels Using A Template
Note: If this report is saved to the “My Reports” area and is re-executed from this area, the same number of labels is skipped. 6. Click Run Report to generate a PDF file. ® ©2019, InfoTronics , Inc. Information in this document is subject to change without notice. -
Page 33: Appendix F: Issuing A Badge To An Employee
This procedure is used to assign an unregistered badge to an employee in MSS2 with Attendance Enterprise 2. 1. Obtain a proximity badge (packaged with the IDpunch 7). 2. In the employee’s Personal Information, click the Basic tab. The Badge and Clock Group fields affect the employee’s ability to punch at the clock. - Page 34 4. Check to make sure the employee is assigned to one of the clock groups assigned to the IDpunch 7. Click System Setup in the Operations menu group. Click Time Clock Stations. Click the name of the IDpunch 7 where the employee should punch.
Need help?
Do you have a question about the IDpunch 7 and is the answer not in the manual?
Questions and answers