Table of Contents

Related Manuals for Neptune E-Coder)R900i

Summary of Contents for Neptune E-Coder)R900i
- Page 1 FCC Part 15.247 Class II Permissive Change Frequency Hopping Spread Spectrum Transmitter FCC ID: P2SNTGECDR900Z FCC Rule Part: 15.247 ACS Report Number: 05-0310-15C Manufacturer: Neptune Technology Group, Inc. Model: E-Coder R900 Installation Guide...
- Page 2 N e p t u n e T e c h n o l o g y G r o u p I n c . E-Coder)R900i Installation and Maintenance Guide ® Water Revenue System ™...
- Page 4 E-Coder)R900i Installation and Maintenance Guide...
- Page 5 Trademarks used in this manual E-Coder is a trademark of Neptune Technology Group Inc. R900 is a trademark of Neptune Technology Group Inc. Other brands or product names are the trademarks or registered trademarks of their respective holders.
- Page 6 L'opération est sujette aux deux conditions suivantes: (1) ce dispositif peut ne pas causer l'interférence nocive, et (2) ce dispositif doit accepter n'importe quelle interférence reçue, y compris l'interférence qui peut causer l'opération peu désirée. E-Coder)R900i Installation and Maintenance Guide Neptune Technology Group Inc. Literature No. IM E-Coder0R900i 10.05 1600 Alabama Highway 229 Part No.
-
Page 8: Table Of Contents
E-Coder)R900i Programming ........ - Page 9 Completing the E-Coder)R900i Basement Installation ........
- Page 10 E-Coder)R900i Diagram........
- Page 11 Figures Notes: viii E-Coder)R900i Basement and Pit Installation and Maintenance Guide...
- Page 12 ............15 E-Coder)R900i Basement and Pit Installation and Maintenance Guide...
- Page 13 Tables Notes: E-Coder)R900i Basement and Pit Installation and Maintenance Guide...
-
Page 14: E-Coder)R900I Basement And Pit Versions
A walk-by handheld, mobile unit, or fixed network receives the data and stores it to be downloaded into the utility billing system for processing. The E-Coder)R900i is easily installed and operates within an RF band which does not require an operating license. The E-Coder)R900i meets FCC regulations part 15.247, allowing higher output power and greater range. -
Page 15: E-Coder)R900I Programming
Product Description E-Coder)R900i Programming The E-Coder)R900i is NOT field-programmable. At the factory, each of the follow- ing items is programmed into the MIU: • Serial number - Each MIU is given a unique 10-digit serial number/identifica- tion number. • Time between MIU transmissions - The time between MIU transmissions is set for approximately 14 seconds. -
Page 16: Specifications
-40° to 158°F (-40° to 70°C) Operating Humidity 0 to 95% Condensing Functional Specifications Register Reading 8 digits MIU ID 10 digits Dimensions and Weight Dimensions Refer to Figure 3 Weight 1.08 lbs. (490 grams) E-Coder)R900i Basement and Pit Installation and Maintenance Guide... -
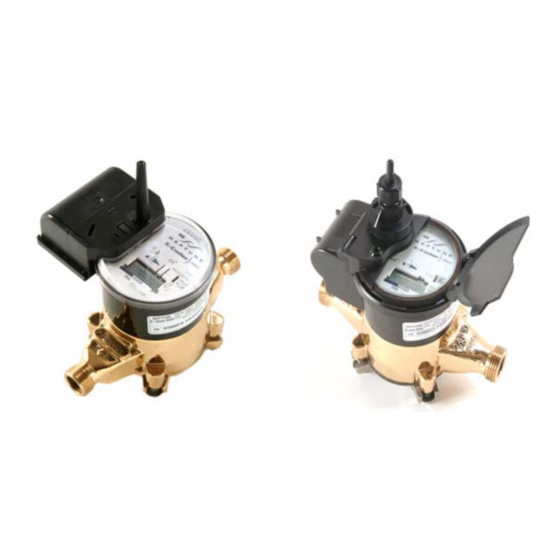
Page 17: E-Coder)R900I Basement And Pit Version Dimensions
Specifications Figure 2 E-Coder)R900i Diagram Figure 3 E-Coder)R900i Basement and Pit Version Dimensions E-Coder)R900i Basement and Pit Installation and Maintenance Guide... -
Page 18: General Installation Guidelines
Tables 1 and 2 show the recommended tools and materials you may need to suc- cessfully install the E-Coder)R900i or to replace the MIU’s internal battery. Some items may not apply to your specific installation or the list may not contain all required tools or materials. -
Page 19: Activating And Reading The E-Coder)R900I
Figure 4 Activating the LCD How to Read It is important to become familiar with the information available from the meter. To identify this information the following icons and displays are helpful. E-Coder)R900i Basement and Pit Installation and Maintenance Guide... - Page 20 It is activated by light. Light Sensor, recessed under the small hole near the center of the face- plate of the E-Coder)R900i, supplies the power for the LCD panel (light activated). Flow/Leak Indicator shows the direction of flow through the meter: Water in use Water not in use.
-
Page 21: Common Causes Of Leaks
Activating and Reading the E-Coder)R900i Common Causes of Leaks If the leak indicator is flashing or continuously on, the E-Coder)R900i is indicating that a possible leak may exist. Leaks can result from various circumstances. To better help you identify a possible leak, the following table contains some common... -
Page 22: How To Tell If Water Is In Use
If the leak has been correctly repaired, the leak icon changes from Continuous ON to Flashing. Software A software update is required for EZRoute or RouteMAPS to inter- pret the advanced feature data communicated from the Neptune E-Coder)R900i. E-Coder)R900i Basement and Pit Installation and Maintenance Guide... -
Page 23: Installing The Basement Version
Once the inspection is complete, store the cartons in a clean, dry environment. Keep in mind that the E-Coder)R900i MIU basement version has an internal bat- tery. Storage for more than one year may affect product life. Be sure to use a first- in first-out inventory control system. -
Page 24: Installing The E-Coder)R900I Basement Version Miu
Suitable inlet and outlet meter valves and couplings/setters must be in- stalled if they are not already present. Appropriate space must be allowed in the line for the E-Coder)R900i meter laying length and two couple gas- kets. The pipe ends must be sufficiently aligned so that the coupling and E- Coder)R900i meter threads can engage without binding or cross-threading. -
Page 25: Retrofit Meter Installation
Open a down stream faucet and run enough water to dissipate entrained air and flush the line. While the faucet is open, check to see if the E-Coder)R900i meter is operating cor- rectly. Turn off the faucet and check the E-Coder)R900i meter instal- lation for leaks. -
Page 26: Testing The E-Coder)R900I Basement Installation
3 feet from the MIU. In a densely saturated area, removing the antenna from the handheld can assist with readings. When the E-Coder)R900i is installed correctly, its MIU ID# and a meter-reading appears on the HHU’s display within one minute. -
Page 27: Testing The R900 Miu Installation
If using a ProRead Encoder Register (Rev E or earlier): • Ensure the unit is programmed in three-wire mode. • Verify all electrical connections. • Reactivate the MIU using the magnet If a problem still exists, contact your Neptune representative. E-Coder)R900i Basement and Pit Installation and Maintenance Guide... -
Page 28: Checklist
Verify that you have followed all requirements of this Quick Install Guide. Verify that you have recorded all required informa- tion. Clean up any installation debris. Verify that the requirements of the site work order have been completed. E-Coder)R900i Basement and Pit Installation and Maintenance Guide... -
Page 29: Installing The Pit Version
Once the inspection is complete, store the cartons in a clean, dry environment. Keep in mind that the E-Coder)R900i pit version has an internal battery. Storage for more than one year may affect product life. Be sure to use a first-in first-out inventory control system. -
Page 30: Installing The E-Coder)R900I Pit Version Miu
Suitable inlet and outlet meter valves and couplings/setters must be in- stalled if they are not already present. Appropriate space must be allowed in the line for the E-Coder)R900i meter laying length and two couple gas- kets. The pipe ends must be sufficiently aligned so that the coupling and E- Coder)R900i meter threads can engage without binding or cross-threading. -
Page 31: Retrofit Meter Installation
Open a down stream faucet and run enough water to dissipate entrained air and flush the line. While the faucet is open, check to see if the E-Coder)R900i meter is operating cor- rectly. Turn off the faucet and check the E-Coder)R900i meter instal- lation for leaks. -
Page 32: Testing The E-Coder)R900I Pit Installation
3 feet from the MIU. In a densely saturated area, removing the antenna from the handheld can assist with readings. When the E-Coder)R900i is installed correctly, its MIU ID# and a meter-reading appears on the HHU’s display within one minute. -
Page 33: Maintenance And Troubleshooting
7 Maintenance and Troubleshooting This section takes you through maintenance and troubleshooting procedures for the E-Coder)R900i. The first topic will guide you through the steps necessary to replace the battery that is in the main housing. In addition, this section will guide you through some troubleshooting procedures for both a six-wheel and a four-wheel encoder. -
Page 34: Pushing In New Tamper Nail
Use of a hammer or other device may be necessary to force the tamper nail into position. Reactivate the E-Coder)R900i as described in Step 3 on page 13. For help on how to position and activate the MIU found in Step 8 on page 12. -
Page 35: Cutting The Battery Wires
Attach new battery pack to hinges and swing down into posi- tion. Be careful not to pinch any wires during this procedure. Push in new register seal pin until it snaps. E-Coder)R900i Basement and Pit Installation and Maintenance Guide... -
Page 36: Upgrading The R900 Antenna
(See Figure 15.) Figure 15 Placing Washer on MIU 10 Apply a coating of Novaguard around the base of the "F" con- nector and on the flat black rubber washer. E-Coder)R900i Basement and Pit Installation and Maintenance Guide... -
Page 37: Contact Information
To contact technical support by phone, call 1-800-645-1892. If all support technicians are helping other customers, your call is routed to the Neptune Support voice mail system. Please leave your name, the name of your company, your company's Personal Identification Number (PIN), and your telephone number. Calls are returned within business hours in the order they are received. -
Page 38: Glossary
A unique identification number given to each MIU at the factory. The default value is the last programmed plus one. Custom serial numbers are not available. strain relief posts Posts located on the encoder register and the back of the main MIU housing. E-Coder)R900i Basement and Pit Installation and Maintenance Guide... - Page 39 Glossary terminal screw cover The plastic cover on the encoder register that protects the terminal screws and exposed wires. terminal screws The screws on the encoder register face that are used to connect and anchor the three (3) conductor wire to the register. transmission time The time between MIU transmissions.
-
Page 40: Index
Specifications possible leak specifications inspect storage, basement basement version storage, pit pit version tools and materials Install unpacking, basement version 10–15 basement version unpacking, pit version 16–19 pit version weight install E-Coder)R900i Basement and Pit Installation and Maintenance Guide... - Page 41 10, 16 storage 1, 3 MIU ID basement version MIU ID number 10, 16 MIU transmissions pit version storage temperature support, Neptune swimming pool, leaks operating humidity operating temperature output power E-Coder)R900i Basement and Pit Installation and Maintenance Guide...
- Page 42 11, 17 pit version recommended 13, 19 transcription errors washing machine, leaks transmission randomness water in use, determine transmission, RF weight transmissions, MIU wires, splice transmit period E-Coder)R900i Basement and Pit Installation and Maintenance Guide...
- Page 43 Notes: E-Coder)R900i Basement and Pit Installation and Maintenance Guide...
- Page 45 Fax: (525) 55203 6503 w w w . n e p t u n e t g . c o m IM E-Coder)R900i 10.05 Part No. XXXXX-XXX 38 R900 MIU Installation and Maintenane10e © Copyright 2005, Neptune Technology Group Inc.
Need help?
Do you have a question about the E-Coder)R900i and is the answer not in the manual?
Questions and answers