
Related Manuals for Thinklogical TLX1280

Summary of Contents for Thinklogical TLX1280
- Page 1 Page i Revision B, March 2019 thinklogical TLX1280 Matrix Switch Product Manual Rev. B, March 2019...
- Page 2 A BELDEN BRAND 100 Washington Street Milford, Connecticut 06460 U.S.A. Telephone: 1-203-647-8700 All trademarks and service marks are property of their respective owners. Subject: TLX1280 10G KVM Matrix Switch Product Manual Revision: B, March 2019 ® thinklogical TLX1280 Matrix Switch Product Manual...
-
Page 3: Table Of Contents
Design Features ..........................7 Product Compatability.......................... 7 Chassis Dimensions ..........................7 Diagram: Front View of the TLX1280 Matrix Switch ................. 8 Diagram: Rear View of the TLX1280 Matrix Switch ................. 9 Power Supply Modules .......................... 10 The Fan Tray Module ..........................10 Alarms ............................... - Page 4 Fiber-Optic Cable .......................... 23 Requirements ........................... 23 Handling ........................... 23 Installing ........................... 23 Routing Thinklogical Extenders through the TLX1280 ................24 Connecting to a Receiver ........................24 Connecting to a Tranmitter ........................ 24 Connecting to a Control CPU......................25 Linux Command Console (Console Port) ..................25 ASCII API Settings (RS-232 Port) ....................
-
Page 5: Preface
System (VDS) category. Thinklogical products are designed and manufactured in the USA and are certified to the ISO 9001:2015 standard. Thinklogical is headquartered in Milford, Connecticut and is owned by Belden, Inc., St. Louis, MO (http://www.belden.com). For more information about Thinklogical products and services, please visit www.thinklogical.com. -
Page 6: About This Product Manual
All documents referenced in this manual (In_This_Text_Format) are available to view or download on the Thinklogical website at www.thinklogical.com. Most online documents are stored as Adobe Acrobat “PDF” files. If you do not have the Adobe Acrobat reader needed to view PDF files, visit www.adobe.com... -
Page 7: Section 1: Regulatory And Safety Requirements
Page 3 Section 1: Regulatory and Safety Requirements Class 1 Laser Information The TLX1280, like all Thinklogical fiber-optic products, is designed and identified as a Class 1 LASER ® product. This means the maximum permissible exposure (MPE) cannot be exceeded when viewing the laser with the naked eye or with the aid of typical magnifying optics (e.g. -
Page 8: Australia & New Zealand
Manufacturer’s Name & Address: Thinklogical, A BELDEN BRAND 100 Washington Street Milford, Connecticut 06460 USA Thinklogical’s products comply with the requirements of the Low Voltage Directive 2006/95/EC, the EMC Directive 2004/108/EC, the RoHS Directive 2011/65/EU, the WEEE Directive 2012/19/EU and carry the marking accordingly. -
Page 9: Section 2: Tlx1280 Features
The key to any Thinklogical Matrix Switch is the Digital Crosspoint Switch, a non-blocking, 12Gpbs asynchronous switch that can connect any input to any output of Thinklogical’s TLX, VX and MX Matrix Switches. Video and Data signals are routed in both directions and the data stream is de-multiplexed at the receiver to deliver uncompressed, high resolution video, audio and peripheral data to the end-user. -
Page 10: Tlx Matrix Switch Security Features
Because creating physical separation between potential threats (users) and the target (secure data) is essential to a secure system design, Thinklogical’s system permits users to access sources up to 80 kilometers away, with no performance degradation. System administrators can safeguard sources in... -
Page 11: Tlx1280 Matrix Switch Design
Page 7 THE TLX1280 MATRIX SWITCH DESIGN The modular approach of the TLX1280 KVM Matrix Switch (sometimes referred to as a Switch or Router) allows all critical system components to be hot-swappable, including Input/Output Cards, Power Supplies and pluggable optics (SFP+), thus minimizing down-time during reconfigurations, updates or failures. -
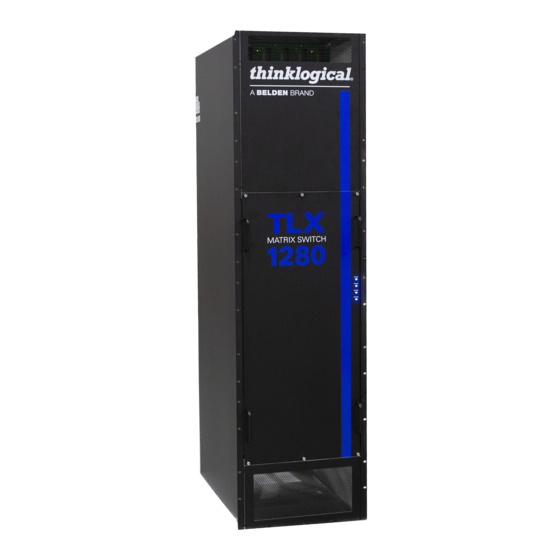
Page 12: Diagram: Front View Of The Tlx1280 Matrix Switch
Page 8 thinklogical TLX1280 Matrix Switch Product Manual Rev. B, March 2019... -
Page 13: Diagram: Rear View Of The Tlx1280 Matrix Switch
Page 9 thinklogical TLX1280 Matrix Switch Product Manual Rev. B, March 2019... -
Page 14: Power Supply Modules
Card Cage. The hot-swappable feature allows easy replacement of a supply without interrupting the system. Although the TLX1280 will function with one power supply per Card Cage, redundancy requires a minimum of two per Cage. -
Page 15: The Controller Cards
HALT (Back-up Controller): Holding this button for >5 seconds will halt the CPU (IMX6). If the Back-up Controller was the active controller, the TLX1280 will also power down the IO. If the Back-up Controller was not the active controller, the CPU will be halted and is ready to be removed. -
Page 16: The Processor
Controller Card. These addresses are set by an external DIP switch (see: TLX1280 DIP Switch Settings, pg. 22). The primary’s IP address can be set from 15 to 45. The default subnet used by the TLX1280 is 192.168.13.xxx. The user may use their own subnet by reconfiguring the switch’s network startup. -
Page 17: Snmp Support
6. Service Request (LOS) Signaling (UDP port 17560) The TLX1280 can broadcast a message over the network when a remote receiver requests attention. When enabled, the receiver will toggle its TX pin, causing a LOS (loss of signal) event to occur at the Matrix Switch. -
Page 18: Ntp Support
The TLX1280 can have a minimum of one I/O Card (32 x 32) and a maximum of 40 I/O Cards (1280 x 1280). Each TLX1280 I/O Card contains 32 ports, so that when fully configured, the TLX1280 will provide 1280 Optical Input/Output connections (SFP+ T/R) described as Ports 1- 1280. -
Page 19: Port Numbering
Port Numbering Port numbering begins at the bottom of the TLX1280’s chassis and starts with Card 1, the leftmost I/O card of the Lower Card Cage. Card 2 is directly above Card 1 in the Upper Card Cage. When installing fewer than 40 I/O Cards, cards slots may be chosen at the user’s discretion. -
Page 20: The Switch Cards
The Interconnect Card connects the Upper Card Cage to the Lower Card Cage. It is located within the chassis of the TLX1280 beside the Switch Cards and contains no active components. The Interconnect Card is not hot-swappable and requires a system shut-down to replace. It is not user serviceable. -
Page 21: Diagram: Chassis Dimensions And Cable Guides
Page 17 Upper Fiber Management Guides HWR-507 Lower Fiber Management Guides HWR-508 (Fiber Cable Management Guides are optional) thinklogical TLX1280 Matrix Switch Product Manual Rev. B, March 2019... -
Page 22: Section 3: Set-Up And Installation
Install the Chassis into its permanent mounting rack (pg. 19, Step 5). Unpack and install the modules, spares and options (pg. 19, Steps 6 & 7). 7. Connect the TLX1280 to the Ethernet and set the static IP address via the DIP switch located on the Interconnect Card (pg. 21). -
Page 23: Unpacking The Tlx1280 Chassis
All connections are found on the rear of the unit. 1. When the TLX1280 has been inspected and found to be in suitable condition, the process of removing the chassis from the shipping container can begin. -
Page 24: Lifting Fixtures
Page 20 Lifting Fixtures The TLX1280 is shipped with six lifting fixtures attached to the chassis. They provide connection points for lifting the chassis from its shipping container with a suitable lift crane (at least 500 pounds). The lifting fixtures should be removed before installing the unit into the rack. -
Page 25: Connecting To The Tlx1280
Ethernet Control If the TLX1280 Matrix Switch is to be controlled via Ethernet, it will require a static IP address. This value can be set via the DIP switch located on the Interconnect Card. The front panel must be removed to access the DIP Switch*. -
Page 26: Tlx1280 Dip Switch Settings
The simplest network connection is an isolated network with only the TLX1280, the control server, and any control clients using static IP addresses. The TLX1280 can be set to any of the above settings. The Control Server must be at 192.168.13.9 and the Control Clients can then be set to any other addresses in the 192.168.13.X subnet. -
Page 27: Fiber-Optic Cable
Page 23 Fiber-Optic Cable Requirements: Thinklogical recommends SX+ Laser Enhanced (50µm) fiber for your TLX1280 Matrix Switch and TLX Extension System. OM4 Multi-mode fiber can extend up to 400m and Single-mode fiber can extend up to 80km. ◄Receive ◄Transmit Handling: Unlike copper cabling, glass-core fiber-optic cables require special handling. -
Page 28: Routing Thinklogical Extenders Through The Tlx1280
Connecting to the Receiver The Receiver serves as the Destination (desktop, theater, conference room, editing suite, etc.). • First, connect the Receiver(s) to the TLX1280 using fiber-optic cables (Multi-mode fiber for distances up to 400m, Single-mode fiber for distances up to 80km). -
Page 29: Connecting To A Control Cpu
Page 25 Connecting to a Control CPU The TLX1280 is controlled via a dedicated external Control CPU (supplied separately). This permits customization and ease of control and administration. Access is provided via a CATx network connection or serial RS-232. • The network and serial RS-232 connection both use the same low-level ASCII API syntax. This... -
Page 30: Section 4: Maintenance
If the module does not slide in easily, do not force it! Damage may occur. Remove the module, reinsert it, and start over. 3. Hand-tighten the thumbscrews. Do not tighten the thumbscrews with a screwdriver. thinklogical TLX1280 Matrix Switch Product Manual Rev. B, March 2019... -
Page 31: The Interconnect Card
The Interconnect Card contains no active components and is not user serviceable. If there is a suspected problem with the Interconnect Card, please call Thinklogical immediately at 203-647-8700. How to Remove and Replace Modules that DO NOT Require a Halt Command... -
Page 32: How To Remove And Replace A Fan Tray
How to Remove and Replace a Fan Tray The TLX1280 uses six DC fans to move air vertically through the enclosure. Be sure not to block the air vents on the front of the unit and below the card cage on the rear panel. -
Page 33: Section 5: Thinklogical Support
Email Thinklogical is staffed Monday through Friday from 8:30am to 5:00pm, Eastern Time Zone. We will do our best to respond to your email inquiries promptly. Please use the following email addresses: – Information on Thinklogical and our products. -
Page 34: Warranty
Thinklogical warrants this product against defects in materials and workmanship for a period of one year from the date of delivery, with longer terms available at time of purchase on most products. Thinklogical and its suppliers disclaim all other warranties. Please refer to your product invoice for the Warranty Terms &... -
Page 35: Appendix A: Tlx1280 Quick Start Guide
Page 31 APPENDIX A: TLX1280 QUICK START GUIDE thinklogical TLX1280 Matrix Switch Product Manual Rev. B, March 2019... -
Page 36: Appendix B: Fpga Program Code Update Procedure
Page 32 Appendix B: TLX1280 FPGA Program Code Update Procedure thinklogical TLX1280 Matrix Switch Product Manual Rev. B, March 2019... -
Page 37: Appendix C: Secure Applications
Thinklogical’s TLX, VX and MX Matrix Switches use two methods for secure routing. One is known as Restricted Switching and the other is known as Partitioning. These methods can be deployed singularly or jointly, depending on security requirements. - Page 38 For access to the daemon.log file via SSH, refer to THE NETWORK INTERFACES section of this document (pg. 12) for correct IP addresses of Controller Cards when in Primary Active or Back-Up Active mode. thinklogical TLX1280 Matrix Switch Product Manual Rev. B, March 2019...
- Page 39 When an update is made to the table, the Controller will not evaluate the updated table until the following procedures are followed: When updates are made to the Restricted Switching Table in a non-redundant system, Thinklogical recommends the following...
- Page 40 The following example shows a priority scheme for four levels of security managed by one TLX Matrix Switch: Restricted switching is configured via firmware loaded into the Matrix Switch. The configuration file for this scenario will appear like the table at right. thinklogical TLX1280 Matrix Switch Product Manual Rev. B, March 2019...
- Page 41 A VX80 with four partitions: Ports 5-10 are accessible to both partitions 2 and 3. The following example shows a VX80 Switch with an overlapping partition: The Partition Table files are stored on the controller card at: /var/local/router/partition/upstream.csv thinklogical TLX1280 Matrix Switch Product Manual Rev. B, March 2019...
- Page 42 2. Take the Primary Controller Card out of service by following guidelines in the “Safely Remove an Active Controller Card” section of this document (pg. 26). When updates are made to the Partition Table in a redundant system, Thinklogical recommends the following...
- Page 43 Mix LETTER5 AND NUM8ER5 within the password to enhance its strength. Include NON-ALPHANUMER!C CH@RACTER$. Special characters (& $ % >) and punctuation marks (? “ - !) increase the strength of a password. thinklogical TLX1280 Matrix Switch Product Manual Rev. B, March 2019...
- Page 44 Page 40 Secure Application Examples The Diagram on pg. 41 shows the TLX1280 Matrix Switch in a secure application. The highly secure components are described as the Red Network and the other, lower security components are described as the Black Network. The Red Network, containing the computers (sources), is shown in a physically secure environment along with the TLX Matrix Switch, the computer server used to manage the Switch, and the Network Hub.
- Page 45 Page 41 TLX1280 10G Matrix Switch Secure Application thinklogical TLX1280 Matrix Switch Product Manual Rev. B, March 2019...
Need help?
Do you have a question about the TLX1280 and is the answer not in the manual?
Questions and answers