Advertisement
Quick Links
Thank you for purchasing the SleepSafe Safety Bed. With proper care, your bed will provide years of
safe use. Carefully unpack all the contents of your bed and verify that all parts are included using
the following pages.
PLEASE CHECK ALL BOXES FOR HARDWARE BEFORE DISCARDING
WARRANTY AND USER INFORMATION CAN BE FOUND AT THE END OF THESE INSTRUCTIONS
TOOLS NEEDED:
7/16" Wrench
Flat-Head Screwdriver
3/8" Wrench
4mm Allen Wrench
At least 2 People
(x2)
(Provided)
Advertisement

Related Manuals for SleepSafe Beds Sleep Safer

Summary of Contents for SleepSafe Beds Sleep Safer
- Page 1 Thank you for purchasing the SleepSafe Safety Bed. With proper care, your bed will provide years of safe use. Carefully unpack all the contents of your bed and verify that all parts are included using the following pages. PLEASE CHECK ALL BOXES FOR HARDWARE BEFORE DISCARDING WARRANTY AND USER INFORMATION CAN BE FOUND AT THE END OF THESE INSTRUCTIONS TOOLS NEEDED: ...
- Page 2 (Detailed Instructions for Assembling your Bed) (Explanation of the Bed Articulation) (Extension/Topper Assembly Guide) (Detailed Instructions for Adjusting Safety Rails) 2 ...
- Page 3 90mm Allen Bolt ¾“ Hex Bolt Barrel Nut (Preinstalled on padded beds) Alignment Pin Locking Pin Cardboard Spacer ¼” Allen Wrench 4mm Allen Wrench T15 Torx Wrench T10 Torx Wrench ...
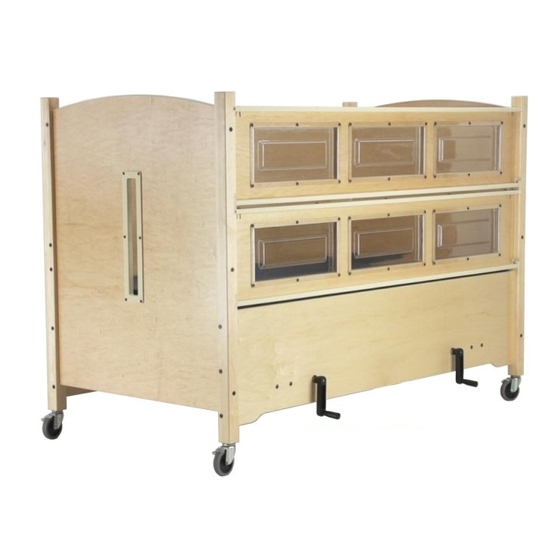
- Page 4 Casters Frame Crank Handle Mattress Headboard Footboard Front Panel Back Panels Safety Rails 4 ...
- Page 5 Determine where your SleepSafe Bed® will be positioned: Depending on the placement of your bed, it may be necessary to move the Crank Assembly to the opposite side of the bed. If so, set the frame flat on the ground, remove the Assembly using your two 7/16”...
- Page 6 Prepare Side-Rails (insert Barrel Nuts): Align Barrel Nut Slot Perpendicular to the edge of the Side Rail. Attach Side Rails to Frame: 6 ...
- Page 7 Attach Headboard and Footboard to Side Rails: Install Casters and Remove Spacers * Once the caster is inserted, turn the tightening nut as shown above to compress the rubber sleeve on the stem inside the wood leg, thus preventing the caster from falling out. ...
- Page 8 Attach Back Panel using Alignment Pins Note: Place the alignment pins in the holes at the top of the side panel (Fig. A) then lower the back panel onto the pins (Fig. B). After the back panel is in position, secure with 90mm Allen Bolts using the 4mm Allen Wrench as you did in the previous step.
- Page 9 Install Mattress: Install Safety Rails: 9 ...
- Page 10 Bed Operation: Crank handles rotate clockwise to articulate up and counter-clockwise to articulate down. The left handle is for Head Articulation and the right handle is for Foot Articulation. FOOT HEAD ...
- Page 11 90mm Allen Bolt 4mm Allen Wrench Curved End Piece Extension Side Rail Topper (Optional) Allen Screws (w/ Topper Only) 11 ...
- Page 12 Set Extension Side Rails on Top of Legs: You will be assembling the Extension upside-down *Be sure Screens are facing in (as shown) Attach Extension Ends to Side Rails: Attach Ends with Curve Up (smiling) using the 90mm Allem Bolts and 4mm Allen Wrench provided: ...
- Page 13 Flip Extension Assembly over: Curve-down (frowning) If you don’t have a Topper, skip Step #4: Attach Topper: Using the Allen Screws included 13 ...
- Page 14 Loosen Allen Bolts at Top of SleepSafer® Legs: Shown at “A” below: Loosening the Allen Bolts before adding the Extension allows for easier assembly and tighter fitting. If you have flip-up rails, be sure the proper legs match up before tightening all Allen Bolts.
- Page 15 *Each Safety Rail is pre-adjusted at our factory, but it may become necessary to adjust the Safety Rail height over time. TOOLS NEEDED: Rubber Mallet T10 Torx Wrench T15 Torx Wrench (or Hammer) (Provided) (Provided) Determine if your Safety Rails need adjustment:...
- Page 16 *Each Safety Rail is pre-adjusted at our factory, but it may become necessary to adjust the Safety Rail height over time. Determine if your Safety Rails need adjustment: With the safety rail in the locked position, check the spacing between the end of the safety rail and the headboard and footboard legs.
-
Page 17: Full One-Year Warranty
Limited Five-Year Warranty: During the second through fifth years from the date of purchase, SleepSafe Beds will replace any part found to be defective. Purchaser shall pay any service and shipping costs related to the replacement of the defective part.
Need help?
Do you have a question about the Sleep Safer and is the answer not in the manual?
Questions and answers