PIONEER DJ DDJ-800 Operating Instructions Manual
Dj controller
Hide thumbs
Also See for DDJ-800:
- Operating instructions manual (116 pages) ,
- Operating instructions manual (124 pages) ,
- Operating instructions manual (32 pages)

Related Manuals for PIONEER DJ DDJ-800


Summary of Contents for PIONEER DJ DDJ-800
- Page 1 Operating Instructions (Quick Start Guide) DJ Controller DDJ - 800 pioneerdj.com/support/ rekordbox.com For FAQs and other support information for this product, visit the above site.
- Page 2 IMPORTANT CAUTION RISK OF ELECTRIC SHOCK DO NOT OPEN The lightning flash with arrowhead symbol, The exclamation point within an equilateral CAUTION: TO PREVENT THE RISK OF ELECTRIC within an equilateral triangle, is intended to triangle is intended to alert the user to the SHOCK, DO NOT REMOVE COVER (OR alert the user to the presence of uninsulated presence of important operating and...
- Page 3 (2) this device must accept any interference received, including interference that may cause undesired operation. Product Name: DJ Controller Model Number: DDJ-800 Responsible Party Name: PIONEER ELECTRONICS (USA) INC. SERVICE SUPPORT DIVISION Address: 2050 W. 190th Street, Suite 100, Torrance, CA 90504, U.S.A.
-
Page 4: Table Of Contents
PC/Mac and outputting audio. For the detailed procedures, refer to the “Operating Instructions” on the Pioneer DJ site. Read both this manual and “Operating Instructions” which include important information to be understood before using this unit. In particular, be sure to read safety regulations. -
Page 5: Before Start
2 Click [Tutorials, manuals & documentation] under [Support]. Power cord 3 Click [DDJ-800] in the [DJ CONTROLLER] category. 4 Click the desired language from the Operating Instructions list. Download the manual as necessary. -
Page 6: Rekordbox
rekordbox Preparing rekordbox ! rekordbox Install the software by following the procedure below when you use rekordbox is music management software for DJs to prepare tracks rekordbox for the first time or if you are using rekordbox 4.x or an ear- and perform DJ play. -
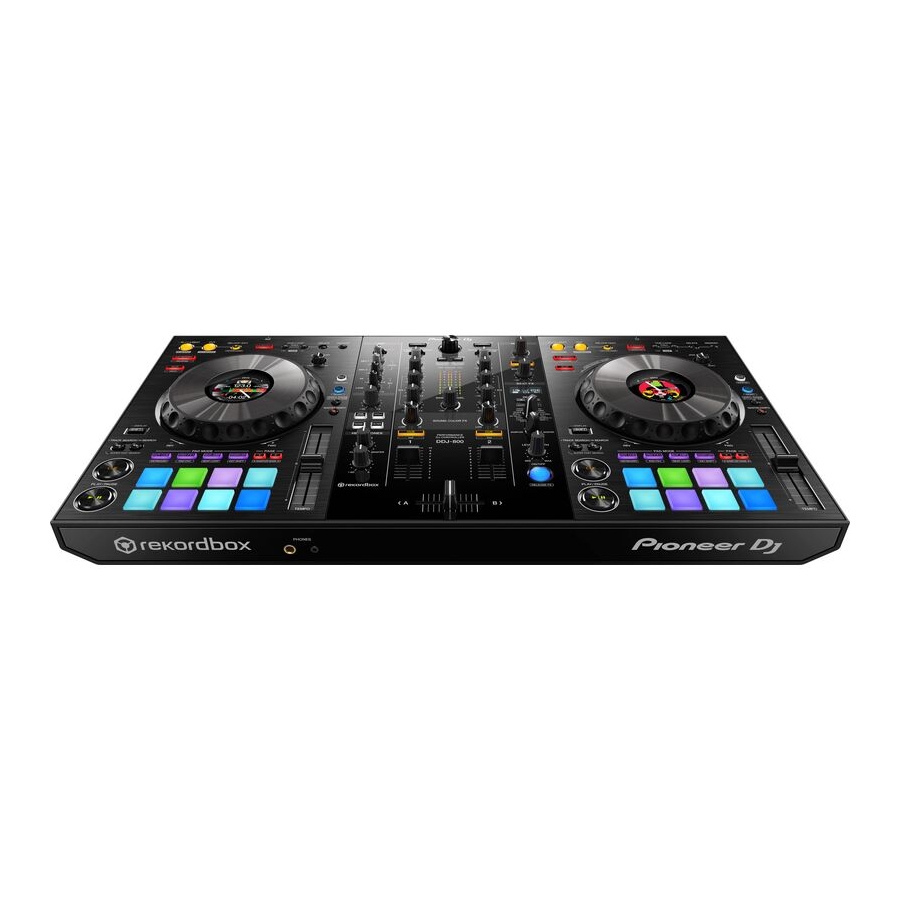
Page 7: Part Names
Part names For details on the functions of the various buttons and controls, see “Part names and functions” in the “Operating Instructions”. 1 Browser section 3 Mixer section 2 Deck sections Browser section 1 LOAD button 2 BACK button 3 Rotary selector 4 VIEW button... -
Page 8: Deck Sections
Deck sections This section is used to control the four decks. The buttons and controls for operating decks 1 and 3 are located on the left side of the controller, and those for operating decks 2 and 4 are located on the right side of the controller. 1 LOOP IN/4 BEAT (IN ADJUST) button i SAMPLER mode button 2 LOOP OUT (OUT ADJUST) button... -
Page 9: Mixer Section
Mixer section 1 MIC ON, OFF selector switch j Crossfader 2 Microphone indicator k HEADPHONES LEVEL control 3 PHONO/LINE, DECK3, DECK1 selector switch l HEADPHONES MIXING control 4 TRIM control m SOUND COLOR FX SELECT buttons 5 Master level indicator n AUX TRIM control 6 CLIP indicator o MIC EQ (HI, LOW) control... -
Page 10: Rear Panel
Rear panel Top panel 1 DC cord hook 8 LINE/PHONO switches 2 DC IN terminal 9 SIGNAL GND terminal This terminal helps reduce noise when an analog player or other 3 u switch device is connected. Turns this unit on or puts this unit into standby mode. a MIC attenuator 4 BOOTH output terminals b MIC 1 input terminal... -
Page 11: Operation
Operation ! Connect the power cord to a power outlet after all the connections are completed. Turn off this unit and disconnect the power cord from the power outlet before connecting components or changing the connections. Refer to the operating instructions for the components to be connected. ! Be sure to use the included power cord and AC adapter. -
Page 12: Connections
For more information on how to use this product with rekordbox dj, refer to this product’s Operating Instructions that is available on the power amplifier, and components to the [MASTER 1] or Pioneer DJ site. [MASTER 2] output terminals. 1 Connect headphones to the [PHONES] output terminals. - Page 13 3 Connect your PC/Mac to the unit via a USB cable. USB cable (included) 4 Turn on your PC/Mac. 5 Connect the AC adapter. AC adapter (included) Power cord included To power outlet 6 Press the [u] switch on the rear panel of this unit to turn this unit on.
-
Page 14: Starting The System
[Headphones Output]: [DDJ-800: PHONES] For Windows [Audio]: [DDJ-800 ASIO] [Output channels]: [Master Output]: [DDJ-800 ASIO: MASTER] [Booth Output]: [DDJ-800 ASIO: BOOTH] [Headphones Output]: [DDJ-800 ASIO: PHONES] ! If PC MASTER OUT is enabled, the “+ Name of audio device in PC/Mac”... -
Page 15: Turning Off The System
2 Press the [PLAY/PAUSE f] button to play the Play tracks track. The following describes the procedure for outputting the sound of deck 1 (left side) as an example. 3 Turn the [TRIM] control. Adjust the [TRIM] control so that the channel level indicator’s orange indicator lights at the peak level. -
Page 16: Additional Information
! If you think that there is something wrong with this unit, check the items in the “Troubleshooting” section of the “Operating Instructions” of this unit or access the Pioneer DJ support page and then check [FAQ] of DDJ-800. pioneerdj.com/support/ Also, refer to [Support] >... -
Page 17: Specifications
PHONES output terminal Specifications 1/4” stereo jack ................. 1 set 3.5 mm stereo mini jack............. 1 set USB terminals AC adapter B type ..................1 set Power requirements ......AC 100 V to 240 V, 50 Hz/60 Hz Rated current ..................0.6 A ! Be sure to use the [MASTER 1] output terminals for a balanced Rated output .............. - Page 19 Within 40 days of receiving your complaint, Pioneer DJ will investigate the dispute and will either: (1) respond to your complaint in writing informing you what action Pioneer DJ will take, and in what time period, to resolve the dispute; or (2) respond to your complaint in writing informing you why it will not take any action.
- Page 20 URL suivantes : In the USA/Aux Etats-Unis or In Canada/Aux Canada http://www.pioneerelectronics.com S018_C1_EnFr_PSV © 2019 Pioneer DJ Corporation. All rights reserved. PIONEER ELECTRONICS (THAILAND) CO., LTD. 17th Fl., KPN Tower, 719 Rama 9 Road, Bangkapi, Huaykwang, Bangkok 10310...
Need help?
Do you have a question about the DDJ-800 and is the answer not in the manual?
Questions and answers