
Related Manuals for Dockmate Dockmate


Summary of Contents for Dockmate Dockmate
-
Page 1: Installation Manual
DOCKMATE, complete control over your boat, single- handed. EASY TO USE EASY TO INSTALL 100% SAFE Installation manual... - Page 2 Dockmate installation manual...
-
Page 3: Safety Precautions
Before installing the Dockmate, read all the manuals carefully. Before starting any work on the installation of the Dockmate, make sure the boat is very well moored on strong and tight ropes. The Dockmate should be installed by a trained and qualified engineer only. -
Page 4: Preparing The Transmitter
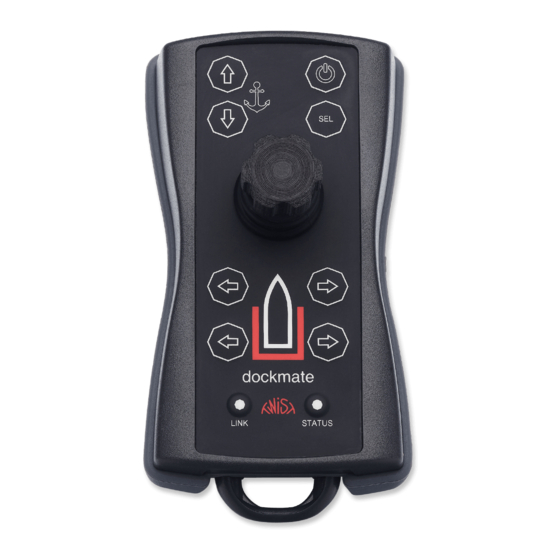
Dockmate installation manual 2. Preparing the transmitter 2.1. TWIN/SINGLE Transmitter Open the battery compartment by unscrewing the 2 screws and remove the lid. Install 3xAAA batteries respecting the polarity as indicated in the housing. When closing, be careful not to damage the rubber seal. - Page 5 Dockmate installation manual 2.2. TWIST Transmitter Press the key for 1 second to turn on the transmitter. The transmitter will be automatically switched off after 30 minutes of non use. Alternatively the transmitter can be switched off by pressing 3 times the button or holding it down for 3 sec.
- Page 6 4. Installing the modules Always disconnect the power, before installing or removing modules ! Usually, the Dockmate comes ready with the correct modules. When a module needs to be changed, it has to be done with care, not to damage anything by putting too much force.
- Page 7 5. Connecting and installing the antenna To connect the antenna to your Dockmate, remove the red rubber protection cap from the SMA connector on top of the Dockmate receiver, and connect the antenna directly or with the optional extension cable.
- Page 8 The two pins with white and brown wires are used for the ship’s ground, and the two pins with yellow and green should be connected to the ship’s +12VDC or +24VDC. The normal colors of wires in the power cable for single supply of the Dockmate receiver are: BROWN (-)
- Page 9 Switch off the power of the transmitter and the receiver, then switch on again. From now on, whenever the transmitter is on, the status LED inside the Dockmate will blink green every time a button is pressed and 15 seconds after – this means that the link is established.
- Page 10 Dockmate installation manual 9. Connecting the horn module The first step of connecting the Dockmate to the boat is by connecting the horn module. Please note that when depressing the ‘Horn’-button on the single and twin transmitter, there will be a delay time of about 0,6 seconds.
- Page 11 Polarity of the cables (black-red and yellow-brown) is not important The above scheme is valid only for the panel shown above ! Newer Volvos (EVC) can be used with Dockmate but it is not possible to connect the “Take command” signal. The station has to be activated manually, so it is strongly recommended to connect the Dockmate at the helm position that is used most.
- Page 12 Dockmate installation manual 10.2. Older Volvo panel For the older panel type like on the picture, connect as shown below.
- Page 13 Micro Commander For “TAKE COMMAND” scheme see point 10.7. 10.4. Connecting the engines (engine module) The procedure is identical for both Port - and Starboard engine. After connecting the engines, always remember calibrating the potentiometers inside the Dockmate receiver (see below)!!!
- Page 14 Cut the wire as shown on the scheme and connect it to the green and yellow cable. (Cutting the cable is required only if you don’t have ready-made adapter cables). Connect the white (-) and brown (+) cable to the Dockmate. CALIBRATION :...
- Page 15 The above scheme is the same as the previous one with exception of the additional red and black cable. These cables are connected to a safety switch in the gear lever. Cut one of the leads from the neutral switch and connect the black and red cable from the Dockmate in-between. Connection and calibration...
- Page 16 Dockmate installation manual 10.6. Analogue VOLVOs (EDC, EVC-B, EVC-C) Dockmate Comes with readymade connecting cables (Volvo type 3-1 on the left, and Volvo type 3-2 on the right). Remember calibrating the potentiometers before the first use! See point 10.4 First, connect only the male and female plugs to the gearshift, and make the...
- Page 17 When it is installed, you have to disconnect the male / female socket from the gearshift (Dockmate cable) and connect it to the same type of socket BEHIND this SPM neutral switch box, on the cable from the black box to the gearbox. Make sure, to calibrate the potmeters in the Dockmate first when it is connected directly to the lever.
- Page 18 Dockmate installation manual Scheme of 3 possible connections : The polarity of the red and black cable from the Dockmate is not important. Connecting to either the green/brown or red/blue cable on the grey neutral switch plug is possible. Do not connect the neutral switch to the middle...
- Page 19 Dockmate installation manual 10.7. ZF Microcommander For ZF Microcommander use the scheme below. Remember calibrating the potentiometers before the first use! See point 10.4.
- Page 20 Dockmate installation manual 11. Connecting the anchor winch 11.1. Standard Anchor module Most anchor winches are connected as shown. Wires shown with a red have to be disconnected (cut), so the signal can go via the Dockmate. To find out which wire is which, use a voltmeter. Turn on the power of the windlass (but don’t press any buttons) and measure the voltage between the ship’s ground...
- Page 21 X2 module. In case you need to reverse the buttons (up instead of down and vice versa) you can do this in the software settings (via the Live View Cable) or by swapping the green and brown wire from the Dockmate.
- Page 22 Dockmate installation manual 11.3. Anchor X2 module The connection scheme looks like in previous cases, with the difference that there are two identical circuits. The first anchor winch is connected to the “Windlass” plug and the second is connected through the “Windlass2” plug.
- Page 23 12.1. Standard Thruster panel On-Off The wires shown with a red have to be disconnected (cut), so the signal can go via the Dockmate. The stern thruster connection is the same as the bow thruster connection. NOTE: If the thruster operates in reversed direction change the yellow with black and the green with brown wires.
- Page 24 Side power socket. The yellow lead has to go through the Dockmate single yellow cable. When there is no power switch installed (no yellow lead coming from the joystick panel) then isolate the yellow lead coming from the Dockmate cable,...
- Page 25 Dockmate installation manual 12.3. Connecting the Side-Power S-link bow - and stern thruster For details, see separate manual “Side Power S-link Dockmate CAN bus module Installation Manual”...
- Page 26 Dockmate installation manual At this point your DOCKMATE system is ready to use. From now on you can dock your ship single handed!
Need help?
Do you have a question about the Dockmate and is the answer not in the manual?
Questions and answers