
Related Manuals for Uninet iColor Series

Summary of Contents for Uninet iColor Series
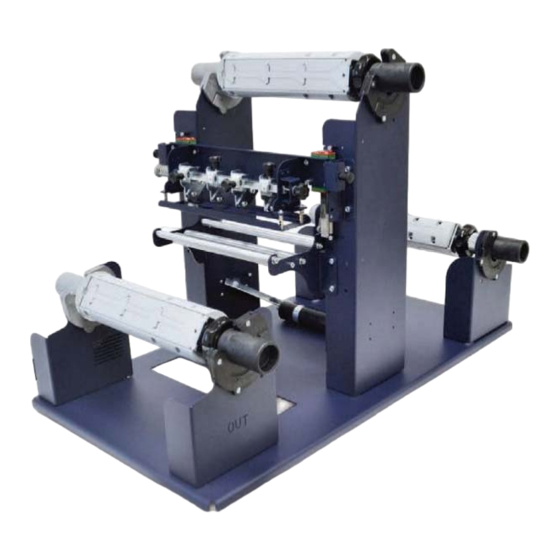
- Page 1 Matrix Remover and Slitter User Manual UniNet 3232 W. El Segundo Blvd., Hawthorne, California 90250 | sales@icolorprint.com www.icolorprint.com...
-
Page 2: Important Notice
IMPORTANT NOTICE THE MACHINE CAN ALSO BE USED AS SLITTER ONLY. WHEN YOU DO THAT, PLEASE REMOVE THE TOP MOTORIZED CORE HOLDER AND ADJUST THE CLUTCH KNOB ON THE UNWINDER CORE HOLDER. CORE HOLDER Motorized core holder Non-Motorized core holder Use only on unwinder station... - Page 3 Waste Matrix Take up mandrel / Weeder (Motorized) Commands Unwinder Supply mandrel (Non-Motorized) Tension arm Slitter station Slitter Blade Housing Take up mandrel (Motorized) Legend MCH: MOTORIZED CORE HOLDER...
- Page 4 Note on Media Environment: 50% humidity and 72 degrees Fahrenheit is the optimal conditions for both storage and use of label stock. Store label stock in protective plastic wrappings. Rewrap partially used stock. Do not store stock directly on concrete floors. Label stock should be conditioned in this environment for 72 hours prior to use.
- Page 5 Place an empty wide core on the mandrel (motorized). Push the core until it touches the core stop. Tighten using the tension knob. Insert the empty cardboard core on the MCH (motorized) to receive the new labels roll. Set the supply mandrel in the supply location.
- Page 6 Paper path. Pull the printed labels for about fifty centimeters. Set the weeder mandrel in the weeder location on the top of the MCH.
- Page 7 Separate the matrix from liner at this point. the matrix to the empty core on the weeder mandrel. Insert the MCH into the lower matrix support.
- Page 8 Continue pulling the printed labels and manually turning the weeder mandrel so that the matrix is wrapped around the core at least once. 1. Move the printed label behind the lower MCH 2. Position the empty cardboard core on the single future new labels roll 3.
- Page 9 Position the blades in between each column and on either edge if desired. You can alternate the position of the thumb screw from the top to the side to gain easier access. WARNING! The slitter blades are exposed and VERY sharp when the slitter station is in the “up”...
- Page 10 The black knobs lock the slitter module in the requested position. Screw the thumb knobs to move the blades to the right or to the left. Turn on the MATRIX REMOVER using the power switch on the back. Make sure the speed knob is in the slowest position before you switch on the MATRIX REMOVER.
- Page 11 Remove the labels that have wrapped around take-up mandrel. Attach the labels to the core using waste label or tape.
- Page 12 Note: Make sure the tension on all rolls is even. If they are not even and you have already attached them to the core you can easily equalize them by loosening the tension knob on the mandrel just a little. Now turn each core on the mandrel until all label rolls are taut.
- Page 13 When the roll is finished, the unit automatically stops when contact on the dancer arm touches the screw on the base. You will also hear an audible tone. Remove the finished rolls from the take up location. Remove the rolls from the take-up mandrel.
- Page 14 Separate the finished rolls. Some interleaving may occur. This is normal. Finally, remove the waste matrix mandrel and discard the matrix and the core. We do not recommend reusing the same core with matrix from a previous job still attached.
- Page 15 HOW TO ADD OR REMOVE A BLADE HOLDER Keep out the iron slide bar unscrewing Slide in or out the blade holder. the thumb screw. Relocate the slide iron bar in its position and rescrew the thumb screw. REPLACING SLITTER BLADES Loosen the two screws holding the blade in place.
-
Page 16: Paper Path
Paper path Consult the iColor® knowledge base for more information at: www.icolorprint.com/support Technical Support Email: support@icolorprint.com Technical Support Phone: 631-590-1040, Option 2...
Need help?
Do you have a question about the iColor Series and is the answer not in the manual?
Questions and answers