Table of Contents
Advertisement
Available languages
Available languages
Quick Links
Advertisement
Chapters
Table of Contents

Related Manuals for auna BC-1


Summary of Contents for auna BC-1
-
Page 3: Table Of Contents
Sehr geehrter Kunde, wir gratulieren Ihnen zum Erwerb Ihres Geräts. Lesen Sie die folgenden Hinweise sorgfältig durch und befolgen Sie diese, um möglichen Schäden vorzubeugen. Für Schäden, die durch Missachtung der Hinweise und unsachgemäßen Gebrauch entstehen, übernehmen wir keine Haftung. TECHNISCHE DATEN Artikelnummer 10031940... -
Page 4: Sicherheitshinweise
SICHERHEITSHINWEISE • Lesen Sie die Bedienungsanleitung und bewahren Sie sie auf. • Beachten Sie alle Sicherheitshinweise. • Befolgen Sie die Anleitungen. • Verwenden Sie das Gerät nicht in der Nähe von Wasser. • Nur mit einem sauberen Tuch reinigen. • Blockieren Sie nicht die Lüftungsöffnungen. -
Page 5: Lieferumfang
LIEFERUMFANG Anlage Netzadapter Bedienungsanleitung... -
Page 6: Geräteübersicht
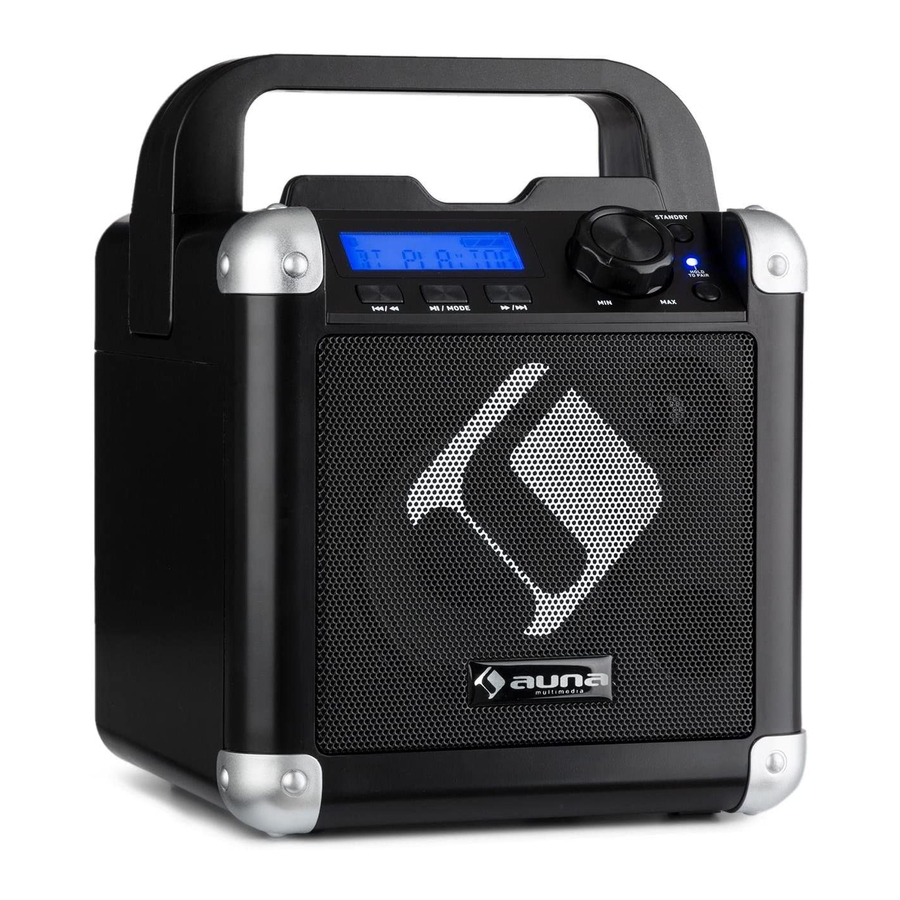
GERÄTEÜBERSICHT Vorderansicht Griff VOR/ZURÜCK Drücken: Voriger/Nächster Titel Gedrückt halten: Vor- und zurückspulen PLAY/PAUSE/MODE button Drücken: Den aktuellen Titel wiedergeben oder anhalten Gedrückt halten: USB/BT-Modus wählen Lautstärkeregelung Die Lautstärke erhöhen oder verringern STANDBY Standby ein- und ausschalten BT-LED PAIRING Kopplung mit einem BT-Gerät Hauptlautsprecher... - Page 7 Rückseite MIC1 und MIC2-EINGANG Gitarreneinfang AUDIO- Ausgang Zum Anschluss an einen externen Verstärker Microfonlautstärke Drehen, um die Mikrofonlautstärke einzustellen. Netzschalter Das Gerät ein- oder ausschalten AUX-Eingang Netzteil-Anschluss USB-Ladeanschluss Mobile Geräte anschließen, um sie aufzuladen USB-Wiedergabe-Anschluss...
-
Page 8: Stromversorgung
STROMVERSORGUNG Anschluss der Anlage an die Stromversorgung. 1. Schließen Sie den Netzadapter an den Anschluss im Gerät an. 2. Schließen Sie den Netzadapter an eine Steckdose an. 3. Schalten Sie das Gerät hinten am Netzschalter und vorne an der STANDBY-Taste ein. Steckdose Netzadapter Hinweis: Wenn Sie das Gerät längere Zeit nicht verwenden, ziehen Sie den... -
Page 9: Anschlüsse Und Verbindungen
das auf die Ladezeit aus. Wir empfehlen, das Gerät während des Ladevorgangs abzuschalten, bis es vollständig aufgeladen ist. • Wiederaufladbare Akkus müssen zur Maximierung des Lebenszyklus mindestens einmal im Monat aufgeladen werden, wenn Sie das Gerät nicht so häufig verwenden. ANSCHLÜSSE UND VERBINDUNGEN Anschluss eines MIkrofons 1. -
Page 10: Bt- Verbindung Und Wiedergabe
BT- VERBINDUNG UND WIEDERGABE Kopplung mit einem BT-Gerät herstellen 1. Schalten Sie das Gerät mit der STANDBY-Taste ein. Die Betriebsleuchte geht an und die BT-Anzeige blinkt. Halten Sie die PAIRING-Taste ca. 5 Sekunden lang gedrückt. Halten Sie das Gerät während der Kopplung innerhalb von einem Meter von der Karaokeanlage entfernt. -
Page 11: Aufladen Eines Externen Geräts
WIEDERGABE ÜBER DEN AUX-ANSCHLUSS Sie können über den AUX-Anschluss die Lautsprecher mit Musik von externen Geräten beschallen (iPod, MP3 oder andere digitale Audiogeräte). 1. Schließen Sie auf der Rückseite des Geräts ein Audiokabel mit einem 3,5-mm-Klinkstecker an. (Darauf achten, dass das externe Abspielgerät eingeschaltet ist.) 2. -
Page 12: Energiesparfunktion
Hinweise • Sehen Sie vor dem Aufladen in der Bedienungsanleitung des zu ladenden Geräts nach, um zu gewährleisten, dass die erlaubte Ladespannung 1 A nicht übersteigt. • Der USB-Ladeausgang ist mit einer maximalen Spannung von 5 V und einen Strom von 1 A versorgt. Andere Spannungen werden nicht unterstützt. -
Page 13: Fehlerbehebung
FEHLERBEHEBUNG Problem Möglicher Grund Abhilfe Das Gerät wurde nicht richtig Trennen Sie Ihr externes Gerät angeschlossen. vom Ladekabel. Anschlüsse auf Fremdkörper hin überprüfen. Der Akku des Das Gerät ist abgestürzt. Achten Sie darauf, dass Ihr externen Gerätes Gerät richtig funktioniert, lädt nicht. -
Page 14: Hinweise Zur Entsorgung
HINWEISE ZUR ENTSORGUNG Befindet sich die linke Abbildung (durchgestrichene Mülltonne auf Rädern) auf dem Produkt, gilt die Europäische Richtlinie 2012/19/EU. Diese Produkte dürfen nicht mit dem normalen Hausmüll entsorgt werden. Informieren Sie sich über die örtlichen Regelungen zur getrennten Sammlung elektrischer und elektronischer Gerätschaften. -
Page 15: Technical Data
Dear Customer, Congratulations on purchasing this equipment. Please read this manual carefully and take care of the following hints on installation and use to avoid technical damages. Any failure caused by ignoring the items and cautions mentioned in the operation and installation instructions are not covered by our warranty and any liability. -
Page 16: Safety Instructions
SAFETY INSTRUCTIONS • Read these instructions. Keep these instructions. • Heed all warnings. • Follow all instructions. • Do not use this apparatus near water. • Clean only with dry cloth. • Do not block any ventilation openings. Install in accordance with the manufacturer’s instructions. -
Page 17: Scope Of Supply
SCOPE OF SUPPLY Main unit Power adapter Instruction Manual... -
Page 18: Product View
PRODUCT VIEW Front panel Handle LCD Display SKIP +/-BUTTON Press to skip the previous or next song to a device Long press to go fast forward or fast backward .(For USB Player only) PLAY/ PAUSE /MODE Button Press to play or pause the current tracks,Long press to select USB/BT in mode. - Page 19 REAR input & control MIC1 + MIC2 input GUITAR Input AUDIO Output Connect to external amplifier MIC Volume Turn to adjust the MIC sound level up or down POWER Switch Switch to power on or off the unit AUX Input DC Input USB CHARGER Connect to other portable device you wish to charge...
-
Page 20: Power Connection
POWER CONNECTION Before using your BT wireless system, connect the power adaptor to AC outlet. 1. Firmly and securely insert the DC plug of the adaptor to the DC IN jack on the rear of the unit. 2. Plug the adaptor’s AC plugs into an AC outlet. 3. -
Page 21: Connections
the internal battery as soon as possible. Notes • Charging time will vary if you are listening to music while charging the internal battery . We recommend you switch off the unit power during the charging process . • To prolong the life of a rechargeable battery , it is recommended to completely discharge it before fully charging it again. -
Page 22: Bt Operations
BT OPERATIONS Pairing a BT Device for the First Time 1. Power on the unit by pressing the STANDBY button. The power indicator will light up and the BT indicator will flash. Press and hold the PAIRING button for about 5 seconds. When pairing, remain within about 5 seconds. -
Page 23: Aux-In Operations
and Press again to resume. AUX-IN OPERATIONS You can play other music sources (iPod, MP3 or other digital audio players) through the speakers of this unit by connecting the AUX IN JACK to your external player’s audio out jack or headphone jack. 1. -
Page 24: Energy Saving
unit. 2. Plug one end of the USB cable (not included) into the USB ”CHARGER” Port located on the back of the unit. Plug the other end of the cord into the device you wish to charge. 3. Observe the battery charge indicator on your device and the charging will start immediately. -
Page 25: Troubleshooting
TROUBLESHOOTING Problem Possible Reason Remedy Portable device is not Remove your installed properly. portabledevice from the charging cord and check for obstruction on the connectors. Portable device is locked up Please make sure your No Charging or frozen. portable device is working properlybefore plugginginto the unit Portable device battery has... -
Page 26: Disposal Considerations
DISPOSAL CONSIDERATIONS According to the European waste regulation 2012/19/EU this symbol on the product or on its packaging indicates that this product may not be treated as household waste. Instead it should be taken to the appropriate collection point for the recycling of electrical and electronic equipment.
Need help?
Do you have a question about the BC-1 and is the answer not in the manual?
Questions and answers