Table of Contents
Advertisement
SAGEMCOM F@ST 5355 GATEWAY
Disclaimer
This is not an official document. I am not employed by Telstra nor am I an IT person. I wrote this
document because setting up my gateway was a hassle due to the lack of a manual or any set up
information on Testra's Web Site. I don't guarantee the accuracy of it content. What worked for me might
not work for you.
Table of Contents
Backup and R estore S ettings
D evice Information (FTTN or ADSL connection Link Speed and Max
Speed)
Statistics (Place to look to find what's causing problems)
NB: Document needs to be downloaded for internal links to work.
Version 2.4 Last updated 01/03/2017
Advertisement
Table of Contents

Subscribe to Our Youtube Channel
Related Manuals for SAGEMCOM F@ST 5355


Summary of Contents for SAGEMCOM F@ST 5355
-
Page 1: Table Of Contents
SAGEMCOM F@ST 5355 GATEWAY Disclaimer This is not an official document. I am not employed by Telstra nor am I an IT person. I wrote this document because setting up my gateway was a hassle due to the lack of a manual or any set up information on Testra’s Web Site. -
Page 2: Lights And Buttons
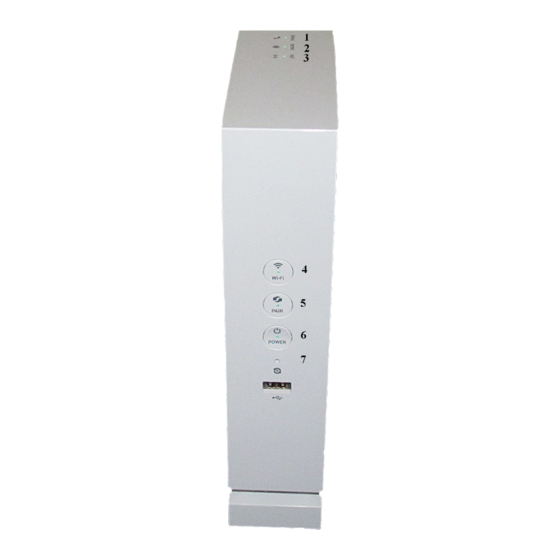
Lights and Buttons: 1. Phone Off: Phone line not registered Green: Phone line registered. Blue: Phone in use. Red: Fault (Reboot gateway) 2. On Line Blue: Trying to connect to Telstra Gateway Green: Connected to Telstra Gateway. (See changing Telstra User Name and Password) 3. -
Page 3: Login
Login Open a browser and type 10.0.0.13 8 into the address bar and press enter. The default password is admin Change Gateways Login Password Once logged in the first thing I do is change the password to something easy to remember.If the password is forgotten the modem will have to be reset resulting in the loss of all settings. -
Page 4: Telstra's Internet User Name And Password
Telstra’s Internet User Name and Password If Link Light is green and the On Line light doesn’t turn green these are the first settings I would check. Click on Broadband The User Name is the one provided by Telstra for the internet connection. Example someone@bigpond.com. -
Page 5: Parental_Control
Parental Control Click on Parental Control The internet and access control tab is where you can set the times a device can access the internet. In the Select drop down list every device ever connected to the gateway is listed by its MAC address. Note devices that can be connected by either Wi-Fi or Ethernet will have two different MAC addresses. -
Page 6: Connecting Wi-Fi Devices
The URL filter tab is where access to malicious sites can be blocked for all devices. The example above blocks access to google. Click on the Add Address to add a site. Enter its URL If there are more sites to be blocked Click Add Address and enter its URL. Repeat for all the sites to be blocked. -
Page 7: Address Reservation (Static Lan I P Address)
Address Reservation. There are two ways to set up address reservation. The easy way is to click on the device on the home page and then click on Reserve Address. This doesn’t always work and when it doesn’t any further attempt to change address reservation results in an error message. - Page 8 Click on Add Reserved Address. Click on Add MAC Address. The drop down list contains the MAC addresses of every device that was ever connected to the gateway. Select the device that needs a fixed address. If the device is currently connected the IPv4 Address will automatically be filled in. Suggest you change the address to something over 50 (10.0.0.51) to prevent reserved address being taken by another device.
-
Page 9: Port Forwarding
Port Forwarding For port forwarding to work you need a fixed IP LAN address. (See Address Res e rvation for how to do this) There are two ways to set up Port Forwarding. I will describe the easy way. Click Home. On the centre left of the page are a list of connected devices. - Page 10 Enter a descriptive name. If you wish to forward a non standard port select Other as the service. If you select a predefined services from the drop down list the Protocol, External and Internal ports are pre filled. If you select Other the Protocol defaults to TCP.
- Page 11 Back up and Restore Click on Advanced. Click on Gateway Settings. Click on Maintenance. Click on Back up and Restore. To Backup Modems Configuration click on Backup Configuration.
- Page 12 File named device.cfg will be saved to the default download folder. To restore a previous back click on Choose File Browse to a the backup file its default name is device.cfg and in will normally be found in the download folder.
-
Page 13: Reset Gateway
Reset Gateway. There are two methods for resetting the gateway. 1. Using a paper clip press for several seconds the gateway’s reset button located below the power button. 2. Log into the gateway, go to Advanced/Gateway Settings/Maintenance/Resets and click on reset. Turn Wi-Fi OFF or ON. -
Page 14: Bridge Mode
Bridge Mode. In bridge mode the phone doesn’t work and you can’t log into the modem. A factory reset is require to disable bridge mode resulting in loss of all settings. Log into the gateway. Click on Advanced Click on Gateway Click on Bridge Mode Click on the Enable switch to toggle it to on. -
Page 15: Pair A Dect Handset
Enter the DDNS URL without the http:// Click on Apply. After a few seconds the Status should change to Enabled. Pair a DECT Handset Press the Pair button on the front panel between the Power and Wi-Fi buttons until it starts flashing. While its flashing the gateway is ready to pair with the handset. -
Page 16: Remote Web Access
Click on the Handset, it is displayed on the right hand side of the screen. Click on unpair The handset is unpaired. Remote Web Access. To turn Remote Web Access on log into the gateway and go to Services/Remote Access Click on the Enabled switch to toggle it on. -
Page 17: Wi-Fi Mac Filtering
Click on Apply. If you had switched Use Random Password Off it toggles back on but don’t worry your password will be saved. Take note of the URL including the port number. This is the URL used to access the Modem remotely. 1 Can only access Gateways GUI, can not access media connected to USB ports. -
Page 18: Dns
To change DNS go to Advanced / Gateway Settings / DNS Enter Primary DNS Server address and a optional Secondary DNS Server address and click apply. Any connected devices will have to be reconnected for changes to take effect. Change Wi-Fi SSID and Password. In Basic Mode click on Wi-Fi Select Wi-Fi Band you wish to change Enter new SSID and Password and click Apply. -
Page 19: Third Party Vdsl Modem Router
In third party gateway set connection type as DSL and no login ID or password required (IPOE). Used same DHCP address range as F@st 5355 Gateway but different Gateway IP address Might need to port forwarding BOTH TCP/UDP ports 5060/5061 to F@st 5355 Gateway Using this configuration was still able to make and receive calls, DLNA Server and USB Mass Storage. - Page 20 Mass Storage To connect to drives connected to the USB ports open file explorer and type \\10.0.0.138 (IP address of gateway) into address bar and press enter. To enable connection of drives set Network to Private and go to Control Panel\All Control Panel Items\Network and Sharing Centre\Advanced sharing settings and “Turn on Network Discovery”...
- Page 21 To eject a drive Click on the USB symbol home page gateway Place tic in “Force to eject” and click eject. To Turn Mass Storage On or OFF click on “Mass Storage” The highlighted text is the address to used in file explore to connect to USB attached drives.
-
Page 22: Device Information
Device Information Go to Advanced /Gateway Settings / Device Information / General Here is located information on all the gateways interfaces. For ADSL /VDSL link information scroll down to xDSL... - Page 23 Statistics (FTTN connection) Go to Advanced /Gateway Settings / Device Information / Statistics LAN Layer 1 LAN ports and Wi-Fi statistics...
- Page 24 WAN layer 3 Statistics for Internet Connection WAN Layer 2 -ATM/PTM WAN Layer 1 – Ethernet Statistics for WAN port. (FTTP, Cable and Fixed Radio Connection)
- Page 25 WAN Layer 1 – xDSL Statistics for VDSL or ADSL connection 1. FEC Errors: Errors that have been detected and corrected. 2. Code violations (CRC): A CRC error indicates that part of the data packet is corrupt and requires retransmission. 3.
-
Page 26: Change Ip Address Of Gateway
Change IP Address of Gateway Go to Advanced > Gateway Settings > DHCP Type in New Ip Address Change IPv4 Pool Start and IPv4 Pool End so that they match IP address See example below... - Page 27 Click on apply. If an error occurs see IP address range Bug work around Connected devices will need to be disconnected and reconnected for changes to take effect. Log into Gateway using new IP address.
-
Page 28: Specifications
Specifications • ADSL/ADSL2+/VDSL/VDSL2+ compatible • Dual-band concurrent Wi-Fi interfaces: • 802.11n 2.4GHz (2x2) • 802.11 ac 5GHz (3x3) • 1 x Gigabit Ethernet WAN port • 2 x 100 Mb/s Ethernet LAN ports • 2 x USB 2.0 ports • Built-in DLNA allows for media sharing via an external hard drive connected to the USB ports •... -
Page 29: Changing Ip Address Range Bug Work Around
It seems that the WEB UI for the DHCP settings is buggy. However, if you hack around this you can get the F@st 5355 router to accept DHCP settings in the 192.168 range. If you are using chrome (Modify as appropriate for the developer tools on other browsers): * Enter the IP address for the router (e.g.
Need help?
Do you have a question about the F@ST 5355 and is the answer not in the manual?
Questions and answers