Table of Contents
Advertisement
Quick Links
Advertisement
Table of Contents

Related Manuals for 4titude TubeMarker 2

Summary of Contents for 4titude TubeMarker 2
- Page 1 Operation Manual Version: 2.0 4titude Ltd. • The North Barn • Surrey Hills Business Park Damphurst Lane • Wotton • Surrey • RH5 6QT T: +44 (0)1306 884885 • F: +44 (0)1306 884886 • E: info@4ti.co.uk • www.4ti.co.uk TubeMarker™ 2, Operation Manual V2.0 • en1 • 09.2018...
- Page 2 Copyright Notice No part of this manual may be reproduced or transmitted in any form or by any means, electronic or mechanical, for any purpose, without prior written permission of 4titude Ltd. Safety Information This operation manual contains important operating and maintenance instructions which must be read, understood, and followed by the product user.
-
Page 3: Table Of Contents
TubeMarker™ 2 Table of Contents 1 TubeMarker™ 2 Introduction ......................6 1.1 The Instrument …………………………………………………………………………………………………………6 1.2 Package Contents ……………………………………………………………………………………………………6 1.3 TubeMarker™ 2 Parts ………………………………………………………………………………………………7 2 Software Installation ........................8 3 Hardware Installation ........................10 3.1 How to Install Ribbon for Printing ………………………………………………………………………………… 10 3.2 How to Set-up Tube Support ………………………………………………………………………………………... -
Page 4: Tubemarker™ 2 Introduction
TubeMarker™ 2 1 TubeMarker™ 2 Introduction 1.1 The Instrument The TubeMarker™ 2 allows printing directly onto the surface of of a wide range of tubes including PCR, centrifuge and cryogenic vials from 0.2 – 50 ml in volume, limiting need and use of sticky labels or marker pens. Markings are resistant to ethanol, isopropanol, water, DMSO, liquid nitrogen and mechanical stress. -
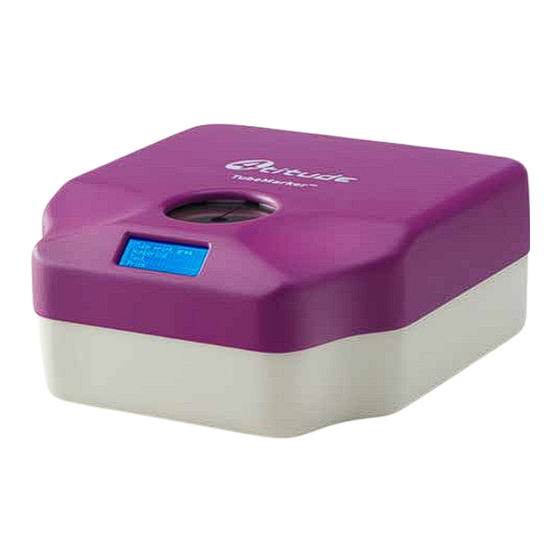
Page 5: Tubemarker™ 2 Parts
TubeMarker™ 2 1.3 TubeMarker™ 2 Parts 1.3.1 TubeMarker™ 2 External Parts TubeMarker™ 2 front Tube adapter LCD display Top cover TubeMarker™ 2 back Keyboard connector (USB / A) PC connector (USB / B) DC power connector 1.3.2 TubeMarker™ 2 Internal Parts Adjustable Ribbon Sled... -
Page 6: Software Installation
TubeMarker™ software. Note: Both the installer and set-up files must be located in the same file space for installation to be successful. 4titude recommends you run the installer directly from the USB stick. Double click on the Installer. The following message will appear. Upon reading the disclaimer, Click to confirm you are happy to Next >... - Page 7 TubeMarker™ 2 Click and installation will begin. Next > The following screen will appear displaying the installation progress. The following screen will appear to show installation is now complete. Click to exit and complete Close installation. A shortcut to the software application will automatically be saved to the computers desktop. You are now ready to execute the TubeMarker™ software.
-
Page 8: Hardware Installation
TubeMarker™ 2 3 Hardware Installation 3.1 How to Install Ribbon for Printing Ink ribbon, ink side Drive shaft Ink ribbon Spool locking cap Ink ribbon, glossy side Where possible gloves should be worn when installing the ribbon. This will ensure ink is not removed by the heat emitted from your fingers. -
Page 9: How To Set-Up Tube Support
Tubes without a collar will be supported from the bottom via an adjustable adapter. They will also be aligned with the print head from the top via an adapter plate. ® Tube adapters for tubes not fitting to any of the existing adapters are available on request. Please contact 4titude at 4ti-info@brooks.com. Tube adapter guide pin Insert the tube adapter on the sled as shown in the picture above. Check that the plate guide pin slots into the small hole in the tube adapter. - Page 10 TubeMarker™ 2 3.2.2 Setting Adjustable Support Platform Housed within the TubeMarker™ 2 unit is an adjustable support platform from which tubes without a lip or collar can be fully supported. Integrated within the support platform is a magnet which attracts and stabilizes the magnetic pole attachment used to support tubes of less than 65 mm in length and do not have a collar or lip.
- Page 11 ® In other instances where the tubes are larger and more susceptible to falling over, 4titude recommends the use of an adapter plate to align the tube against the printhead and sled. This will alleviate any possibility of the tube dropping into the unit after a print has been made.
- Page 12 TubeMarker™ 2 3.2.4 Setting the Sled Pivot Point To improve the overall print quality, users have the ability to adjust the position of the sled’s pivot point, increasing the surface area of the tube in which pressure is applied. This is particularly useful for larger tubes or those which are not printing fully near the base of the tube. The pivot point can only be lowered to a maximum of 14 mm below the default position.
-
Page 13: How To Connect Printer To Pc
TubeMarker™ 2 See below, examples of prints which were printed with the pivot point at default position and again with the pivot point adjusted to the centre of the tube. The print quality has drastically improved and important label data hasn’t been lost as a result of the lowered pivot point. Pivot point default Pivot point 10 mm lower 3.3 How to Connect Printer to PC Please check the following items before connecting the power source: •... -
Page 14: Preparation For Printing
TubeMarker™ 2 4 Preparation for Printing 4.1 How to Create Label Content 4.1.1 How to Set the Tube Label Dimensions In order to set the optimum tube label dimensions, ensuring all label content is printed onto the tube being used, you must first measure your tube to find the height and diameter parameters. - Page 15 TubeMarker™ 2 Setting the Height and Diameter value can be done in three ways: 1. By highlighting and typing in the actual number 2. By clicking on . Value is adjusted in 1 mm increments/decrements. ▲ ▼ 3. By using the slider; this will adjust the dimension in 1 mm increments/decrements. Once the tube parameters have been set, your label format will change to represent these. Two examples have been shown below: Example - Label format for 1.5 ml Microcentrifuge Tube (4ti-0797)
- Page 16 TubeMarker™ 2 To access the tube preset profiles, tick the Use Tube Preset box The following menu will appear Added as defaults to the Tube Preset menu are 8 compatible Brooks tubes. You can add to this list by clicking on Create You will then be able set the Diameter and Height parameters and edit the tube profile Name. Click to confirm and save settings.
- Page 17 TubeMarker™ 2 4.1.2 How to Create Text Cells Once your label layout has been set you can begin filling it with data. If you wish to make your design area larger, go to > . This will pop the screen out to a separate window, allowing you to maximise the view. View Designer Within the Designer click on the button. This will place an 8 x 8 mm Cell in the top left corner of AddText the label. Go to the tab, here you will be able to set the following parameters: Layout Font (all TrueType fonts), Weight (Regular, Bold and Heavy), Text size (4 to 64), Angle of text (360°), Alignment of text (horizontal and vertical placement), Wrap (NoWrap, Wrap and WrapWithOverflow) and Text (Cell content entry).
- Page 18 TubeMarker™ 2 4.1.3 How to Create Linear Barcode Cells There are four variations of linear barcode to choose from: Code_128, Code_93, Code_39 and EAN_8 with module sizes ranging from 125 µm to 375 µm. Within the click on . This will place an 8 x 8 mm Cell in the top left corner of the label. Designer AddLbc Go to the tab, here you will be able to set the following parameters:...
- Page 19 TubeMarker™ 2 4.1.4 How to Create Datamatrix Cells There are two variations of Datamatrix ECC200 to choose from: Square and Rectangular. Module sizes range from 125 µm to 375 µm. Within the click on . This will place an 8 x 8 mm Cell in the top left corner of the label. Designer AddGfx Go to the tab, here you will be able to set the following parameters: Layout Angle of Barcode (360°), Alignment of barcode (horizontal and vertical placement), Stretch (Fill, Uniform, None...
- Page 20 TubeMarker™ 2 4.1.5 How to Create Graphic Files There are four graphic file types that can be imported into the software: .bmp, .jpg, .gif and .png. Optimisation of the graphic files should be done prior to importation. You should aim to get your graphic as small as possible, without pixelating the content. If the graphic size needs to be reduced, keep in mind that 1 pixel corresponds to 0.125 mm. For example, a picture of 100 x 100 pixels is 12.5 mm in width. Re-sizing of the graphic file needs to be done in an external program. Within the click on . This will place an 8 x 8 mm Cell in the top left corner of the label. Designer AddLbc Go to the tab, here you will be able to set the following parameters: Layout Angle of Graphic (360°), Alignment of Graphic (horizontal and vertical placement), Image (Load), Stretch (Fill, Uniform, None and UniformToFill), Process (Dither, Threshold).
- Page 21 TubeMarker™ 2 4.1.6 How to Edit Cell Content Manually Click on the Cell you would like to edit, this includes Text, Linear Barcode and Datamatrix Cells. Go to the Text box within the tab of the Cell you would like to edit and write in the new data. Layout This is the data binding box. If linked to the database it will contain a data binding...
- Page 22 TubeMarker™ 2 You can repeat this process for other Cells that require alternative or the same information or formatting. You can also link other sections of the Data Spreadsheet by entering other data binding codes, within the same Cell if unique formatting is not essential. This works for Text Cells only! Example: If you wish to populate one Text Cell from two or more columns, you must write the data binding codes to both columns on separate lines in the same Text Cell.
- Page 23 TubeMarker™ 2 To widen the Cell, click and drag on the centre diamond. To alter the position of the Cell, click in the centre of the Cell and drag to your chosen location To delete a Cell within a label, click on the Cell and press Delete Alternatively, you can clear the label contents by going to >...
- Page 24 TubeMarker™ 2 4.1.9 How to Save and Load Labels Saving a Label Once you have fully designed your label for production, you can Save it for future use. Go to > > File Label Save File Explorer will open, from here decide where to save the optimised label and click Save Your label will be Saved ready for the next time you need to Load it. Loading a Label Should your label have already been designed, you can Load a previously saved file.
-
Page 25: How To Enter Data Into The Tubemarker™ Spreadsheet
TubeMarker™ 2 4.2 How to Enter Data into the TubeMarker™ Spreadsheet There are two ways in which the TubeMarker™ Data spreadsheet can be filled: manual entry or imported from a .csv file. Each row represents an individual tube and is numbered; starting from 1. Each column represents individual pieces of information relating to the tube sample and is headed; starting with col1. - Page 26 TubeMarker™ 2 Editing Data To edit a particular piece of information, double click on the Data Cell and re-type the new information. Note the inclusion of (D/M/Y) in row 2, col 2. To delete a piece of information, simply double click on the Data Cell, highlight the text and press the Delete or Backspace button on your PC keyboard.
-
Page 27: How To Set The Printer Settings
TubeMarker™ 2 The column headers will change to represent those of the .csv file. In this case Name, Patient ID, Sample Type and Date. To replace this information with another .csv file, simply repeat the steps above. To clear the whole Data spreadsheet, go to > > File Data 4.3 How to Set the Printer Settings Within the TubeMarker™ printer tab, are three sub tabs: Settings, Firmware and Sled. These control the settings which directly affect the hardware performance. - Page 28 ▼ 3. By using the slider; this will adjust the dimension in 1 mm increments/decrements. Alternatively, you can choose to use the default settings, as recommended by 4titude. To do so, tick the Preset box. And click on the drop-down menu to choose from 4 options: 4ti-0686 (blue), 4ti-0688 (white), 4ti-0689 (black) and 4ti-0689-1 (black, universal).
- Page 29 TubeMarker™ 2 4.3.3 How to Control the Sled Movement To manually control the Sled, click on the tab. Sled Ensure the top cover is closed. to move the Sled back. to move the Sled forward. 4.3.4 How to Perform a Firmware Update To upload the latest version of firmware, click on the tab.
- Page 30 TubeMarker™ 2 To load the latest version of firmware, click on the drop-down menu and select the latest version number. Click Install Open the cover and click Wait for the firmware to load. Close the cover and click Go to > within the Navigation bar. Instrument Manager Click on Enumerate TubeMarker™ 2, Operation Manual V2.0...
- Page 31 TubeMarker™ 2 The TubeMarker™ will now re-connect to the PC and show on the left-hand side of the screen. Click on the tab to ensure the firmware has updated properly, as it will now be shown as the latest Firmware version.
-
Page 32: Printing Modes
TubeMarker™ 2 5 Printing Modes There are three methods to print your tube labels. If the whole spreadsheet needs to be printed onto multiple tubes where the data varies from tube to tube, > should be used. Print If only selected data is needed to print onto several tubes, >... -
Page 33: How To Use Print Mode - Selected
TubeMarker™ 2 5.2 How to Use Print Mode – Selected or on the Navigation Bar. Go to the tab, found in the Print Designer Highlight the rows of data you wish to print by clicking and dragging over them, or, by holding down the Ctrl key and selecting individual rows of data within the spreadsheet. -
Page 34: How To Use Print Mode - Single
TubeMarker™ 2 5.3 How to Use Print Mode – Single or on the Navigation Bar. Go to the tab, found in the Print Designer Highlight the row of data you would like to print. Press Single The Print Manager window will pop-out and provide a live and visual representation of the label data it is waiting to print. -
Page 35: How To Adjust The Ribbon During Print Mode
TubeMarker™ 2 5.4 How to Adjust the Ribbon during Print Mode In the event the ink ribbon needs changing OR in the unlikely event the ribbon becomes snagged or tears during a print, you can immediately open the cover of the instrument to repair or replace it. Being able to adjust the ribbon ensures no loss of data is experienced or your position in the print queue compromised. - Page 36 TubeMarker™ 2 4. Remove Tube Adapter 5. Repair or replace the ink ribbon 6. Reposition the Tube Adapter 7. Close the cover and wait for calibration to complete 8. Wait a further 2 seconds for the Print Manager’s job status to update to “Waiting for blank tube” 9.
-
Page 37: How To Print Using Multiple Printers
TubeMarker™ 2 6 How to Print using Multiple Printers The TubeMarker™ software can control and send label data up to 16 printers. This increases throughput and productivity whilst ensuring labels are not duplicated. Together with the three automatic printing modes. Whether feeding the printers manually or via a robot, labelling your tubes couldn’t be simpler. - Page 38 TubeMarker™ 2 If connecting a printer with the software open and connected to a printer already you must follow the instructions below. Connect the printer and PC following section 3.3. Go to > within the Navigation bar. Instrument Manager A pop-out window will open, displaying connected printers. To connect a printer(s) to the software that are not connected to the software already, click Enumerate Previously connected printers will appear with the last known name and settings.
-
Page 39: How To Print Using Multiple Printers
TubeMarker™ 2 6.2 How to Print using Multiple Printers Once all printers have been connected and settings for each printer have been established, you can begin printing your tubes. Depending on the amount of labels you need to print, you can choose from the three Print Modes available; see section 5. -
Page 40: How To Disconnect A Printer From Software
TubeMarker™ 2 6.3 How to Disconnect a Printer from Software Select the printer you would like to disconnect, by clicking on the applicable Tab. Click on Enable, to un-tick the box. Remove the power supply. The selected printer will now be Disabled, printing will commence from the printers connected. TubeMarker™... -
Page 41: Maintenance / Cleaning The Printhead
TubeMarker™ 2 7 Maintenance / Cleaning the Printhead To ensure high quality printing, the ceramic surface of the printhead should be cleaned at a regular interval to remove any dirt or dust that might accumulate. This also applies to the ribbon tensioner surface. Note: Touching the printhead with bare fingers should be avoided. -
Page 42: Error Messages / Troubleshooting
The operating voltage is marked on the label on the back of the TubeMarker™ 2. Note: The device might be damaged if incorrect power supply is used. ® Some of the electric components might have a fault. Contact 4titude at 4ti-info@brooks.com. Hardware error ®... - Page 43 Check that the ink ribbon is set correctly (see section 3.1). Please also refer to section 8.2.2. Note: The surface of the tubes must be flat. The use of tubes with embossed scale should be avoided. ® If the problems persist, contact 4titude at 4ti-info@brooks.com. 8.2.2 Troubleshooting ‒ Insufficient Printing Quality Problem...
-
Page 44: Appendix A: Technical Specifications
TubeMarker™ 2 9 Appendix A: Technical Specifications Dimensions (W x L x H) 270 x 280 x 122 mm Weight 4.8 kg Printing Area Height 6 - 40 mm Power Supply 1000mA Operating Temperature 18° to 26°C Operating Humidity 20% to 70% relative humidity, noncondensing Storage Temperature 10° to 40°C Fuses Non customer-replaceable fuses in system Computer Interface USB 2.0 Note: Technical specifications are subject to change without prior notice. -
Page 45: Appendix B: Accessories / Ordering Information
Choose the ribbon colour that gives the best contrast to the tube colour and the colour of the tube content respectively. ® For details please see section 10.2, refer to our webpage www.4ti.co.uk or contact 4titude at 4ti-info@brooks.com. 10.2 Ordering Information... -
Page 46: Appendix C: Warranty
® is the shorter. For this automation extension to be valid, 4titude must be notified of this requirement along with the details of the integrator at the point of purchase. ® Each TubeMarker™ 2 is tested and documented by the manufacturer before shipping. 4titude Ltd‘s Quality Control System guarantees that the performance of the TubeMarker™ 2 you have purchased is within its specifications. The warranty covers all parts and labour costs associated with a repair of the unit within the first 12 months. The ® need for returning a unit for service must first be agreed with 4titude via telephone support. Once it is established ®... -
Page 47: Appendix D: Shipping Instruction
TubeMarker™ 2 12 Appendix D: Shipping Instruction When packing the TubeMarker™ 2 for shipping YOU must ensure that the sled is tight up against the printhead. Disconnect the instrument from the power source and turn the sled screw locking nut so that it cannot be turned anymore.
Need help?
Do you have a question about the TubeMarker 2 and is the answer not in the manual?
Questions and answers