Table of Contents
Advertisement
Quick Links
Download this manual
See also:
Installation Manual
Advertisement
Table of Contents

Subscribe to Our Youtube Channel
Related Manuals for Cloud CDI-S100


Summary of Contents for Cloud CDI-S100
- Page 1 ‘Clearly Better Sound’ Version 1 CDI-S100 SERIAL INTERFACE CARD Cloud Electronics Limited CDI-S100 Installation & Setup Guide Copyright Cloud Electronics Limited 2003...
- Page 2 CLOUD ELECTRONICS LIMITED CDI-S100 Installation and Setup Guide © Cloud Electronics Limited 140 Staniforth Road • Sheffield S9 3HF • England Phone +44 (0)114 244 7051 • Fax +44 (0)114 242 5462 E-mail technical@cloud.co.uk • WebSite www.cloud.co.uk...
-
Page 3: Table Of Contents
Installation ..........1 3 CDI-S100 Configuration ........2 3.1 Baud Rate . -
Page 4: Introduction
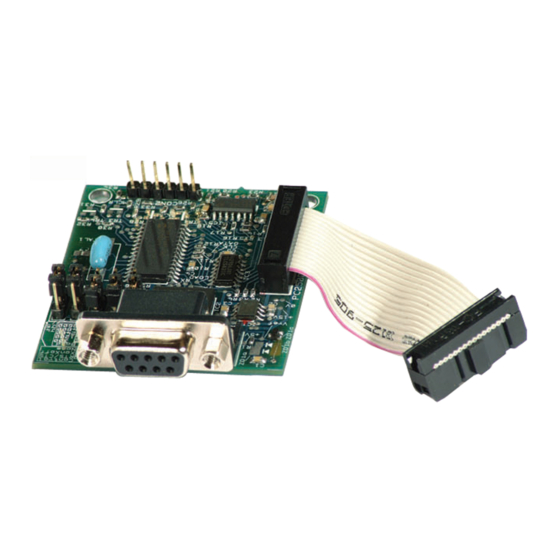
The CDI-S100 should be configured before being installed (see section 3 for configuration details). The CDI-S100 is supplied with two 25mm hex spacers and a 9-pin sub-D plug. The module is connected to the CX462 main board via a connector located at the rear of the mixer, close to the output terminals. The connector is marked 'CON 7'. -
Page 5: Cdi-S100 Configuration
The CDI-S100 uses a serial data packet consisting of one start bit, eight data bits and one stop bit. The CDI-S100 does not support parity, so the controlling device should be configured to operate without parity checking. -
Page 6: Cx462 Configuration
CX462 Configuration To install the CDI-S100 in the CX462, the CX462 needs to be correctly configured. To allow the module to have full control of the unit there is a set of internal jumpers which need to be checked and set. In all configurations the module will have control over the master microphone level. -
Page 7: The Destination Field
CDI-S100 Serial Interface Card Setup And Installation Guide CLOUD ELECTRONICS LIMITED 5.2 The Destination Field The destination field is an abbreviated description of the mixer section the command is intended to effect. In the CX462, there are three possible destinations, the module itself, the microphone channel and the music channel. -
Page 8: The Command Set
5.5 System Commands and Defaults It is possible to modify the behaviour of the CDI-S100 by sending the appropriate system commands to the unit. System commands are sent to the system destination, identified as 'SY'. System commands are available for the following: data formatting, initialisation mode and reset to factory defaults. -
Page 9: Table Of Commands
CLOUD ELECTRONICS LIMITED Factory power on defaults for the CDI-S100 are to set all volume controls to -∞, all microphone channels to 'Open' and the music source to Line 1. Music level data format is set to ASCII character format. The system reset command reverts the module to the factory default settings and reasserts all the factory defaults as the power-on defaults. -
Page 10: Testing With A Terminal Emulator
HyperTerminal. This may be installed on your computer anyway, but is also distributed with the Windows ™ CD. Connect the CDI-S100 to a serial port on the computer using a standard D type 9 pin male to 9 pin female cable. - Page 11 Notes:...
Need help?
Do you have a question about the CDI-S100 and is the answer not in the manual?
Questions and answers