LI-COR LI-1500 Quick Start Manual
Light sensor logger
Hide thumbs
Also See for LI-1500:
- Instruction manual (64 pages) ,
- Installation manual (2 pages) ,
- Installation instructions (2 pages)
Table of Contents
Advertisement
Quick Links
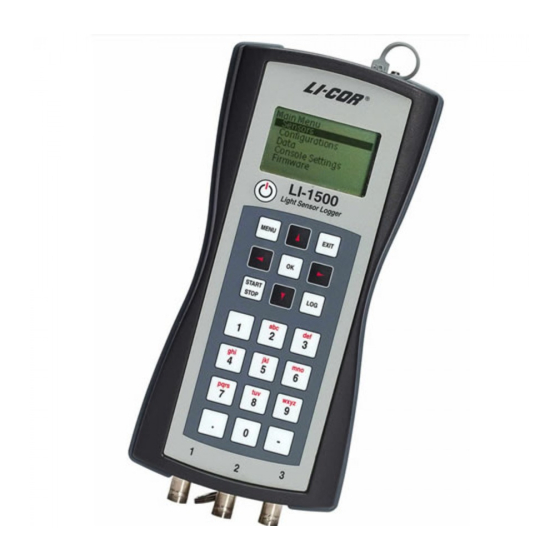
LI-1500 Light Sensor Logger
Installing Batteries
Note: The AC to DC power adapter will not re-charge batteries.
Powering On
Press power on/off
. You will see one of these messages:
New Config File: Start at "Creating a Configuration", step 2.
Select Config File: Scroll up or down
configuration, then press OK to activate that configuration
and go to Monitor Mode.
Note: A configuration must be made active in order to get light
readings with the LI-1500.
Monitor Mode
Each line can be set to
display any one of the
available variables including
real-time sensor readings and
GPS data. The STATUS
variable indicates the logging
status.
Scroll up or down
Scroll left or right
Menu Navigation
From Monitor Mode, press
MENU for the Main Menu.
Scroll up or down to high-
light a menu item. Press OK
to select that menu item.
Press OK after entering file
names or other data.
Press EXIT to go back to the previous screen.
to highlight a
to highlight a line.
to change the variable displayed.
Adding a Sensor
1. Select MENU > Sensors > Add New Sensor and
select the model number of your LI-COR light sensor.
2. Enter the sensor's serial number (printed on the
sensor).
3. Select Cal Val (terrestrial sensors) or Cal A/W
(underwater sensors) and enter the sensor's calibration
multiplier (use
for backspace). Underwater sensors
require both "Air" and "Water" calibration multipliers.
4. Select Cal Date, use arrows
sensor's last calibration (YYYY/MM/DD), then EXIT.
Note: Calibration certificates with multipliers and dates are
available at: http://www.licor.com/env/support/.
Enter the sensor's serial number in the Calibration search box.
Creating a Configuration
1. Select MENU > Configurations > Add New Config.
2. Enter a file name > OK.
3. Select Inputs and
choose 1, 2, or 3.
Attach a LI-COR light
sensor to the chosen
BNC input port.
4. For terrestrial sensors,
highlight your sensor's serial number, then OK > EXIT.
If your sensor is not listed, select Add New Sensor (see
"Adding a Sensor" above). For underwater sensors,
select Air, Water, or Prompt on Log, then press OK.
5. Select Active > Yes. Readings are now visible in
Monitor Mode and can be logged (see reverse side).
Changing the Sampling Rate
Select MENU > Configurations. Select a file from the list.
Select Samp Rate and select a sampling rate from the list.
For faster sampling (up to 500 hz), select Raw Mode from
the bottom of the list and choose a whole number from 1
through 500 Hz. In Raw Mode, only INPUT1 is sampled.
The other two inputs are ignored. The routine is Continual
and each sample is logged. Averaging and Math outputs are
not available.
Quick Start Guide
to set the date of the
1
Advertisement
Table of Contents

Subscribe to Our Youtube Channel
Related Manuals for LI-COR LI-1500


Summary of Contents for LI-COR LI-1500
- Page 1 Installing Batteries Adding a Sensor 1. Select MENU > Sensors > Add New Sensor and select the model number of your LI-COR light sensor. 2. Enter the sensor's serial number (printed on the sensor). 3. Select Cal Val (terrestrial sensors) or Cal A/W (underwater sensors) and enter the sensor’s calibration...
- Page 2 Select an individual record to view data. window. Select Min/Max > Yes to include minimum and maximum sampled values in the output. Press EXIT twice. LI-COR Biosciences – Global Headquarters LI-COR Ltd., United Kingdom Serving Denmark, Finland, Ireland, Norway, Sweden, and UK.
Need help?
Do you have a question about the LI-1500 and is the answer not in the manual?
Questions and answers