Advertisement
Advertisement
Table of Contents

Subscribe to Our Youtube Channel
Related Manuals for mxr Mini Iso-Brick M239


Summary of Contents for mxr Mini Iso-Brick M239
-
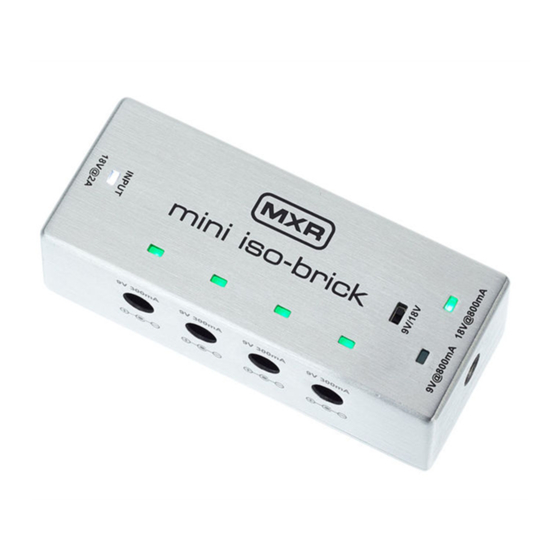
Page 2: External Controls
External Controls 1 WHITE LED indicates good input power connection 2 Four 9V DC outputs 3 One switchable 9V/18V DC output 4 9V/18V switch sets voltage output level of 9V/18V output (indicated by green LED) 5 INPUT jack 18V @ 2000mA power GREEN LEDs indicate good output power connection M239 | Mini Iso-Brick 2... -
Page 3: Basic Operation
Basic Operation Operation Power Connect included AC adapter into M239’s 18V INPUT jack. The Mini Iso-Brick Power Supply requires an 18V regulated power supply rated at 2000 mA, with Plug AC adapter into wall outlet; white INPUT LED indicates 5.5mm x 2.1mm positive barrel, negative center plug. good connection. -
Page 4: Connection Notes
Basic Operation Connection Notes Troubleshooting The power LED fails to light. Included cables use industry standard 5.5mm x 2.1mm positive barrel, negative center polarity plugs. Dead AC outlet. Try plugging into another outlet, or test Each output features a green LED. When lit, this LED indicates the outlet with another device like a lamp. -
Page 5: Specifications
Specifications Input 18V At 2 Amps regulated supply (positive barrel negative center 5.5mm x 2.1mm plug) Outputs 9-18V @ 800mA (switched) (4) 9V @ 300 mA (all positive barrel negative center 5.5mm x 2.1mm) *Note: Using a split cable allows you to share one output with two devices. Remember the straight plug is the end that goes into the Mini Brick DC output and the two 90°...
Need help?
Do you have a question about the Mini Iso-Brick M239 and is the answer not in the manual?
Questions and answers