ZSK T8 User Manual
Hide thumbs
Also See for T8:
- Operating manual (170 pages) ,
- Quick reference manual (124 pages) ,
- Software settings (26 pages)
Advertisement
Quick Links
Advertisement

Related Manuals for ZSK T8


Summary of Contents for ZSK T8
- Page 1 User Manual T8/T8-2 Control Unit Writing 022438V10 [GB] - 2018...
- Page 2 Subject to change! Änderungen vorbehalten! © ZSK Stickmaschinen GmbH Printed in Germany [ GB ] 02438V10...
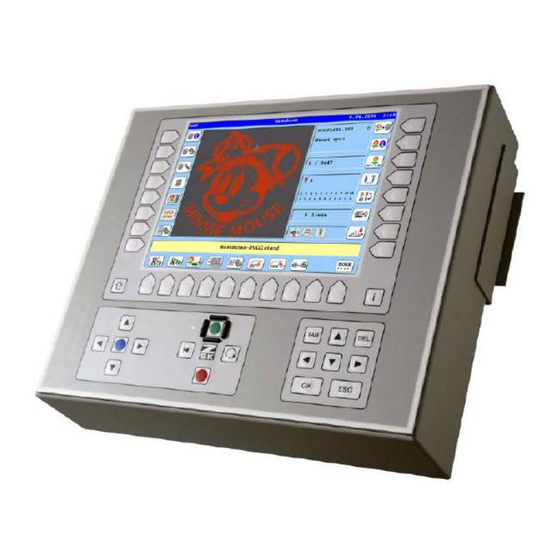
- Page 3 YouTube Video, Install Software Update: https://www.youtube.com/watch?v=JNCRShq8pKk All discribed functions of the control unit T8-/T8-2 will be started at the Base Screen (BS). The keys used in the function descriptions are shown in the above T8-/ T8-2-figure. 02417V10 • 07.08.2018/DC •...
- Page 4 Monogram Machine/Writing Monogram Machine/Writing The Writing tool of the T8 control unit can be used to generate simple single-line, multi-line and circular monograms. There are seven font families with a total of 30 fonts in various sizes available, as well as various options for arranging a lettering.
- Page 5 Monogram Machine/Writing Start Writing The function Writing can be started via the design editor (Start A) or via the function Select machine design (Start B): Start A Start B 02417V10 • 07.08.2018/DC •...
- Page 6 Monogram Machine/Writing Start A via function design editor • Press the button [L5] Editor. • Press the button [R8] Previous 2x. Ö The selection dialog Writing is displayed. Start B via function Select Machine design Press the button [R1] Machine design. •...
- Page 7 Monogram Machine/Writing • Use the arrow keys [p], [q] to select the desired font from the list. There is a choice of 30 fonts available. The available characters are displayed in the upper right preview window of the dialog. The buttons [R4] - [R7] lead to a preview of the selected font.
- Page 8 [Shift] + [►] End of text [Shift] + [TAB] Text input via barcode reader. • Press the key [OK] in the cursor block of the T8 controll unit. Ö The design head of the created monogram is displayed. [U1] Mark starting point of design...
- Page 9 Monogram Machine/Writing Setting dialogs of monogram types With the function Writing can be generated simple monograms. The different monogram types are created in principle like a single-line monogram. However, there are different setting dialogs for the respective monogram types, which are explained below.
- Page 10 Monogram Machine/Writing Single-line Monogram [L1] Trimming X mm Distance in mm, from which the thread should be cut. The function can be switched on or off. [L2] Baseline angle X DEG The baseline is tilted and the text is adjusted to the tilt. [L3] Letter width X % Setting the letter width in percent.
- Page 11 Monogram Machine/Writing When the input fields are marked, the dialog display switches over and the buttons [U1] - [U3] are displayed. [U1] (+) Positive sign [U2] (-) Negative sign [U3] 0 … 9 - Numerical entry [◄] Cursor to the left [►] Cursor to the right 02417V10 •...
- Page 12 Monogram Machine/Writing Multiline monogram The setting dialog Multiline is used to adjust the settings for multiline monograms. The same functions apply to this setting dialog as to the setting dialog Singleline. In addition, the Line spacing between the lines can be adjusted here. [R5] Line spacing X % Setting the line spacing in percent.
- Page 13 Monogram Machine/Writing Circular monogram clockwise The setting dialog Circular clockwiseis is used to adjust the settings for circular monograms. The same functions apply to this setting dialog as to the setup dialog Singleline. In addition, the Start angle, the End angle and the Baseline radius can be adjusted here.
- Page 14 Monogram Machine/Writing Setting examples Singleline Monograms Baseline Letter Letter angle spacing angle (°) (mm) (°) ±0 ±0 ±0 ±0 ±0 ±0 ±0 +180 +180 +180 • 02417V10 • 07.08.2018/DC...
- Page 15 Monogram Machine/Writing Multiline Monograms Baseline Letter Letter angle spacing angle (°) (mm) (°) ±0 ±0 ±0 ±0 +120 ±0 +135 +180 +180 +180 02417V10 • 07.08.2018/DC •...
- Page 16 Monogram Machine/Writing Circular monogram clockwise Start Letter Baseline angle angle angle radius (°) (°) (°) (mm) -180 ± 0 -135 ± 0 ± 0 +180 ± 0 +180 +180 Circular monogram in counterclockwise direction Start Letter Baseline angle angle angle radius (°) (°)
- Page 18 © 2018 ZSK Stickmaschinen GmbH Printed in Germany ZSK Stickmaschinen GmbH Magdeburger Str. 38-40 D-47800 Krefeld Germany www.zsk.de zsk@zsk.de...
Need help?
Do you have a question about the T8 and is the answer not in the manual?
Questions and answers