Table of Contents
Advertisement
Advertisement
Table of Contents

Related Manuals for SmokeCloak EASY 600


Summary of Contents for SmokeCloak EASY 600
- Page 1 SmokeCloak EASY range INSTALLATION AND OPERATING INSTRUCTION...
- Page 2 Reproduction in any matter whatsoever without the written permission of MSS Professional A/S is strictly forbidden. READ AND SAVE THESE INSTRUCTIONS MSS Professional A/S Agerhatten 25 DK - 5220 Odense SØ Danmark Telefon: +45 7217 0011 smokecloak@mssprofessional.com www.smokecloak.com SmokeCloak EASY manual...
- Page 3 Manual SmokeCloak EASY range Please read this manual carefully before attempting to install a Smokecloak easy. SmokeCloak EASY manual...
- Page 4 Indicates important information that is critical for the correct use of your products and must always be read carefully. It is essential that only genuine SmokeCloak fluid is used. Damage to the equipment and possible health hazard is likely if incorrect fluid is used. The warranty on all of the equipment will also be void.
-
Page 5: Table Of Contents
Contents 1. IN THE BOX ................. 6 2. QUICK START GUIDE ............6 3. SPECIFICATIONS ..............8 4. MACHINE LAYOUT ............... 9 5. INSTALLATION ..............10 6. DIRECTING THE NOZZLE ............ 11 FLUID ................12 8. PRIMING THE MACHINE ............ 14 9. -
Page 6: In The Box
1. In The Box Before attempting to install the machine it is advisable to ensure that you have all the required components. Upon opening your SmokeCloak EASY box you should find: x1 off SmokeCloak EASY Check serial labels to ensure the correct voltage. - Page 7 Test SmokeCloak EASY manual...
-
Page 8: Specifications
3. Specification EASY 600 EASY 1100 252 mm wide x 327mm wide x Dimensions 193 mm deep x 418 mm high 193mm deep x 418mm high Installation 10,6 kg 13,8 kg weight Colour white RAL 9016 white RAL 9016 Fluid... -
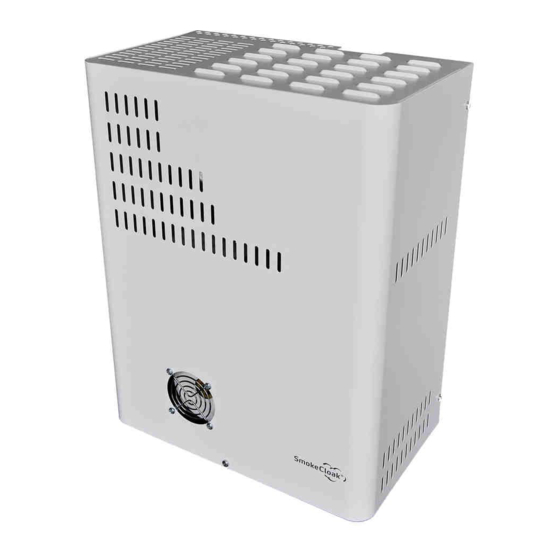
Page 9: Machine Layout
4. Machine Layout Internal isometric External front Internal Bottom Rear L/H side R/H side Front SmokeCloak EASY manual... -
Page 10: Installation
5. Installation 5.1 Position The SmokeCloak EASY can be installed vertically for wall mounting, or alternatively mounted horizontally for ceiling installations. This equipment should only be installed and connected to the supply by a suitably skilled and competent person. This apparatus must be earthed. Connections are made to a plug-in terminal block. -
Page 11: Directing The Nozzle
Take great caution when directing the nozzle, it becomes extremely hot as the machine heats up. Do not attempt to handle the nozzle once the machine has heated up to temperature. SmokeCloak EASY manual... -
Page 12: Fluid
40 cm with minimum condensation. Installing the Fluid Bottle Your SmokeCloak EASY product will be supplied with a full fluid container installed. It will arrive with a sealed travel cap installed. The following steps should be taken in order to correctly install the fluid bottle and the fluid sensing unit. - Page 13 Changing the Fluid As part of the maintenance of the SmokeCloak EASY it is essential that the fluid is replaced annually to ensure that the quality of the effect produced is maintained at the desired level.
-
Page 14: Priming The Machine
1. The fluid cap was correctly reengaged into the bottle, that the fluid feed pipe wasn’t trapped in any way, and that the cap was firmly screwed back into position. 2. If there still appears to be a problem contact your supplier. SmokeCloak EASY manual... -
Page 15: Batteries
9. Batteries To install the batteries: NEW drawing? SmokeCloak EASY manual... - Page 16 The red wire should be terminated at PL22 on the power board and the black wire at PL21. The terminals labeled + with the red wire, and - with the black wire. The battery backup system provides power for the control electronics and pumps when mains electricity is removed. SmokeCloak EASY manual...
- Page 17 - the batteries must be able to with- stand this temperature under charging. Take care with polarity. The SmokeCloak is protected with an auto-reset fuse to safeguard against reverse polarity connection of the batteries. The LEDs on the interface board will give indication of correctly installed fluid and batteries.
-
Page 18: Wiring Up The Machine
30 cm. 10.1 Wiring the mains feed Remove the mains plug from the electronics module and fit to the flexible mains cable that has been fed through the cable grommets. Plug mains lead back into motherboard. NEW picture? SmokeCloak EASY manual... -
Page 19: Interface Board
* LED 2 flashing = Temperature fault * Mains fail Indicated by LED 6 going off with no other fault Indicated. * Battery fault will cause the LED 5 to go off as well due to the nature of fault output. SmokeCloak EASY manual... -
Page 20: Connection Details
Terminal 12 System fault Under no circumstances should the on board power supplies of the SmokeCloak (- 12v) be linked to any other 3rd party equipment e.g. alarm panels, additional power supplies, etc. as this could cause unexpected faults within the machines. This supply may drop to 0 V while the machine is still operation- al. - Page 21 12.3 Typical Cables required: Connections between the SmokeCloak and the alarm panel 7 are made to the interface board via two 6-way plug-in connectors. LEDs also found on the interface board indicate information concerning the status of the SmokeCloak. 1 cable with up to 16-cores...
- Page 22 PIRs or similar can be connected to terminals 1 and 2. The power for active devices (250 mA max) is taken from (+12 V) (0 V). This input does not trigger the SmokeCloak, but holds off its activation despite an alarm trigger until the verification loop detects an intruder.
- Page 23 Unset is the opposite of the set, and therefore the alarm panel should remove the set signal when the alarm is turned off. It is only possible to trigger the SmokeCloak EASY once after the alarm is set, which means that if the EASY is required to trigger more than once (from the Alarm Panel) the SmokeCloak EASY will require an unset signal before it will trigger again.
- Page 24 Examples of connections of the set and trigger signal to the alarm panel. Use the appropriate diagram below to interface the SmokeCloak to your alarm panel: DISCLAIMER: Actual alarm panels may vary from those illustrated and MSS PROFESSIONAL cannot be held responsible for faults due to incorrect installations.
- Page 25 Always ensure that this will not cause a problem within the installation. It is not desirable to have a full alarm condition and then a SmokeCloak activation just because of a fault condition. If the alarm panel is not capable of supporting local alarm only, for monitoring these circuits, then consider using a spare communicator line to central station.
- Page 26 System fault output (terminals 11 and 12) Terminals 11 and 12 are normally closed. (Default) The relay opens if a critical fault is present (default) • LED 2 flashing • No fluid • Temperature fault • Mains failure SmokeCloak EASY manual...
-
Page 27: Setting The Activations Time
Setting the activations time SmokeCloak EASY manual... -
Page 28: Preparation For Final Test
Ensure that any fire detection system is put on test or the customer has control of it. SmokeCloak will activate all types of smoke detector. However, it will not activate heat or carbon monoxide detectors. -
Page 29: Maintenance
15. Maintenance The SmokeCloak EASY machines require an annual maintenance check in order to sustain the correct levels of performance and security. This requires the following: • Replace the fluid (do not top the fluid up). • A test of the system. -
Page 30: Timers
16. Timers Runtime Runtime Runtime Runtime Runtime Runtime Runtime Runtime Retrigger Retrigger Retrigger Retrigger Retrigger Retrigger Retrigger Here the current values are displayed for Retrigger, Backstop and Run timers. SmokeCloak EASY manual... -
Page 31: Accessories
The typical “hang” time in a static air environment is around 45 min and the FL600 fluid creates a uniform sub micron particle size. Fluid is supplied in a 1 litre container which fits all SmokeCloak EASY machines. The fluid is harmless and a full safety data sheet is available on request. -
Page 32: Strobe Ipl3000
Instant Protection by blinding the intruders. The IPL 3000 is a high quality, very high intensity, security strobe light. The system is compatible with all of the SmokeCloak products, and is configured so that the operation of the IPL 3000 is controlled by the SmokeCloak. -
Page 33: Sounder Ipa 117
The IPA 117 can be easily linked with other IPA 117 units in order to protect larger areas; the SmokeCloak products can be used to control the IPA 117. Dimensions:... -
Page 34: Voice Module
17.4 Voice Module The SmokeCloak CS140 voice module is a 12 V digital voice system, containing an embedded chip with a pre-recorded message. It is designed to be remotely positioned near to the normal access to the building and, if required, the protected area. -
Page 35: Batteries
17.5 Batteries The SmokeCloak is installed with a lead acid battery insuring full smoke protection in the event of main power failure. The battery is from one of the worlds leading manufactures of maintenance-free lead acid batteries. This assures long service intervals, and low periodical costs. - Page 36 Supplier: Contact: MSS Professional A/S Agerhatten 25 DK - 5220 Odense SØ Danmark Telefon: +45 7217 0011 www.smokecloak.com...
Need help?
Do you have a question about the EASY 600 and is the answer not in the manual?
Questions and answers