Table of Contents
Advertisement
Advertisement
Table of Contents

Related Manuals for Skywatch Geos N11

Summary of Contents for Skywatch Geos N11
-
Page 2: How To Use This Manual
English How to use this Manual We thank you for selecting a SKYWATCH® instrument. Even though this instrument was designed for ease of use in mind, we recommend that you nonetheless spend a little time reading this Manual in order to be able to use it to its full potential. -
Page 3: Table Of Contents
Table of Contents How to use this Manual ......... 2 Where to find information ............2 Symbols used in this Manual ..........2 Table of Contents..........3-5 Introduction ............6 Background information ............6 WARNING .................6 Description of Instrument ............7 Functions (Measuring Modes)..........7 Description of the Sections of the Display Screen ....8 Display principle with regard to functions ......8 Distribution of basic modes over the standard screen.. - Page 4 Selecting the unit of measurement in relation to pressure ..15 Calibration of relative pressure (QNH) ......15-16 QFE height................16 Resetting the Maximum Altitude and the QFE Height ..16 Calibration of QFE pressure ..........17 Compass.................17 Display ................17-18 Calibration................18 Flight Level................19 Display .................19 Special Screens............
- Page 5 Manual Recordings..............27 Display .................27 Operation ................28 Viewing ................28 Measurements Based on Selected Rate......29 Display .................29 Operation ................29 Viewing ................29 Selecting the rate of recordings ...........29 History ..................30 Display .................30 Operation ................30 Viewing and rate selection...........30 Other..............30 States of the Instrument............30 Storage ................31 OFF..................31 Automatic Stop ..............
-
Page 6: Introduction
Introduction Background information The GEOS N°11 is a high performance instrument used by professionals, the culmination of our 25 years of experience in the development and manufacturing of measuring devices. It is solely built with industrial- quality components and uses Swiss-made barometric pressure, wind speed, humidity, and temperature sensors. -
Page 7: Description Of Instrument
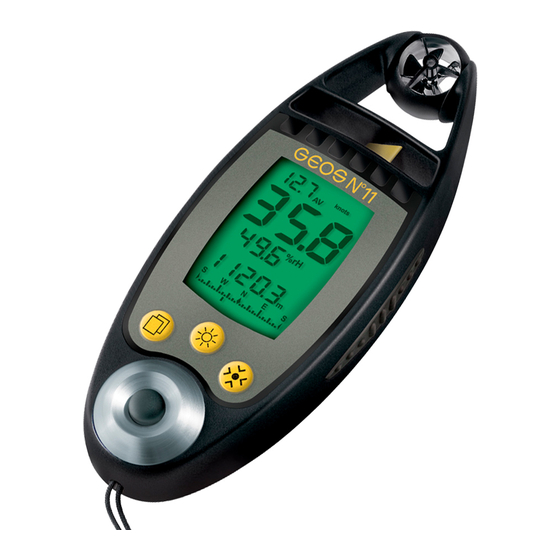
Description of Instrument Legend a wind sensor (impeller) h lid of battery compartment b protective sphere around the impeller light emitting diode (L D) lamp c weather vane selection (SEL) button d black metal case k luminosity (LUM) button e ribbed rubber strip mineral glass window m protection slots for the sensors modification... -
Page 8: Description Of The Sections Of The Display Screen
Description of the Sections of the Display Screen Upper block Large block Middle block Lower block Analogue compass block Display principle with regard to functions (measuring modes) Each measuring mode occupies a very particular space on the screen. Measuring modes are always displayed following the same principles, i.e.: - 1 standard screen containing all the basic measuring modes. -
Page 9: Starting Up The Instrument
button is pressed briefly, the next block is selected in the following order: upper, large, middle, lower, upper, etc. If one (or several) special mode has (have) been activated, the selection will take place as follows: upper, large, middle, lower, special mode screen, upper, etc. The MOD ( ) button is used to modify the display of a block (it scrolls down the various modes of the block), and will only work if the block is selected. -
Page 10: Instantaneous State
down to confirm your setting, the instrument is than activated and displays the standard screen. Remark: Setting the date and time may also be carried out at a later stage. Please refer to Section on ‘Special Modes’; ‘Date and Time’. Instantaneous State (The instrument remains turned on for only 5 seconds) This state allows you to see the current measured values at a glance,... -
Page 11: Basic Measuring Mode (Standard Screen)
state. Releasing the button during the countdown, brings back the default screen on the instrument. Basic Measuring Mode (Standard Screen) Reminder: All the basic modes that are described hereafter are available on the same screen ( standard screen), only the special modes avail of a screen per mode (see relevant section). -
Page 12: Wind Speed
Wind speed Measuring modes Instantaneous wind speed Maximum wind speed Average wind speed The measuring modes for the maximum and average wind speeds are displayed on the upper block, while the instantaneous wind speed is displayed on the large block. In order to access the measuring mode for the maximum reached or average wind speed, select (with the help of the button) the upper block (it flashes), then use the button to modify... -
Page 13: Selecting The Unit Of Measurement
The various measuring modes in relation to temperature are displayed on the middle block. In order to access a measuring mode, select (with the help of the button) the middle block (it flashes), then use the button to change the display on the block and switch from one measuring mode to another. -
Page 14: Resetting The Minimum And Maximum Humidity To Zero
Resetting the minimum and maximum humidity to zero Select the middle block and display the measuring mode that you wish to reset (it flashes), then press the button for 2 seconds. Pressure Measuring modes altitude altitude pressure height pressure flight level maximum relative (QNH) absolute... -
Page 15: Resetting The Maximum Altitude And The Qfe Height
Select the lower block and display the measuring mode in relation to altitude (it flashes), then keep pushing the button down. starts flashing on the upper block. Release the button as soon as you enter the calibration function (screen opposite). Use the button to select which way the setting is made ( increment,... -
Page 16: Qfe Height
Select the lower block and display the measuring mode in relation to relative pressure (it flashes), then keep pushing button down. starts flashing on the upper block. Release the button as soon as you enter the calibration function (screen opposite). Use the button to select which way the setting is made ( increment,... -
Page 17: Calibration Of Qfe Pressure
Calibration of QFE pressure In aeronautics, the QFE pressure corresponds to the pressure on the landing runway (ground level), and is used as the basis for calculating the height above ground level. Air traffic control will give you this pressure value. Select the lower block and display the measuring mode in relation to the QFE height (it flashes), then keep pushing button down. -
Page 18: Calibration
here are two types of compass display: bargraph on the compass block (always visible) and digit al display on the lower block. Select the lower block with the button (it flashes), then display the compass using the button. HICH MEANS : The default setting of the compass is for the magnetic North, and not for true North. -
Page 19: Flight Level
Flight Level Display In aeronautics. The Flight Level corresponds to an altitude expressed in hundreds of feet above the isobaric surface 1013.25 hPa, which allows all aeroplanes in the world to fly alongside each other risk-free, irrespective of the pressure values governed by local meteorological conditions. Select the lower block using the button (it flashes), then display the Flight Level with the help of the... -
Page 20: Enabling A Special Mode
To display the special menu, press and hold simultaneously the buttons, flashes on the upper block. When stops flashing, release the buttons. The special menu features 10 screens (7 screens for special modes and 3 screens for the memories): Navigate (switch from one screen to another) in the special menu with the help of the button. -
Page 21: Date And Time
Date and Time Display upper block: day of the week large block : date middle block: month lower block: time and year + seconds on the bargraph Operation The year is displayed by pressing briefly the button, release the button, and the time is shown again. The seconds are marked on the compass bargraph. - Page 22 The tendency is displayed using 63 values. The first 3 values show the variations in relation to the current pressure, the next 46 values in relation to the last measured pressure on the hour, and the last 14 in relation to the last pressure read at noon. To view the tendency (only if the special mode is enabled, please refer to Section: ‘Enabling a Special Mode’): display the barometric tendency mode, select the middle block (it flashes), then by pressing briefly the...
-
Page 23: Chronometer
The pressure displayed is that of 2 days earlier, i.e. the pressure recorded at noon (12:00) on April 28 . The instrument compares the last pressure read at noon (here, the pressure measured at noon on April 30 , 1011.9) with the pressure recorded 2 days earlier and displays the difference. -
Page 24: Operation
Operation Pressing both the buttons briefly at the same time launches the chronometer (brief display of the message ). This can be done from any screen, and whether the instrument is turned on or off. Pressing briefly the button freezes the screen, which allows to read an intermediate time (the instrument keeps counting the time while the display is frozen). -
Page 25: Magnetic Field In Μtesla + Compass Heading
Magnetic Field in µTesla + Compass Heading Display This mode is displayed as follows: upper block: wind speed large block : heading in degrees middle block: indicates , = degree (unit of the large block) and = micro Tesla (unit of the lower block) lower block: magnetic field in µTesla Operation The role of this mode is twofold:... -
Page 26: Variometer
button to select the direction of the adjustment ( increment, decrement), then set the value in degree of the declination with the help of the button. Keep the button down to confirm your setting, release it, and then press it down again to exit the special menu. IMPORTANT ! When a declination has been stored, all the display modes of the compass will show true North and no longer the magnetic North. -
Page 27: Operation
Operation It is not possible to modify any data on the finesse screen. It is necessary for the impeller to rotate and there must be a drop in altitude for finesse to be displayed. To calculate finesse, the instrument takes the mean wind speed as the horizontal velocity and the data supplied by the variometer as the vertical velocity. -
Page 28: Operation
Operation This type of memory displays all the recordings carried out manually. To record manually (from any screen, whether instrument turned on or off), press simultaneously the buttons for a short time. The message indicates that the recording has indeed been made. -
Page 29: Measurements Based On Selected Rate
Measurements Based on Selected Rate Display is displayed if the memory is empty (no recordings). The default screen is used to display the memory content. In the example shown opposite, this screen is the standard screen with the basic measuring modes (wind speed, temperature, digital and analogue compass heading). -
Page 30: History
History Display is displayed if the memory is empty (no recordings). The default screen is used to display the memory content. In the example shown opposite, this screen is the standard screen with the basic measuring modes (wind speed, humidity, relative pressure and compass heading). The upper block displays which flashes when being accessed. -
Page 31: Storage
Storage The example shown opposite indicates that the instrument is in the storage state; the clock and sensors have stopped, and there is no automatic recording. This is the default state of the instrument when it comes off the production line, thus avoiding the depletion of the battery if the instrument is stored for a long period of time. -
Page 32: Permanent Operation
the button, then keep the button down ( flashes on the upper block). In the calibration mode (opposite screen), release the button. Set the time: pressing briefly on the button will change the direction of the setting ( increment and decrement), and short and long pushes on button are used to change the value. -
Page 33: Other States
Other states The instrument features another two states: normal (turned on) and instantaneous (please refer to the Section entitled “Starting up the Instrument”). Resets Memory reset (deletion) Empties the 3 types of memory, and resets the rates of automatic recordings. To erase all the memories, go to the special menu and display one of the 3 types of memory, then press and keep down simultaneously the 3 buttons. -
Page 34: Instrument Reset
the screen displays the message , release the buttons and press the MOD ( ) button down for 2 seconds to confirm. The instrument displays the message informing you that the reset operation has indeed been carried out. Instrument reset Remove the batteries for 20 minutes. -
Page 35: Batteries Of The Light Emitting Diode (Led )Lamp
Check that the round seal is properly positioned in its groove, screw the lid back on using the 2 screws. Always pay attention to the polarity, as positioning the batteries the wrong way may cause damage. Batteries of the Light Emitting Diode (LED )Lamp It is imperative that the batteries of the LED lamp are replaced at the same time;... -
Page 36: Lcd Display Test
2. While the instrument is on, press simultaneously on the 3 buttons and then release: the following indications will appear: (the instrument is in the automatic stop mode), 127 (the software version) and the segments that are lit up (1 segment = 0.025V, no segment: <2.3V, all the segments lit up: >3.1V). -
Page 37: Calibration Of The Pressure Sensor
Calibration of the Pressure Sensor This operation is reserved to those professionals who hold a highly accurate laboratory standard. The consequence of any wrong calibration will be to supply erroneous data on all the measurements relating to pressure. Calibration is carried out from the measuring mode for absolute pressure. Proceed in the same way as with the other calibrations. - Page 38 From a few seconds to several minutes Humidity depending on wind speed instantaneous Pressure Compass instantaneous Measuring range of sensors Wind speed 0 to 300 (peak) km/h -40°C to +85°C Temperature Humidity 0.1 to 100%rH 10 to 1,100hPa Pressure -1,000 to 21,535m Altitude Perpetual calendar until 2175...
-
Page 39: Limited Warranty
LIMITED WARRANTY JDC ELECTRONIC SA extends a 12 months’ warranty over parts and labour for this instrument, effective from the date of purchase. JDC ELECTRONIC SA reserves to itself the right to repair or replace any component which may have become faulty in the course of normal use.
Need help?
Do you have a question about the Geos N11 and is the answer not in the manual?
Questions and answers