Table of Contents
Advertisement
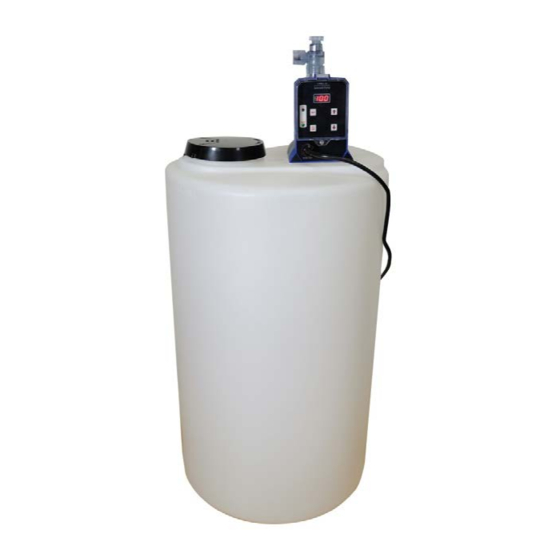
J-PRO-22 110V – 230V Dual Voltage
Chlorinator Installation & Start-Up Guide
Thank you for purchasing a Clean Water System! With proper
installation and a little routine maintenance, your system will be
providing treated water for many years.
Please review this start-up guide entirely before beginning to install
your system and follow the steps outlined for best results.
LIQUID POOL CHLORINE CAN DAMAGE CLOTHING
AND IRRITATE SKIN AND EYES.
USE RUBBER GLOVES AND EYE PROTECTION WHEN HANDLING.
Specifications:
Pumps 0.1 to 22 gallons of solution per day
Injects into line pressures up to 110 PSI
Dual voltage. 110V or 220V, works on either voltage.
Uses maximum 22 watts of power.
Dimensions:
15-gallon model: 14.5" wide x 24", height including pump is 35".
35-gallon model: 18" wide x 33", height including pump is 44".
NOTE ABOUT 220V INSTALLATIONS: This pump is dual voltage right out of the box and works
on 110v OR 220v.
If you plan to install to run on 220v-240v, we recommend cutting off plug and either hard-
wiring to 220v circuit OR installing a 220v plug-end.
This pump is intended for indoor use, or for outdoors if protected from sunlight and freezing.
2806-A Soquel Ave Santa Cruz CA 95062
For assistance call: 1-831-462-8500
Email us:
support@cleanwaterstore.com
More information online:
www.cleanwaterstore.com
Rev 091718
Advertisement
Table of Contents

Related Manuals for Clean Water Systems J-PRO-22


Summary of Contents for Clean Water Systems J-PRO-22
- Page 1 J-PRO-22 110V – 230V Dual Voltage Chlorinator Installation & Start-Up Guide Thank you for purchasing a Clean Water System! With proper installation and a little routine maintenance, your system will be providing treated water for many years. Please review this start-up guide entirely before beginning to install your system and follow the steps outlined for best results.
-
Page 2: Table Of Contents
Table of Contents J-Pro-22 Metering Pump Warranty and Returns: ..................3 Pre-Installation .............................. 3 Typical Installation (Diagram) ........................4 How Your Chlorine Pump Works ........................5 Wire To Pressure Switch Option ........................6 Use a Flow Switch Option ..........................6 J-PRO-22 Installation Instructions: ........................ -
Page 3: J-Pro-22 Metering Pump Warranty And Returns
This is the leading cause of failure. Pump failure during, or because of, power failure is not covered under warranty. For Returns Contact Clean Water Systems & Stores Inc. 2806-A Soquel Ave Santa Cruz, CA 95062831- 462-8500 support@cleanwaterstore.com Pre-Installation 1. -
Page 4: Typical Installation (Diagram)
Typical Installation (Diagram) Rev 091718... -
Page 5: How Your Chlorine Pump Works
How Your Chlorine Pump Works The pump is designed to pull chlorine solution out of a solution tank and pump a precise amount of chlorine into a pipeline under pressure. Right out of the box, this is a dual-voltage (110/220) pump. There are several ways to wire the pump such that it triggers when there is water flow. -
Page 6: Wire To Pressure Switch Option
Install a dedicated wall outlet that is wired in to the pressure switch and powered up whenever the well pump turns on. The J-Pro-22 is a dual voltage pump. It has a 110 volt- style plug. A person who is qualified may (without voiding the warranty) cut off the plug, and wire it directly to the pressure switch terminals. -
Page 7: J-Pro-22 Installation Instructions
J-PRO-22 Installation Instructions: While you can mount the pump on a shelf above the solution tank, it is strongly advised to mount the pump directly on top of the solution tank. If the tubing from the foot valve to the suction side of the pump exceeds 60”, the unit will not have enough lift force to stay primed. -
Page 8: Install Discharge Side Tubing
½” NPT fitting, where you can screw in the injection check valve (included with your J-PRO-22 pump). 3. Wrap Teflon tape on the ½” pipe threads of the injection check valve and apply a light coating of white Teflon pipe paste and install into Tee fitting. -
Page 9: Install Suction Tubing From Pump To Solution Tank
Install Suction Tubing from Pump to Solution Tank Connect hard tubing from foot valve in Solution Tank to Inlet/ Suction side of metering pump 1. Measure the tubing from the outside of the solution tank to ensure it will be 2-3” from the bottom of the solution tank. -
Page 10: Connect Tubing From Degassing Port ("Kicker Port")
Connect Tubing from Degassing Port (“Kicker Port”) You can use the soft tubing for this run, connect tubing to the degassing port fitting (labeled on the pump as “Kicker Port”) and pass tubing through the hole you drilled down into the tank 4-6”. Rev 091718... -
Page 11: Prime & Start The Pump
Prime & Start the Pump 1. Fill solution tank with 4 gallons of soft, distilled, or RO water, but don’t add chlorine yet. 2. Connect the suction tubing to the foot valve and discharge tubing to your injection check valve. 3. -
Page 12: About Chlorination
About Chlorination Chlorine is used for three main objectives: 1. Disinfection and inactivation of pathogens in water such as E. Coli. 2. Odor control: eliminates rotten-egg, metallic and other odors in water. 3. Oxidization of iron and manganese. When chlorine is added to water, the water has a “demand” for chlorine. When that demand is satisfied, any additional amount of chlorine added is called the “free residual”. -
Page 13: Formula For Calculating Solution Strength And Settings
6. If you get too much chlorine you can turn down the speed of the pump or make the chlorine solution more diluted. 7. Once you are in the yellow spectrum, use the up and down arrows to adjust the speed setting, until you are measuring 0.2- 1.0 ppm residual. -
Page 14: Watch How-To Videos On Our Youtube Channel
If the pump pumps in manual mode and makes a thumping sound, then it is working. Watch How-To Videos On Our YouTube Channel https://www.youtube.com/cleanwaterstore Priming Problems 1. If you cannot get it to prime, it is either because a fitting is too loose, too tight, or not installed correctly. -
Page 15: Need Assistance
NOTE: when diluting the bleach, use only distilled water, water from a reverse osmosis system, or at least softened water. Do not use untreated well water. Need Assistance? Call us at 831-462-8500 or email support@cleanwaterstore.com Spare Parts: These installation parts are included with initial order, but you may wish to have spares on hand, or...
Need help?
Do you have a question about the J-PRO-22 and is the answer not in the manual?
Questions and answers