
Subscribe to Our Youtube Channel
Related Manuals for Tatu Marchesan RTA-6

Summary of Contents for Tatu Marchesan RTA-6
- Page 1 U C T I O N S M A N U AL I N S T R I N S T R U C T I O N S M A N U RTA-6 Ta t u B a c k H o e...
- Page 2 It is essential to become completely acquainted with the Tatu Back Hoe before starting operations or even getting on the tractor. Used with wheeled agricultural tractors (in the range of 60 to 70 CV), the RTA-6 is designed for agricultural use, such as drainage, cleaning canals and digging up to 3,0 meters deep.
-
Page 3: Table Of Contents
INDEX INDEX INDEX INDEX INDEX TO THE OWNER ........................3 TO THE OPERATOR ....................... 4 a10 Safety Warnings ....................4 a 6 Transporting on Truck/Trailer ..................6 Safety Stickers ....................... 7 a 9 Identification of Controls Levers ................10 TECHNICAL SPECIFICATIONS .................... 11 General Dimensions .................... -
Page 4: To The Owner
TO THE OWNER TO THE OWNER TO THE OWNER TO THE OWNER TO THE OWNER The acquisition of any TATU product assures to the original pruchaser the following rights : - Warranty certificate; - Instructions manual; - Technical assistance by the dealer on the equipment delivery. - The owner has obligation to inspect the conditions of the product on delivery, as well as knowing the warranty terms. - Page 5 TO THE OPERA TO THE OPERA TO THE OPERA TOR TO THE OPERA TO THE OPERA Dear User! Respect the Ecology. Do not throw the trash away. This gesture of goodwill helps to protect our Environment. Do not spill combustible oil, battery and filter residues in the soil.
-
Page 6: To The Operator
TO THE OPERA TO THE OPERA TOR TO THE OPERA TO THE OPERA TO THE OPERA Never use your Never attempt to hands to check for change hydraulic leaks. adjustments. clean Escaping hydraulic or lubricate the oil under pressure implement when in can have sufficient movement. -
Page 7: Safety Warnings
TO THE OPERA TO THE OPERA TO THE OPERA TOR TO THE OPERA TO THE OPERA - During the operation or transport do not allow riders on the tractor or implement. Serious personal injuries could result from falling in the path of the machine while in operation or transport. -
Page 8: Safety Stickers
TO THE OPERA TO THE OPERA TO THE OPERA TOR TO THE OPERA TO THE OPERA Safety Stickers The safety stikers are used to alert you to hazards in the most dangerous parts in the Retro. Keep the stickers clean and replace them when it is necessary. U T I O N U T I O N C A U T I O N... - Page 9 TO THE OPERA TO THE OPERA TO THE OPERA TO THE OPERA TO THE OPERA TOR CUID CUID ADOS ADOS SPECIAL CUID CUID CUID ADOS ADOS ADOS ESPECIALES ESPECIALES PROCEDURES ESPECIALES ESPECIALES ESPECIALES ALWAYS ATTEMPT TO THE FOLLOWING INSTRUCTIONS. SIGUEN ABAJO LAS INSTRUCCIONES QUE DEBEN SER OBSERVADAS.
- Page 10 TO THE OPERA TO THE OPERA TO THE OPERA TO THE OPERA TO THE OPERA TOR WARNING ADVERTENCIA - PRECAUTIONS IN THE BACKHOE OPERATION - THE OPERATOR SHOULD BE FAMILIAR WITH THE CONTROLS AND GET KNOWLEDGEMENT ON SAFE OPERATION, BEFORE USING THE BACKHOE. - ONLY THE OPERATOR CAN OPERATE THE BACKHOE, POSITIONED IN ITS SEAT.
-
Page 11: Identification Of Controls Levers
TO THE OPERA TO THE OPERA TO THE OPERA TO THE OPERA TO THE OPERA TOR Identification of control levers The diagram below shows the functioning of the control levers of the Tatu Back Hoe and has copies of the decals that are handle of each control. STABILIZERS: (Levers 1 and 6) Moving these levers forward lowers the stabilizers and vice versa. -
Page 12: Technical Specifications
TECHNICAL SPECIFICA TECHNICAL SPECIFICA TIONS TIONS TECHNICAL SPECIFICA TECHNICAL SPECIFICA TECHNICAL SPECIFICA TIONS TIONS TIONS General dimensions: (In millimeters) A - Depth of excavation ................... 3000 mm B - Angle of horizontal rotation ..............170 Degrees C - Maximum height for unloading ..............2870 mm D - Reach (from joint) .................. -
Page 13: Bucket Dimensions
Capacity (litres) ....51 ....68 ....76 ....84 ....102 Weight (kg) ......50 ....58 ....61 ....65 ....71 Total weight: (RTA-6 with16" bucket) ..............1010 kg Hydraulic system: Hydraulic pump with flow of 35 litres/minute at 540 rpm Tank capacity: ...................... -
Page 14: Components
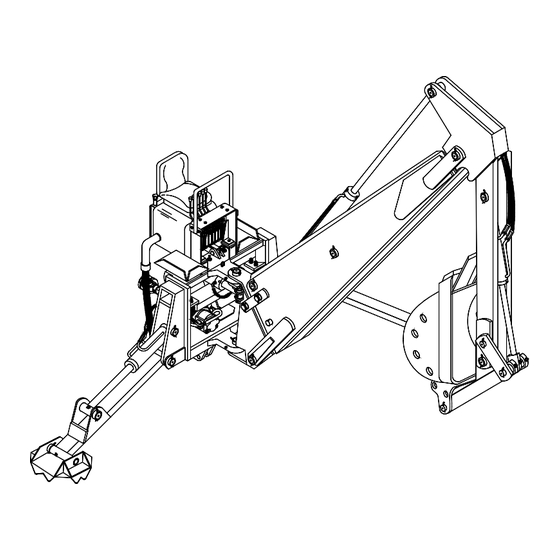
COMPONENTS COMPONENTS COMPONENTS COMPONENTS COMPONENTS 01 - Seat 11 - Mounting rotation support 02 - Controls levers 12 - Plateau 03 - Control support 13 - Hydraulic pump 04 - Arm cylinder 14 - Shoe 05 - Boom 15 - Estabilizing arm 06 - Arm 16 - Foot rest 07 - Bucket cylinder... -
Page 15: Assembly
ASSEMBL ASSEMBL Y Y Y Y Y ASSEMBL ASSEMBL ASSEMBL Hydraulic Pump Assembly Do the assembly of the hydraulic pump as following: - Couple the pump (A) in the support (B) using the bolts (C), lock washers and nuts. - Do the assembly of the shaft (D) in the pump (A). -
Page 16: Preparing The Tractor
-UP INSTRUCTIONS -UP INSTRUCTIONS SET -UP INSTRUCTIONS -UP INSTRUCTIONS -UP INSTRUCTIONS The following instructions must be observed carefuly to get the a better performance at work. Setting-up the Tractor The adition of water ballast in the tires, are the ways more used to increase the traction to the soil and giving a better stability to the tractor. -
Page 17: Coupling The Shaft
-UP INSTRUCTIONS -UP INSTRUCTIONS SET -UP INSTRUCTIONS -UP INSTRUCTIONS -UP INSTRUCTIONS 3rd Point Regulating - Rod Guide Chassis Tractor TPO Shaft Cardan Shaft Pump Pump Support Stabilizer Arm Nota: THE SUPPORTING BAR ASSEMBLING (A) SHOULD BE INSPECTED BEFORE COUPLING TO THE TRACTOR. Joining the Shaft to the Power Point Before starting the operation check the lenth ot the shaft. -
Page 18: Longtitudinal Levelling
-UP INSTRUCTIONS -UP INSTRUCTIONS SET -UP INSTRUCTIONS -UP INSTRUCTIONS -UP INSTRUCTIONS Longtitudinal Levelling The longtitudinal levelling is done by way of the holes in the regulating rod and the guide in the following manner: - Fully lower the stabilizing arms (With the Tatu Back Hoe hitched in service position). -
Page 19: Final Adjustments
(Letters "A" in the drawing below). - Proceed with transversal levelling by way of the crankshaft of lower right arm. Uncoupling the RTA-6 - Do the uncoupling in a firm, flat place. - Lower the stabilizer arms (shoes) resting them on the ground. -
Page 20: Set-Up Instructions
-UP INSTRUCTIONS -UP INSTRUCTIONS SET -UP INSTRUCTIONS -UP INSTRUCTIONS -UP INSTRUCTIONS Precautions prior to Operation - Check the adjustments of the immobilization pieces: screws, bolts and nuts. - Check the oil reserve level with the rods pulled out (Arms, Boom, Bucket and stabilizers raised). -
Page 21: Adjustments And Operations
ADJUSTMENTS AND OPERA ADJUSTMENTS AND OPERA TIONS TIONS ADJUSTMENTS AND OPERA ADJUSTMENTS AND OPERA TIONS ADJUSTMENTS AND OPERA TIONS TIONS Precautions in operating the Tatu Back Hoe The oprator must familiarize himself with the controls and know the safety measures before using the Tatu Back Hoe. - Only the operator, positioned in the driver seat, can move the retro. - Page 22 ADJUSTMENTS AND OPERA ADJUSTMENTS AND OPERA TIONS TIONS ADJUSTMENTS AND OPERA ADJUSTMENTS AND OPERA ADJUSTMENTS AND OPERA TIONS TIONS TIONS Operating Techniques General Informations: In operating the Tatu Back Hoe a continuous and smooth movement cycle shoud be stablished. Operators whitout prior experience should first familiarize themeselves with the controls, without excavating, or excavating superficially.
- Page 23 ADJUSTMENTS AND OPERA ADJUSTMENTS AND OPERA ADJUSTMENTS AND OPERA TIONS TIONS TIONS TIONS ADJUSTMENTS AND OPERA ADJUSTMENTS AND OPERA TIONS...
- Page 24 ADJUSTMENTS AND OPERA ADJUSTMENTS AND OPERA ADJUSTMENTS AND OPERA TIONS TIONS TIONS TIONS ADJUSTMENTS AND OPERA ADJUSTMENTS AND OPERA TIONS Basic excavation technique: When starting an excavation, make a first flat cut of each section, taking care to follow exactly the established outline for the excavation. The reason for making a flat cut is to minimize demage to the upper part of the opening.
- Page 25 ADJUSTMENTS AND OPERA ADJUSTMENTS AND OPERA ADJUSTMENTS AND OPERA TIONS TIONS TIONS TIONS ADJUSTMENTS AND OPERA ADJUSTMENTS AND OPERA TIONS Only when the sides of the ditch are finished should the bottom of the excavation be finished. This is done with large and flat cuts, be careful to make them level and smooth.
- Page 26 ADJUSTMENTS AND OPERA ADJUSTMENTS AND OPERA ADJUSTMENTS AND OPERA TIONS TIONS TIONS TIONS ADJUSTMENTS AND OPERA ADJUSTMENTS AND OPERA TIONS Face the unit forward so that the two trenches can be connected. Dump the earth on the opposite side of the trench.
- Page 27 ADJUSTMENTS AND OPERA ADJUSTMENTS AND OPERA ADJUSTMENTS AND OPERA TIONS TIONS TIONS TIONS ADJUSTMENTS AND OPERA ADJUSTMENTS AND OPERA TIONS Escavating on slopes: When escavating on slopes, keep the Tatu Back Hoe facing upwards. If necessary, build a level surface before starting excavation.
- Page 28 ADJUSTMENTS AND OPERA ADJUSTMENTS AND OPERA ADJUSTMENTS AND OPERA TIONS TIONS TIONS TIONS ADJUSTMENTS AND OPERA ADJUSTMENTS AND OPERA TIONS Repairing buried pipes: To investigate leaks in buried pipes, start by digging an exploratory trench approximately 1.80 metres wide and 3.0 metres long. Excavate in the direction of the pipe until finding the leak.
-
Page 29: Operating Techniques
ADJUSTMENTS AND OPERA ADJUSTMENTS AND OPERA ADJUSTMENTS AND OPERA TIONS TIONS TIONS TIONS ADJUSTMENTS AND OPERA ADJUSTMENTS AND OPERA TIONS Excavating compacted soil: To begin excavating compacted soil, it will be necessary to reduce the entry angle of the bucket into the ground (teeth must be inclined). It will also be necessary to apply downward pressure with the arm. -
Page 30: Maintenance
MAINTENANCE MAINTENANCE MAINTENANCE MAINTENANCE MAINTENANCE Lubrication In order to reduce the wearing caused by attrition among moving parts of the machine, it is necessary to make a correct lubrication, as indicated bellow. Lubricate every 10 hours of work, lubricate all the articulations through the grease fittings in the following manner: - Be sure about the lubricant quality, with relation to its efficiency and purity, avoiding the use of products contaminated by water, earth, etc... - Page 31 MAINTENANCE MAINTENANCE MAINTENANCE MAINTENANCE MAINTENANCE Hydraulic system The Tatu Back Hoe is normally supplied with hydraulic oil "Tellus 68" (Shell), although an equivalent can be used (ISO VG 68). - Capacity of the oil tank: 55 litres; - Total capacity: 65 litres, approximately. - Check oil level daily, with all the cylinder rods withdrawn (Retro raised).
-
Page 32: Hydraulic System
MAINTENANCE MAINTENANCE MAINTENANCE MAINTENANCE MAINTENANCE Hydraulic system Rotation Bucket Boom Filter Item Code Description 0501014844 1.1/4" x 27.55" Hose 0501019999 1 x 1100 43.3" Hose 0501080099 3/4 x 51.2" Hose Assy 0501080105 3/8 x 27.5" Hose Assy 0501080106 3/8 x 31.49" Hose Assy 0501080373 3/8 x 49.21"... -
Page 33: Precautions In Maintaining
MAINTENANCE MAINTENANCE MAINTENANCE MAINTENANCE MAINTENANCE Precautions in maintaining the Tatu Back Hoe - Never work on the equipment while it is moving. Clamp it, put on the parking brake, lower the bucket and stabilizing arms before doing any maintainance work. - Do not repairs on the hydraulic system while it is pressurized or when the cylinders are loaded. -
Page 34: Important
IMPOR IMPOR IMPOR T T T T T ANT IMPOR IMPOR Attention MARCHESAN S/A RESERVES THE RIGHT AT ANY TIME TO MAKE IMPROVEMENTS IN THE DESIGN, MATERIAL OR SPECIFICATIONS OF MACHINERY, EQUIPMENT OR PARTS WITHOUT THEREBY BECOMING LIABLE TO MAKE SIMILAR CHANGES IN MACHINERY, EQUIPMENT OR PARTS PREVIOUSLY SOLD. - Page 35 NOTES NOTES NOTES NOTES NOTES...
Need help?
Do you have a question about the RTA-6 and is the answer not in the manual?
Questions and answers