Advertisement
Quick Links
Initial Operator Training for the
RS-2000 X-Ray Irradiator
This training module is intended to provide
initial
radiation safety training for
individuals who wish to use
the Rad Source
RS-2000 X-Ray irradiator at the
University
of Minnesota.
The following topics will be discussed in this training;
- What are Ionizing Radiation and X-rays?
1.
- How are X-rays produced?
- Radiation Dose
- Health Effects & Regulatory Dose Limit
- General Hazards Associated with the X-Ray Irradiator
- Safety Instructions Regarding the RS-2000 Irradiator
- Operating Instructions for the RS-2000 Irradiator
More complete and detailed information regarding the RS-
2.
2000 can be found in the RS-2000 Owner's Manual (one
manual in each of the irradiator rooms) or by going to
the Rad Source website (www.radsource.com).
In addition, this training material, the Dose Chart,
3.
scheduling and training links for the irradiator, is
available on CFI Core website at
http://www.immunology.umn.edu/research-equipment-
services/x-ray-irradiator
Advertisement

Summary of Contents for Rad Source RS-2000
- Page 1 Initial Operator Training for the RS-2000 X-Ray Irradiator This training module is intended to provide initial radiation safety training for individuals who wish to use the Rad Source RS-2000 X-Ray irradiator at the University of Minnesota. The following topics will be discussed in this training; - What are Ionizing Radiation and X-rays? - How are X-rays produced? - Radiation Dose - Health Effects & Regulatory Dose Limit - General Hazards Associated with the X-Ray Irradiator - Safety Instructions Regarding the RS-2000 Irradiator - Operating Instructions for the RS-2000 Irradiator More complete and detailed information regarding the RS- 2000 can be found in the RS-2000 Owner’s Manual (one manual in each of the irradiator rooms) or by going to the Rad Source website (www.radsource.com). In addition, this training material, the Dose Chart, scheduling and training links for the irradiator, is available on CFI Core website at http://www.immunology.umn.edu/research-equipment- services/x-ray-irradiator...
- Page 2 What are X-rays & Ionizing Radiation? Everyone knows that x-rays are a type of radiation, but what exactly is radiation? Radiation is simply energy in motion. As you look at the figure below, there are many types of radiation that you are already familiar with: While all these types of radiation have many traits in common (e.g., all travel at the speed of light) only x-rays and gamma rays have enough energy to cause ionization when they interact with the body. So our next question is “What is ionization and why is it a concern?” All matter is made up of atoms. Atoms contain a small central nucleus containing protons, which have electrically positive charges. Orbiting the nucleus are electrons which are small particles with electrically negative charges. In a neutral atom the number of positive (+) and negative (-) charges are equal (see the figure below). When an x-ray or gamma ray is traveling through the human body, it will sometimes interact with an orbital electron of an atom. During the interaction the radiation can impart enough energy to the electron to “free” it from the atom. The...
- Page 3 atom now has one less electron, which results in the atom having more positive than negative charges. An atom that does not have the same number of positive & negative charges is called an ion. The process of ionization is illustrated below; This “freed” electron can potentially cause damage to living cells or DNA. The damage can be repaired from small amounts of radiation, however if enough radiation is imparted, biological damage can occur. The biological damage can include the death of the cell, mutation of the DNA, or preventing the cell from reproducing.
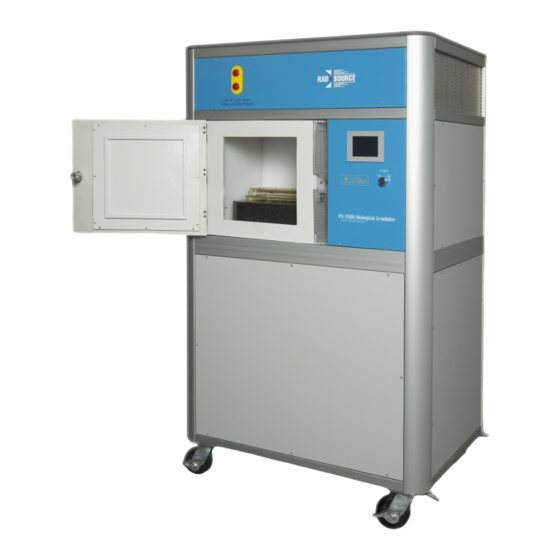
- Page 4 How are X-rays Produced? Most irradiators traditionally use a radioactive substance which continuously gives off gamma radiation. The RS-2000 uses an x-ray tube to produce x-rays as its ionizing radiation source. It should be noted that the only thing that differs between an x-ray and gamma ray is where they were originated (x-rays are produced outside the nucleus, gamma rays originate inside the nucleus), otherwise you can’t tell the difference between either. Like the x-ray machine used to take x-rays on patients, the RS-2000 irradiator uses an x-ray tube to generate x-rays (see picture below). Basically, what happens is that a metal filament is heated up to a very high temperature allowing electrons from the metal to essentially “boil” off. Electrons, the small negatively charged particles orbiting the nucleus, are then accelerated across the glass tube to a positively charged anode. While the majority of the electrons collide with the metal anode and generate heat, some of the electrons lose their energy in the form of x-rays. An important distinction that should be made between traditional irradiators that use a radioactive source and the RS-2000 unit which uses an x-ray tube is that no radiation is produced in the x-ray tube when the power is off (while the radioactive source continuously gives off radiation).
- Page 5 Radiation Dose When x-rays interact with the specimen being irradiated, the radiation interacts with orbital electrons of the atoms and radiation (energy) is deposited. The amount of radiation deposited is called the radiation dose (or simply “dose”) and is measured in either rad or Gray (Gy). A Gray is 100 times greater than a rad. For the specimens being irradiated in the RS-2000 the dose typically ranges from a few Gray to tens of Gray. The rate at which the radiation is delivered is the dose rate and is in either in units of rad/hr or Gray/hr (Gy/hr). A Gray/hr is 100 times greater than a rad/hr. In the RS-2000 the dose rate used is highly dependent upon how close the specimen is to the x-ray tube, but will vary from around 1.2 to almost 9 Gy/minute. The next question you might ask is “How much radiation will I receive from handling irradiated specimens and from using this irradiator?”. As for handling irradiated specimens, they do NOT become radioactive after an irradiation and you will not receive any radiation from handling irradiated these specimens. As for using (or being near) the irradiator, the unit is heavily shielded and minimal radiation is given off outside the unit. In addition, an interlock system will shut off the x-ray tube if the door to the RS-2000 is opened. Therefore, you should expect virtually NO radiation exposure from using the RS-2000 and therefore, individuals using the unit are NOT required to wear radiation badges to monitor exposure (NOTE: If the interlock system is somehow defeated or if the shielding is removed, individuals could receive DANGEROUS radiation doses). Radiation Dose (“Dose”) measured in rad or Gray (Gy) 100 rad = 1 Gy Dose Rate measured in rad/hr or Gy/hr 100 rad/hr = 1 Gy/hr Irradiated specimens do NOT give off radiation Radiation levels outside the RS-2000 are minimal...
-
Page 6: Other Precautions
Warnings, Precautions Using the RS-2000 Radiation Exposure As previously discussed, radiation exposure should be minimal unless the unit itself is compromised. Examples of unsafe conditions which could result in potentially dangerous radiation levels include; - Door interlock to the RS-2000 does not work - Shielding has been damaged - Evidence of machine tampering Turn power off Other Precautions - Another serious hazard from an x-ray device is electrical shock. The x-ray generator is a highly regulated DC power supply that applies a voltage of 160 kilovolts. - No unauthorized personnel may defeat or override any safety features on the x-ray generator, collimator, or shielding, without permission of the manufacturer (Rad Source). The RS-2000 is to be serviced by trained personnel only. - Please keep unit dry. When cleaning do not allow cleaners or water to drip into panels or chamber. Use only a damp cloth with mild soaps for cleaning. - Do not use the top of the unit as a storage area. Do not place any heavy items or items containing liquids or materials that may harm the unit if they leaked or spilled on top or inside. The x-ray tube can be damaged if power is shut off immediately following an irradiation. After the irradiation is completed, wait 5 minutes before turning the unit off. - Page 7 Integrated Safety Features Flashing X-ray Indication Lights, show when X-rays are being produced Shielded and Interlocked X-Ray Tube Chamber, to prevent X-ray production if panel should be opened Door Handle Double Safety Interlocked to prevent X-ray production while door is unlatched...
- Page 8 How to Use the RS-2000 In this section the basic operation of the RS-2000 will be discussed. The procedure for basic operation is posted on the unit and is also provided at the end of this section WARNING Any use of the RS-2000 not for its intended use may result in an unsafe condition. Do NOT insert any flammable or potentially explosive materials into the unit, or apply toxic or corrosive chemicals. If you have any questions about its use, please refer to the Operating Manual (located in irradiator room) or contact Rad Source Technologies. Getting Started/Prerequisites To use the RS2000 an individual must complete initial training which consists of completing the following training modules: 1. Building training for access to MBB/CCRB: Visit www.dehs.umn.edu to complete the following courses: Radiation Safety Orientation • Preventing Employee Exposure to Blood borne and Other Pathogens • 2. Radioactive Materials: Online 1 hour training module, must be documented in order to get Xray access. This training is different that the Radiation training orientation, you need to complete both. Radiation Safety for Radioactive Material Users- For individuals required to handle radioactive materials. Also, all medical, dental, veterinary and research x-ray operators must complete this module for part of their radiation safety training at http://www.dehs.umn.edu/rad_radmat_training.htm...
- Page 9 3. Fingerprint access for the key safe(WMBB) and key/card safe(CCRB): If you haven't already had your fingerprint added to the key safe system you should plan on having that done on any Thursday at 2pm. If you need to have that done make sure to stop by the main desk on first floor of WMBB(or call them at 6-5258) and sign up for this so that central security knows to come. Once your training with me is complete I will submit the request for you to have access to both units for the keys to access the Xray. The fingerprinting is for the unit in WMBB, it is entirely up to you to get access for that unit. I do strongly encourage access to both units so if one goes down you still have access to the other. 4. RAR access: Since the Xray is housed in the CCRB RAR facility we need to get you access if you don't already have it. Here are the different steps that may need to be taken. Let me know which one fits your needs and I will send you the correct forms. 1. If you currently have a mouse protocol and have mice housed in CCRB you will not need to do anything further if you have CCRB RAR access. Please contact me if your PI has a protocol and you are not on it. 2. If your PI has a mouse protocol and your lab houses animals at a different location from CCRB you will need to request RAR access to CCRB. You will need to set up a tour with the CCRB area supervisor and attend a short training session with him. The contact info is: Max Myers meye0649@umn.edu. 3. If you/PI do not have a mouse protocol and you don't work with mice you will need to set up a tour with the CCRB area supervisor and attend a short training session with him. The contact info is: Max Myers meye0649@umn.edu. 5. Hands on training: Once all of the online modules are done contact Deb Lins (benso010@umn.edu) to set up a time for the hands on training and access verification.
- Page 10 Performing an Irradiation When you open up the chamber door there should be a RAD+ reflector block (see picture) which is used to produce a more uniform dose distribution within the block. Do NOT remove this block unless cleaning is required. Make sure that the block lines up with the blue line on the copper flooring. Turning the machine on: 1. To prepare for operation, close the front door and turn the handle clockwise until fully engaged (unit will not operate if not properly closed). This can be done after you load your samples/animals and set your time. 2. Use the key to turn the power on/off switch to on (the key to power on the unit should remain inserted during the run and returned to the key trax unit when finished). 3. The Operator Touch Panel Control Screen will illuminate, control power is applied to the high voltage power supply and the following screen should be displayed: After approximately 30-45 seconds, the system is initialized and the main menu, shown below, is displayed (Note: if at any time after the system is initialized a fault is detected the...
- Page 11 ALARM SCREEN will be displayed, hit clear or turn off the machine and let sit for 20 seconds, then turn back on). 4. If you have a long run or will be in the room for an extended amount of time, you will want to prop the room door open. The irradiator tends to heat the room up and that over-heating can cause the unit to shut down. I also have an electric fan in the room that you can set up to bring cooler air from the hall into the room. 5. Main Menu The main menu enables the operator to access all the features of the RS- 2000. The white rectangular system status box is used to display the machine status. Possible machine statuses include: § WARMUP REQUIRED § WARMUP IN PROGRESS § X-RAY ON § X-RAY OFF If the white box says “WARMUP REQUIRED” proceed to next page.
-
Page 12: Warm-Up Cycle
Warm-Up Cycle When you first power on the unit, the x-ray tube may or may not need to be properly warmed up (a warm-up is required every 40 hours or if there has been an electrical disruption). If the x-ray tube needs to be warmed up the system status box will say WARMUP REQUIRED. It is important to perform the warmup if this message appears. If the tube doesn’t need to be warmed up, the status box will say X-RAY OFF. To initiate a warm-up; 1. Press WarmUp on the main menu 2. The WARM-UPCYCLE menu will appear (see figure at the right). 3. There are two pre-programmed warm-up cycles labeled: NORMAL and EXTENDED. Unless you know that the unit hasn’t been used for a couple of months, select NORMALNORMAL 4. Press START (at the bottom of the screen). 5. The message in the white system status box will indicate WARMUP IN PROGRESS. The flashing indicator lights on the unit will flash on and off indicating that x-rays are being produced. Leave the room for 15 minutes and note on the sign up sheet that a warm up was needed. 6. After the warm up is completed (theNORMAL warm-up cycle takes approximately 10 minutes), that system status block will indicate WARMUP COMPLETE. Press MAIN to take you back to the main menu. You are now ready to perform an irradiation which is discussed in the next section. ... - Page 13 Determining Irradiation Time Before performing an irradiation, you obviously need to first determine how long to irradiate, which corresponds to what level inside the irradiator chamber you will be placing the specimens. So what do we mean by levels? If you open the door and look inside the irradiation chamber of the RS-2000 you will see various levels indicated along each side. Although you can’t see it, because the RAD+ reflector is covering it, the bottom level is labeled “1”. The levels increase in number as you go up higher in the chamber (although not labeled, the level above 5 is level 6). Levels inside the Chamber Because the x-ray tube is located above the chamber in the RS-2000, the higher numbered levels correspond to higher dose rates (& shorter irradiation times). Animals: Small animals must be placed in a CLEAN filtered cage and are typically irradiated on Level 1 (i.e., within the black RAD+ reflective chamber on the floor of the chamber). • Place no more than 5 mice in a CLEAN cage • Remove food and water from the cage, if you have excess bedding remove that as well (using a new cage will alleviate that problem) • There is a hood located in the room and all SPF protocols should be followed. • You will need to prepare new hand dipping solution (bleach water) and spray. The rooms on either side of the X-ray room have a water source to prepare your solutions. • If you choose to not place your animals in a new cage, there is an empty cage in the room. Line the bottom of the cage with a few paper towels and place your mice in that cage and irradiate. Once finished with your...
- Page 14 Non-Animals (e.g., cells, well plates, flasks): These specimens are typically irradiated on Levels 3, 4, 5 using the Aluminum Specimen Shelf (“shelf plate”). Due to the high risk of burns we do not use level 6 or 7. A couple of points regarding using levels and the shelf-plate: - To ensure relative dose uniformity; if you are using the shelf plate, the specimen(s) should fit within the circular area of the level you are irradiating at (85% dose uniformity at outer edges of the circle). For the a specimen inside the RAD+ reflector block, the uniformity is 98%. - The radiation dose rate is highly dependent upon the distance from the radiation source (x-ray tube). Therefore, for certain specimens (e.g., test tubes, flasks, plates) you should lay items horizontally to maintain the dose required. Do not stack plates since the higher plates will be irradiated at a higher dose. - The radiation dose rate is highly dependent upon the density of the specimen. Tubes are fine but if you have your sample in an ice bucket you may need to adjust your irradiation time. The dose rates and corresponding irradiation times are given on a “Dose Chart” which is posted on the front of each irradiator, as well as on our website: https://www.immunology.umn.edu/research-equipment-services/x-ray-irradiator .
- Page 15 Doses are for machine setting: 160 KV, 25mA RAD+(blac k boran carbonite ANIMAL box) CAGE LEVEL 1 LEVEL 2 LEVEL 3 LEVEL 4 LEVEL 5 Dose Rate: Dose Rate: Dose Rate: Dose Rate: Dose Rate: Dose Rate: Dose Rate: 112 rads 114 rads 101 rads 132 rads...
- Page 16 Once you have determined the irradiation time you are ready to enter in the time and perform the irradiation as follows: 1. Place the specimen in the chamber. For small animals, place the HEPA filtered cage within the RAD+ block. For non-animal specimens, place the shelf plate at the level desired and place the specimen on the plate. animal cage placed inside RAD+ block 2. On the Main Menu you will select PROGRAM SETUP if you have not already programmed an irradiation time in for one programs (A, B, C, or D). If you have already programmed in an irradiation time go to Step 3. After selecting PROGRAM SETUP, the following screen (AUTO PROGRAM SETUP) will appear (Programs C and D can be seen by pressing NEXT); ENT=enter, ESC=escape For the Program you wish to program an irradiation time for, press MIN or SEC and a keypad will appear on the display which allows entry of the irradiation time. Once the time has been entered, press MAIN to return to the main menu. 3. On the Main Menu, choose PROGRAM SELECT and the following window will appear:...
- Page 17 4. Select the program (A, B, C, or D) you wish to run and then press AUTO. 5. Press START and the irradiation will begin (flashing lights on the front of the irradiator will flash on and off indicating that x-rays are being produced). 6.After the irradiation is completed, open chamber and remove specimen. IMPORTANT NOTE: After the last irradiation has been completed, wait 5 minutes before turning the key to the OFF position. This is an extremely important step to ensure that the tube cools down properly (the tube costs $25,000 to replace). 7.Complete the User’s Log (located on the front of the irradiator) to document your irradiator usage, make sure to leave any notes and your chart string. 8. Post Procedure Cleaning: After you have completed using irradiator, perform the following; a. Irradiator: Spray a paper towel with bleach solution and wipe the inside of the irradiator chamber including the shelf plate (if used). b. Biosafety Cabinet: If the BSC is used spray and wipe down all surfaces inside the BSC. Repeat with TEC Surf solution. c. Please dispose of all debris and waste in the waste basket provided. d. Empty the bleach water and dry out the animal cage if used, place back on the top of the irradiator. e. Return all empty cages to the proper dish room. 9. Return the key to the key trax unit in CCRB/WMBB, you are billed in 15 minute increments. Billing is done at the end of each month. Please provide a chart string to bill to. If you don’t include it on the sign in sheet in the room then email it to Deb at benso010@umn.edu. 10. If you fail to return the key between split dose irradiations (ie: you return to your lab for 2-8 hours and don’t return the key even though you are not irradiating) or bring the key home with you then you will be charged for the full amount of time that the key is checked out. 11. USER BEWARE!! If you choose to leave during your run, remember we have 2 keys, someone else can check the second key out and come into the room and interrupt your run. One way to avoid this is to check out both keys, and lock the...
- Page 18 12. All users who sign up to use the X-ray on the online calendar have first priority and can ask a user to remove their sample if someone is in the room who has not signed up. Please be courteous and allow a user to finish, most runs are short and a few minutes won’t hurt you. Do note this on the sign-up sheet though, again I don’t want to over-charge if you have to wait. Faults & Possible Causes If during normal operation of the machine a fault condition is detected an ALARM SCREEN will be displayed. Table 3 in the operating manual lists possible faults and the corrective actions for the RS-2000. Most of the time you will just need to hit clear and continue on. If that doesn’t work, turn off the machine, wait 20 seconds and turn it back on. If neither of those options work, you will need to contact Deb at benso010@umn.edu. Keep in mind that some of the faults do not retain your time, so if you choose to leave the room and something happens your sample could be compromised. If you hit “stop” during a run, your time is lost and the machine will go back to the AUTO page. Make sure to note your time prior to hitting stop. If you open the door during a run, your time is preserved and you can choose to initiate (Restart) your run or cancel it. Other Pertinent Information On the Rad Source website (www.radsource.com) information pertaining to the RS-2000 irradiator can be found. The website also provides contact information should you wish to contact a technical representative directly.
Need help?
Do you have a question about the RS-2000 and is the answer not in the manual?
Questions and answers