Table of Contents
Advertisement
Advertisement
Table of Contents

Summary of Contents for MySmartBlinds AUTOMATION KIT
- Page 1 AUTOMATION KIT User’s Manual mysmartblinds.com/installation...
- Page 2 QUICK START 1. Download the MySmart- Blinds app to your smart device from the App Store or Google Play. 2. Visit www.mysmartblinds. com/installation or www.youtube.com/c/ mysmartblinds to access installation and trouble- shooting videos. Apple, the Apple logo, iPhone, and iPod touch are trademarks of Apple Inc., reg- istered in the U.S.
-
Page 3: Table Of Contents
TABLE OF CONTENTS SAFETY INFORMATION ABOUT MYSMARTBLINDS BLINDS IDENTIFIER PARTS IDENTIFIER ROD RETENTION TYPES INSTALLATION USING THE APP TROUBLESHOOTING LIMITED WARRANTY... -
Page 4: Safety Information
Operation is subject to the following two conditions: CAUTION 1. This device may not cause harmful interference, and Do not use the MySmartBlinds automation kit for any- 2. This device must accept any interference received, thing other than its intended use. Any usage of any part... -
Page 5: About Mysmartblinds
However, there MySmartBlinds is a retrofit blinds-automation kit that is no guarantee that interference will not occur in a uses Bluetooth technology to control tilting in your particular installation. -
Page 6: Blinds Identifier
BLINDS IDENTIFIER Tilt rod Tilt mechanism Barrel Headrail Slats... -
Page 7: Parts Identifier
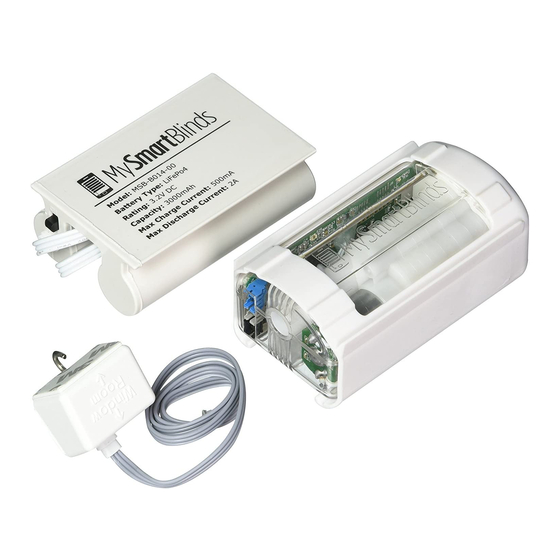
ROD RETENTION TYPES PARTS IDENTIFIER Version A: Rod pin Motor box (A) Motor box bracket (B) Version B: End brackets Manual switch C-clip (C) Manual switch (D) Version C: Crimps Battery pack (E) Rod adapters (F) Cable clips (G) 4x Rubber tubing (H) -
Page 8: Installation
(Fig. 1.1). MySmartBlinds hardware) Fig. 1.1 (Fig. 1.5). Bend the headrail 3. If your blinds use a tilt slightly away from the tilt... - Page 9 Version C—Crimps: 2 Installing MySmartBlinds Hardware Bend the headrail gently 1. Remove the manual switch C-clip (C) from the away from the tilt mecha- bottom of the manual switch (D) by pressing nism, and remove the tilt down on the clip’s center and sliding it out.
- Page 10 4. Lay the battery pack (E) the center of the C-clip to flatten it, and slide the inside the headrail so that clip underneath the man- the cable is on the top ual switch until the clip left side (Fig. 2.6). If your locks in place (Fig.
- Page 11 7. If you are installing a motor box into MySmartBlinds solar the bracket until panel (sold separately), it locks in place connect the solar panel (Fig. 2.11). cable to the black If your headrail connector on the motor is exceptionally box’s left side (Fig.
- Page 12 CAUTION PINCHED CORDS: Ensure that the motor box does not pinch any cords from your blinds. Pinched blinds cords may prevent you from raising and lowering your blinds. Position the cords so that they aren’t pinched beneath the motor box brack- et’s legs (Fig.
- Page 13 NOTE CAUTION TILT ROD: Ensure that the rod adapter can easily BARRELS ALIGNED: Make sure the barrels remain slide over the entire tilt rod. Check for burrs or aligned with each other while reinserting the tilt deformities along the tilt rod, and, if necessary, rod (see Fig.
- Page 14 Step 17. NOTE CHARGING YOUR BLINDS: If you are not installing a solar panel, your MySmartBlinds battery pack will need to be charged periodically. Connect the MySmartBlinds charging cable (sold separately) to the micro USB port on the bottom of the man- Fig.
-
Page 15: Using The App
1. From the home page, tap ADD NEW ROOM, and 1 Setting Up the App enter a name for your room. 1. Download the MySmartBlinds app to your smart 2. Select SET UP NEW BLINDS, and follow the device from either the App Store or Google Play, prompts on the screen. - Page 16 ROOM to adjust the Smart Open and Smart Close 7. To remove a blind from positions and to create schedules for the room. a room, tap the name of You can also adjust smart positions and add the room from the home schedules at a later time from the room’s main page, tap EDIT, and tap page (Fig.
- Page 17 5. From the main schedule 4. Use the sliders to adjust the page (Fig. 3.2), tap on an smart positions (Fig. 4), and event to edit its contents. then select SAVE. 6. To turn an event on or off, 5 Charging the Battery from the main schedule page, select the event’s 1.
- Page 18 5 Home Page 6 Room Main Page Tap the Tap the ARROWS MENU to move the Tap EDIT BUTTON blinds in 45° to edit to access increments. or delete settings, Hold down rooms. the ARROWS help, feed- for more back, and fine-tuned more.
-
Page 19: Troubleshooting
The motor box doesn’t fit inside my headrail: of your MySmartBlinds is designed to fit inside 2-inch hori- account. zontal blinds. The space between each barrel in your headrail should measure at least 5 inches (Fig. 1), or 9... - Page 20 The app cannot find or connect to my installed blinds: Turn the Bluetooth off and back on again on your I need to pair my automation kit to a different account: device, and restart the app. Your device may also be Each automation kit can only be paired to one out of range of the blind;...
-
Page 21: Limited Warranty
Limited One-Year Warranty on Hardware manufacturing defects and includes parts, labor, and the cost of shipping the repaired (or replacement) MySmartBlinds offers a limited one-year warranty on product from MySmartBlinds to you. The warranty the hardware components of its blinds kit. If a defect... - Page 22 TICABLE OR CANNOT BE TIMELY MADE, A REFUND OF THE PURCHASE PRICE. IN NO EVENT SHALL THE Use of the MySmartBlinds kit with any other system LIABILITY OF MYSMARTBLINDS RELATED TO ANY or components (including affixing non-MySmartBlinds PRODUCT EXCEED THE PURCHASE PRICE OF THE attachments or accessories) voids this warranty.
Need help?
Do you have a question about the AUTOMATION KIT and is the answer not in the manual?
Questions and answers