Table of Contents
Advertisement
EVISTR VOICE RECORDER
http://blog.evistr.com
support-us@evistr.com
REQUEST CUSTOMIZED VIDEO
Mailto:
support-us@evistr.com
Write us your issues, and model number or amazon order ID, so we could reply to you effectively
Thanks for purchasing EVISTR Digital Voice Recorder
EVISTR - to be the leading voice recorder brand
We hear from our user, do all our efforts to make better service
L36 Package List
1) L36
2) Earphone
3) LINE-IN Cable
4) External Microphone
5) USB Cable
6) User Manual
7) VIP Card
L36 Digital Voice Recorder
By
EVISTR
http://www.evistr.com
Support-us@evistr.com
Page - 1 - of -14 -
Advertisement
Table of Contents

Related Manuals for Evistr L36


Summary of Contents for Evistr L36
- Page 1 Write us your issues, and model number or amazon order ID, so we could reply to you effectively Thanks for purchasing EVISTR Digital Voice Recorder EVISTR - to be the leading voice recorder brand We hear from our user, do all our efforts to make better service...
-
Page 2: Table Of Contents
13) REST (When Device was frozen)...................- 11 - 14) How to Connect to Computer....................- 11 - 15) Format EVISTR L36 Drive on Computer Directly..............- 12 - 16) System Time & Date Setting....................- 12 - 17) Go to Setting (Menu Options)....................- 14 -... -
Page 3: Chapter One
EVISTR VOICE RECORDER http://blog.evistr.com support-us@evistr.com CHAPTER ONE L36 Open the Box 1) The Package Information The original package comes with film wrapped, and have bar code information Package List 1 x L36 Machine 1 x Earphone 1 x LINE IN Cable... -
Page 4: Important Notice Before Using The Device
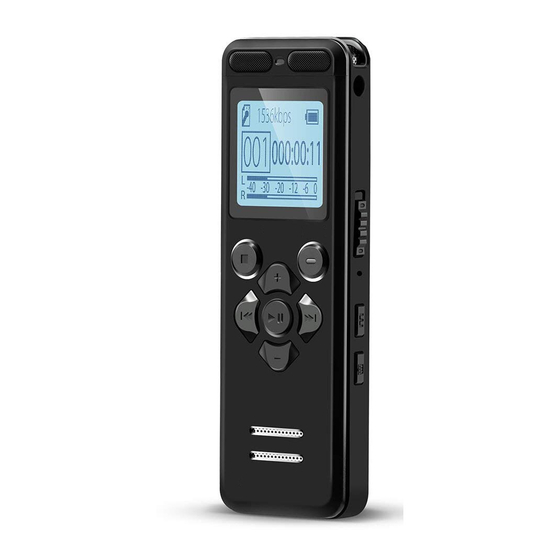
EVISTR VOICE RECORDER http://blog.evistr.com support-us@evistr.com Vol + / Up Stop / Return / Save Record Recording Rewind / Previous Fast Forward / Next Play / Pause / Confirm / OK / Turn ON/OFF Vol - / Down Press: it means hit and release the button... -
Page 5: Chapter Two
no operation, and not playing or recording CHAPTER TWO L36 Basic Operation Guide 1) Charging Voice Recorder Connect it to your computer with enclosed cable, it will charge, once it has finished charging ( typically around 1.5-2 hours), you can eject the device from the USB port... -
Page 6: Turn On Voice Recorder
EVISTR VOICE RECORDER http://blog.evistr.com support-us@evistr.com You could also connect the enclosed cable with your voice recorder and other USB socket for charging (like USB wall charger, USB charge dock) Charging Input: 5V 500mAh ~ 1000mAh 2) Turn On Voice Recorder... - Page 7 EVISTR VOICE RECORDER http://blog.evistr.com support-us@evistr.com 1) Press & hold PLAY to turn ON 2) Press REC, to record NOTE: During Recordings, you should press STOP to save your recordings before turn off your voice recorder 3) Press STOP, save recordings...
-
Page 8: How To Pause And Resume Recording
EVISTR VOICE RECORDER http://blog.evistr.com support-us@evistr.com Each recordings will be saved a file names with date in sequence, but it has a time stamp If we want to see the recorded date of file “2017-03-02-21-52-07.WAV”, we could click right button and view file properties, we will see the... -
Page 9: How To Fast Forward / Rewind
Delete recordings, it could have 5 method A. Format the recorder EVISTR L36 drive on your WINDOWS computer directly B. Go to your EVISTR L36 DRIVE, find folder “RECORD”, select the recordings you want to delete on computer C. Format the recorder on the device directly D. -
Page 10: Download File To Computer
EVISTR VOICE RECORDER http://blog.evistr.com support-us@evistr.com Save position Variable Speed p.. Delete One Record settings Delete All Play setting Delete 1) Press M (at right side), enter 2) Select “Delete” 3) Press PLAY go to delete menu options option “ 2017-03-0...”... -
Page 11: Restore To Factory Settings
EVISTR VOICE RECORDER http://blog.evistr.com support-us@evistr.com Turn on the recorder Press and hold MENU (button 2 seconds), switch to music folder ( if we were at recordings folder) Press PLAY to playback music Notice: if it shows “no songs founds” that means there is no songs file in the recorder disk, or the song ... -
Page 12: Format Evistr L36 Drive On Computer Directly
2) We will see EVISTR L36 on our computer 1) Successfully connected to our computer 15) Format EVISTR L36 Drive on Computer Directly... - Page 13 EVISTR VOICE RECORDER http://blog.evistr.com support-us@evistr.com Screen will display “Time settings”, “Date Settings” Set Time Time settings Date and time Set time format Set time format Time settings 12-hours Set time Date settings 24-hours 1) Select Time settings, Press 2) Select set time format, press...
-
Page 14: Go To Setting (Menu Options)
EVISTR VOICE RECORDER http://blog.evistr.com support-us@evistr.com Date settings Set date format MM DD Set date 7) Press +/- adjust Day, and the 8) Now, press PLAY to confirm setting correctly time and date Now we had successfully set time and date for the recorder...
Need help?
Do you have a question about the L36 and is the answer not in the manual?
Questions and answers
misplaced cable for evistr voice recorder