Advertisement
Advertisement
Table of Contents

Related Manuals for BCP SKY4719

Summary of Contents for BCP SKY4719
- Page 1 INSTRUCTION MANUAL Self-Charging Robot Vacuum SKY4719 Ver. 2...
- Page 2 Thank you for choosing us! Since 2002, Best Choice Products has been bringing customers high-quality products at the absolute lowest price. With everything ranging from instruments and toys to furniture and outdoor, we’ve got your everyday living essentials covered. We’re centered around a customer-first philosophy –...
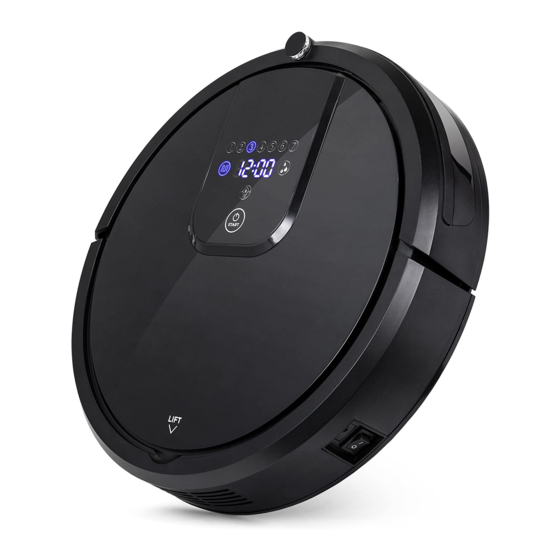
- Page 3 Before initial use, deplete battery of power and charge for 12 hours. After initial charge, follow the normal recommended charging time. bestchoiceproducts.com...
-
Page 4: Technical Specifications
NOTICE Please retain these instructions for future reference. • This machine is intended for indoor use only. • Use with caution in the presence of children as it may startle or hurt them. • Periodically check the connection between the recharger and socket to ensure that it is properly plugged in. - Page 5 TECHNICAL SPECIFICATIONS NOISE LEVEL 50-60 DB SUCTION 1200 pa DUSTBIN CAPACITY 900ml SMALL DUSTBIN & WATER TANK 250ml + 650ml BATTERY Lithium-ion 2200mAh CHARGER 100-240V-5060Hz 0.5, Output: 24V 500mA WARNING • Do not sit or stand on this machine. • Do not use the machine in an extremely small, confined space such as a small table.
-
Page 6: Required Items
REQUIRED ITEMS 1 PERSON APPROXIMATELY 2 AAA BATTERIES ASSEMBLY 45 MIN. 1 PERSON APPROXIMATELY 45 MIMBLY ASSEMBLY 5 MIN. ASSEMBLY PARTS ROBOT VACUUM SIDE BRUSHES REMOTE CONTROL 1 PC 3 SETS 1 PC SMALL DUSTBIN HEPA FILTER EXTRA MOP 2 PCS 1 PC 1 PC POWER ADAPTOR... -
Page 7: Product Assembly
PRODUCT ASSEMBLY NOTE: Vacuum comes fully assembled; the following steps are for reference only. Attach the part B side brushes to the bottom of the part A unit. Push firmly during installation to ensure that they are properly attached. Slide the rolling brush onto the axle. Insert the bracket to secure the rolling brush. - Page 8 DIAGRAM SIGNAL RECEIVER BUMPER DISPLAY SCREEN WALL SENSOR START/STOP CLEANING DUST COVER CHARGING PORT POWER SWITCH BOTTOM CLIFF SENSORS FRONT WHEEL DOCK SIDE BRUSHES CHARGING PORTS ROLLING BRUSH BRACKET CLIFF SENSORS WHEELS RECHARGEABLE BATTERY...
- Page 9 PANEL/DISPLAY SCREEN DAY OF WEEK INDICATOR: The numbers 1 to 7 indicate days of the week, Monday to Sunday. SEEPING SPEED INDICATOR: Solid light indicates normal water seeping speed and blinking light DIGITAL INDICATOR: indicates fast water seeping speed. Displays the current time or The light will turn o and digital error codes.
-
Page 10: Remote Control
REMOTE CONTROL 16ft HOME POWER DIRECTIONAL START STOP BUTTONS START/STOP TURBO WALL TURBO WALL FULL GO TIMER SPOT FULL GO TIMER • Insert two AAA batteries (not included) into the SPOT remote control. • Remote control has a max range of approximately 20 feet. - Page 11 SETTING CURRENT DAY/TIME While in standby, press the TIMER button and then press the TURBO button. Press the LEFT/RIGHT buttons to toggle through the days of the week (1 represents Monday and 7 represents Sunday). Hold the UP button to select a day. Hold the DOWN button to cancel a selected day. Press START/STOP to save and continue to setting the time.
-
Page 12: Cleaning The Rolling Brush
CLEANING THE ROLLING BRUSH Compress the plastic tabs to remove the bracket. Remove the rolling brush by carefully pulling it from the left side. Use the hook on the brush tool or scissors to remove hair/obstructions from the rolling brush. If necessary, rinse the rolling brush with water. -
Page 13: Cleaning The Dustbin
CLEANING THE DUSTBIN Remove the dustbin and brush tool. Open the dustbin and pour out the collected dust/dirt into a waste basket. Use the brush tool to clean the dustbin, filter frame, and part D HEPA filter. If necessary, rinse the parts with water. Make sure that they are completely dry before reinstallation. - Page 14 MOPPING FUNCTION UNDER TRAILING BAR Slide the part E mop over the back edge of the trailing bar. Press down to secure the built-in Velcro strips. Open the plug, fill the water tank with clean water, and replace the plug. Insert the water tank/small dustbin into the unit Slide the part F small dustbin onto the part G (replacing the normal dustbin).
- Page 15 SETTING UP CHARGING DOCK POWER INDICATOR SIGNAL EMISSION WINDOW POWER POSITIVE ADAPTER JACK RECHARGING POLE NEGATIVE RECHARGING POLE NOTE: Robot vacuum unit can also be charged with the power adaptor by plugging directly into the unit.
- Page 16 SETTING UP CHARGING DOCK If room is too large, the unit may not automatically return to charging dock when batteries are low. • Make sure that there are no obstacles or uneven surfaces 6.5 feet in front or 3.2 feet from the sides of the dock. •...
-
Page 17: Cleaning And Maintenance
CLEANING & MAINTENANCE • Clean the machine once every two weeks. Unplug, switch o power, and empty dustbins before each cleaning. • Wipe down the exterior of the machine with a damp cloth. Do not get the sensors or interior of the machine wet. -
Page 18: Error Codes
ERROR CODES NOTE: The unit will sound an alarm & display an error code when an error occurs. ERROR CODE PROBLEM SOLUTION E001 Cannot detect ground Clean the cli sensors or place unit on flat ground E002 Suction inlet blocked Clean the sensor head or clear the inlet E003 Left/right wheels not working... -
Page 19: Fcc Compliance Statement
STORAGE • Turn o power before transporting or relegating machine to storage. • When not in use, leave the machine on the charging dock to keep the battery in optimal condition. • If only periodically used, make sure to recharge the machine at least once a month to keep the battery in optimal condition. -
Page 20: Product Warranty Information
ENJOY YOUR PRODUCT! PRODUCT WARRANTY INFORMATION All items can be returned for any reason within 60 days of the receipt and will receive a full refund as long as the item is returned in its original product packaging and all accessories from its original shipment are included. All returned items will receive a full refund back to the original payment method.
Need help?
Do you have a question about the SKY4719 and is the answer not in the manual?
Questions and answers
Replacement remote for bcp sky4719 robovac
Hello. I need to get new side brushes for my vacuum but I’m having hard time to find the right size. Would you help me please?