
Related Manuals for Hydra Pools Aqua Genie

Summary of Contents for Hydra Pools Aqua Genie
- Page 1 I n st a lla t ion I n st r u ct ion s Rev. Level: G Rev. Level: F Rev. Date: 11/20/2015 Rev. Date: 10/09/2014 Document ID: HM038, Aqua Genie Installation Document ID: HM038 Aqua Genie Installation Page 1 of 8...
- Page 2 Keep AquaGenie operating normally, with full flow as continuously as possible. Rev. Level: G Rev. Level: Rev. Date: 11/20/2015 Rev. Date: 10/09/14 Document ID: HM038 Aqua Genie Installation Document ID: HM038, Aqua Genie Installation Page 2 of 8...
-
Page 3: Installation Instructions
Vacuuming 1. Clean baskets before vacuuming. Backwash The adapter plate is tapered to seal against filter before and during the procedure, if the the seat in the AquaGenie’s main sump. condition of the filter bed hampers flow. 3. Debris vacuumed off the bottom will be 2. - Page 4 Insert screws (part #H006636) through the wall from the inside of the pool. Place steel shim (part #H01556SW) on back of wall on screws (if needed), then line up the Aqua Genie mounting holes with the screws. Use washer and nut to secure.
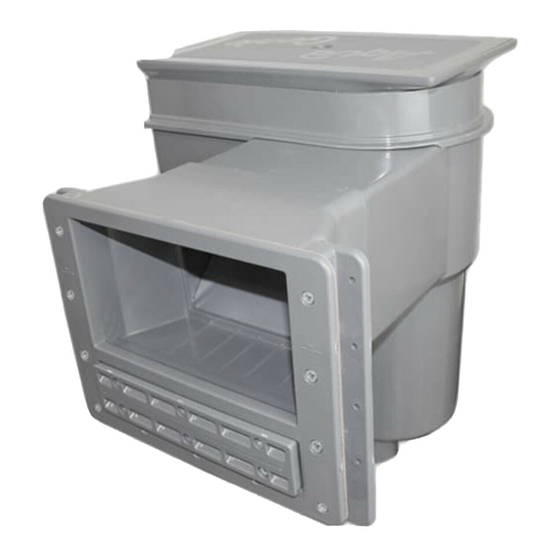
- Page 5 Water level Marks INSTALLING FACE PLATE Apply a small amount of sealant to one side of one of the large gaskets (#2) to hold it temporarily while assembling. Place the adhesive side of the gasket on the face plate, aligning the holes. (see sketch #10) Before positioning the face plate assembly, make two small vertical slits in the vinyl liner as indicated on sketch #11.
- Page 6 THE INFORMATION CONTAINED IN THIS DOCUMENT IS THE SOLE PROPERTY OF HYDRA POOLS, A DIVISION OF PI, INC. ANY REPRODUCTION IN PART OR WHOLE WITHOUT WITH WRITTEN PERMISSION OF HYDRA POOLS A DIVISION OF PI, INC. IS PROHIBITED. AQUAGENIE BILL OF MATERIALS Rev.
- Page 7 For replacement parts see your Dealer or visit www.aquagenie.com Page 7 of 8...
- Page 8 6. Drain water in basket well and follow pump and filter manufacturer's winterizing recommendations. Remove cover for access Sketch #5 Brace Sketch #6 Rev. Level: G Rev. Level: F Rev. Date: 11/20/2015 Rev. Date: 10/09/14 Page 8 of 8 Document ID: HM038, Aqua Genie Installation Document ID: HM038 Aqua Genie Installation...
Need help?
Do you have a question about the Aqua Genie and is the answer not in the manual?
Questions and answers
When the word PAUSE appears on screen what dies it mean?