Table of Contents

Related Manuals for Greiner Vibrograf SL1

Summary of Contents for Greiner Vibrograf SL1
- Page 1 English Operating Manual Greiner Vibrograf AG Mittelstrasse 2 CH-4900 Langenthal Schweiz / Switzerland Tel : +41 (0)62 916 60 80 Fax : +41 (0)62 916 60 81 e-mail: info@greinervibrograf.ch www.greinervibrograf.ch Operating Manual SL1...
-
Page 2: Table Of Contents
Page 10 - 17 8.1 Fitting the adaptor 8.2 Changing the belt 8.3 Control panel 8.4 Drive motor 8.5 Speed indicator 8.6 Emergency stop button 9. Disposal Page 18 10. EC – Declaration of conformity Page 19 Operating Manual SL1... -
Page 3: Introduction
2. Introduction Page 3 Our SL1 grinding machine with polishing disc is a further development with various technical refinements distinguish it substantially from other similar devices. This device was developed as a logical continuation of the following thought: EFFICIENCY THANKS TO SOLID, COMPACT EQUIPMENT DESIGN. -
Page 4: Scope Of Supply
3. Scope of supply Page 4 3. Scope of supply Belt grinding machine with SL1 polishing disc Ready to plug in 1 x Operating Manual 1 x Quick unpacking instructions 1 x Original packaging Packaging set + pallet Operating Manual SL1... -
Page 5: Safety Instructions
Helmut Klein company. (17) Work on/with the device may only be carried out by qualified, appropriately trained and assigned personnel. Be sure to observe the legally permitted minimum age ! (18) Store the Operating Manual carefully. Operating Manual SL1... -
Page 6: Warning And Safety Stickers
This sticker is located at the front on the abrasive belt safety cover. 5.2 Information in the Operating Manual This symbol identifies safety measures and information of equal importance, as well as useful instructions on use. This symbol can be found in the Operating Manual. Operating Manual SL1... -
Page 7: Technical Data
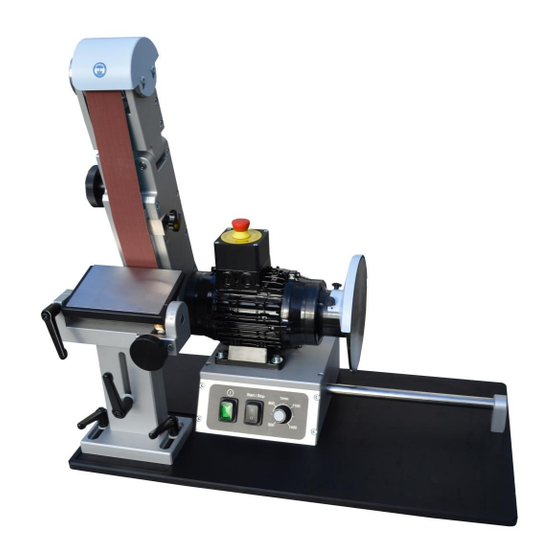
32 kg net (minus packaging) 49 kg gross (incl. packaging) 6.2 Adjusting the speed of the belt grinding machine with SL1 polishing disc Stepless speed adjustment from typically 500 to 1400 rpm is carried out using the speed adjusting knob and scale on the control panel... - Page 8 (4) Emergency stop button (5) Drive motor (6) Polishing disc (7) Guide rod for sleeve (8) Baseplate (9) Control panel (10) Workbench, height-adjustable and to the right tilt setting as per scale (11) Belt adjusting screw (11) (10) Operating Manual SL1...
-
Page 9: Before Putting Into Service
In the event of cable extensions, make sure in perfect condition and check current carrying capacity before use. The machine is now ready to use! Operating Manual SL1... -
Page 10: Operation
8.1 Fitting the adaptor Configuration of belt grinder on delivery: View of grinding arm with mounting angle but without adaptor. The adaptor must be fitted firstly to operate with a grinding belt: Unscrew mounting angle with knurled-head screw… Operating Manual SL1... - Page 11 …and screw onto the adaptor using the two countersunk screws. Then screw the mounting angle with the adaptor attached back onto the grinding arm. The grinding belt can now be operated with the adaptor mounted on the belt grinding machine. Operating Manual SL1...
-
Page 12: Changing The Belt
(pull the mains plug out!) Changing the belt is effected as described below: Rotate the belt adjusting screw to the left until the head of the belt adjuster is in the left-hand position illustrated. Operating Manual SL1... - Page 13 When changing the belt be certain to pay attention to the arrows on the inner side of the belt. The arrows indicate the running direction of the belt. Incorrect running direction will quickly lead to the disintegration of the grinding belt.. Operating Manual SL1...
- Page 14 After changing the belt, carry out a 1- minute trial run. If behaving abnormally, switch the machine off immediately! Grinding belts must be changed at regular intervals! Clean the belt grinder once every 20 hours of operation! Operating Manual SL1...
-
Page 15: Control Panel
Knob 3 Rotary knob for drive motor This knob is used to adjust the speed of the motor from 500 to 1,400 rpm. The grinding belt and polishing disc rotate simultaneously. Operating Manual SL1... -
Page 16: Drive Motor
Page 16 8.4 Drive motor Your SL1 belt grinding machine with polishing disc is equipped with the most powerful 2-spindle electric motor in its class (0.5 HP). In spite of its power, this motor is characterised by its extremely quiet running and optimal torque. The motor is maintenance-free and based on our experience we can confirm it can be used for a long time without any problems. -
Page 17: Speed Indicator
Start/Stop switch from setting 0 to 1 (see also Chapter 6.1 Control panel, Page 11). Once the emergency stop button has been pressed, the grinding/polishing machine continues running for up to 3 seconds! Operating Manual SL1... -
Page 18: Disposal
Thank you ! WEEE Reg. No.: DE51617604 We hope you enjoy using your new device ! Operating Manual SL1... -
Page 19: Ec - Declaration Of Conformity
10. EC - Declaration of conformity Page 19 Operating Manual SL1...
Need help?
Do you have a question about the SL1 and is the answer not in the manual?
Questions and answers