Table of Contents
Advertisement
Quick Links
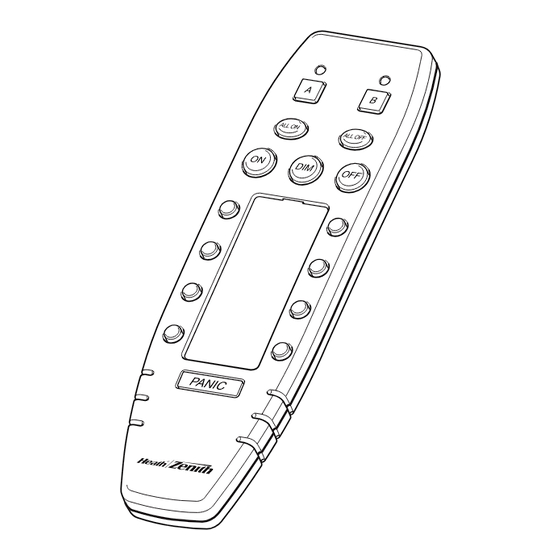
• Operational range of up to 100 feet.
• Controls all Heath
• FCC/IC tested and approved.
• Flash control on compatible receivers when using the Panic
Battery Installation
The Multi-Channel Remote Control is de-
signed for 3 Volt operation:
1. Remove battery cover on rear of hous-
ing by pushing clip and lifting up.
2. Install 2-AAA batteries (not included)
according to polarity markings.
The Control Panel transmitter has
preprogrammed dip switch settings for each
channel. In order for the Control Panel to
communicate with a receiver, the dip
switches on the receiver must correspond
with the preprogrammed dip switch settings
of the channel you wish to use. Note: There
are no dip switches on the Control Panel
that require setting.
1. Determine which receiver(s) will be
operated by which channel.
2. Set receiver(s) dip switches 1, 2, and 3
to match the dip switch settings for the
channel you wish to operate the
receiver(s).
3. Determine whether the receiver(s) will
be in Group A or B.
4. Set dip switch 4 on the receiver to the
same setting as Group A or B.
© 2003 DESA Specialty Products™
feature.
Setting Receiver(s) Dip Switches
Remote Control
Features
®
/Zenith Remote Home™ products.
Preprogrammed Dip Switch
Settings for Remote Control
(Included on Back of Product
Multi-Channel
Battery Cover
Two AAA
Batteries (Not
Included)
Installing 2-AAA Batteries
A
(Dip Switch 4 in
GROUP
DOWN position)
1 2 3
1 2 3
1 2 3
1 2 3
1 2 3
1 2 3
1 2 3
1 2 3
as a Reference)
B
(Dip Switch 4 in
UP position)
598-1145-00
Advertisement
Table of Contents

Related Manuals for Health Zenith

Summary of Contents for Health Zenith
-
Page 1: Remote Control
Remote Control Features • Operational range of up to 100 feet. ® • Controls all Heath /Zenith Remote Home™ products. • FCC/IC tested and approved. • Flash control on compatible receivers when using the Panic feature. Battery Installation Battery Cover... - Page 2 Control Descriptions A or B GROUP: Allows each Group Selection Group Selection channel to be used for 2 dif- LED Indicators Buttons ferent groups of receivers (for a total of 16 channels). To ALL ON ALL OFF choose Group A, press the ALL ON ALL OFF “A”...
-
Page 3: Specifications
Channel DIM: Dims all light fixtures that are equipped with the dimming feature that are configured to work with a particular channel. To perform this function, press the DIM button located by the channel number desired (between 1 and 8). Pressing DIM repeatedly will toggle thru the different dim levels if the light fixture is capable of more than one level of dim. -
Page 4: Regulatory Information
Regulatory Information This device complies with Part 15 of the FCC Rules and RSS-210 of Industry Canada. Operation is subject to the following two conditions: (1) this device may not cause harmful interference, and (2) this device must accept any interference received, including interference that may cause undesired operation.
Need help?
Do you have a question about the Zenith and is the answer not in the manual?
Questions and answers