Advertisement
Quick Links
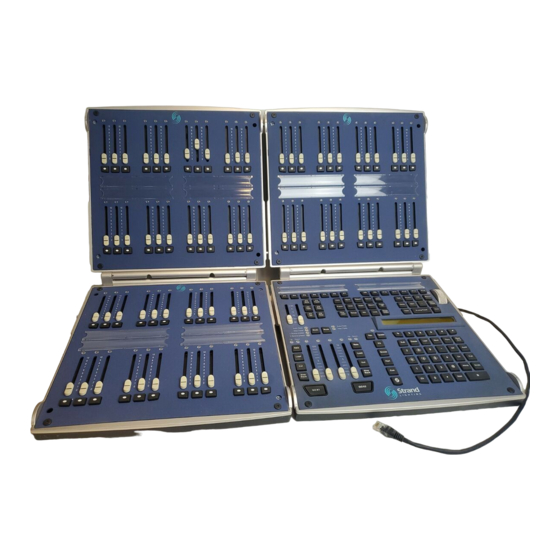
Strand 300 Series
Channel Control
The console defaults to channel mode. So just start by
taking channel 1 to 100%.
1 ON: Channel 1 to the ON level – Full
1 [FULL]: Channel 1 to Full. (FULL is a softkey accessed
by the arrow keys below the LCD screen)
Now let's take another channel to another level.
2 @ 5 *: Channel 2 at 50%. The asterisk is the ENTER key.
The ENTER key finishes off most commands.
3 THRU 7 @ 75 *: The THRU key allows you to do ranges.
Assign levels to channels until you have the look you want.
To release channel 3 type 3 UNDO, to release all UNDO *
Cue Recording
To store the look you want, record it as a cue.
RECORD 1 *: This command stores the entire lighting state
as a cue to be played back in the default time of 5.
(The Record function defaults to Cue.)
Just repeat the process of assigning levels to channels
(see Channel Control above) and record to any cue
number you want from Cue 1 to Cue 600.
You can also use point cues if you need a cue between
whole numbers.
RECORD 1.5 *: This will store the entire lighting state as
Cue 1.5. You can use any point number from .1 to .9.
Cue Editing Live
When you want to edit a cue live that is already recorded,
the first step is to be in the cue. GOTO 1 *: This puts the
cue on stage in a snap count. Now just edit your channel
levels (see Channel Control above) and update the cue.
UPDATE *: This will take all channels whose levels are red
and store their new levels in the current cue.
Where Update is valuable is that it ignores level from subs
and effects.
Time
Now let's change the time of Cue 1. TIME 3 *: This
changes time on the current cue. To change time on a cue
that is not live just type, CUE 2 TIME 2/5 *: This changes
the time of a non-live cue. The slash key assigned it a split
time. This means that all levels that are going up will fade
in a 2 count. Levels that are going down will fade in a 5.
Text
To add a label to Cue 1 while in Cue 1, just type TEXT
(CUE 1 TEXT will show up on the command line) and just
enter the label from the keyboard. To label a non-live cue
just type CUE 2 TEXT LIGHTS UP *
Shutdown
{REPORT} [EXIT] [SHUTDOWN] or [EXIT AND RESTART]
for Software version 2.8.6
Quick Start
Groups
Submasters
Patch
Dimmer Check
Channel Check
HARD KEY [SOFT KEY] {DISPLAY KEY}
Groups allow you to put multiple channels at different levels
into a single item. Set some channels at different levels.
RECORD GROUP 1 *: This stores the entire lighting state
as Group 1. Repeat for any collection of channels that you
want quick access to.
GROUP 1 ON: This will put all channels in group 1 on
stage at their recorded levels.
GROUP 1 * ON: This will highlight all channels in Group 1
and then set them to the ON level.
(Note: This is actually 2 commands)
Subs allow you to put multiple channels at different levels
onto a slider for manual control. Set some channels at
different levels. RECORD SUB 1 *: This stores the entire
lighting state as Submaster 1. Once recorded, the light
above the appropriate sub will be on. Just slide the
submaster up and down as needed. Repeat for any
collection of channels that you want to control by a slider.
The last fader panel (immediately to the left of the channel
control panel) is your submaster panel.
[PATCH] allows you to change dimmer assignment to
different channels. The default patch is a 1 to 1 patch.
This means that dimmer 1 is patched to channel 1 and the
numerical match continues for the capacity of the console.
(The capacity can be seen from the upper right hand corner
of the patch screen.) To start fresh by unpatching all
dimmers, type 1 THRU 100 @ ENTER (where 100 is the
last channel number) All channel numbers will now be dark
grey. This means that all channels are still within the
system but they have no patch. The patching syntax is
"Dimmer @ Channel". For example, 2 @ 5 will patch
dimmer 2 to channel 5. (@ will show up as @PATCH). As
you go through and patch, notice that the channel numbers
change from dark grey to cyan. This is the LightPalette
color for a conventional channel that has a patch. Continue
this process until the show is patched.
From the Live or Patch screen, enter DIMMER 1 ON. This
will take dimmer 1 to the ON level. A red flag will appear
on the bottom right hand corner of the screen that says
DIMMERS UNPATCHED. This means a dimmer has been
given a hard level. You can now use NEXT / LAST to
move up / down the dimmer list. This will take the previous
dimmer out and advance to the next/last dimmer. When
you are done with the dimmer check, just press DIMMER
DIMMER to repatch all unpatched dimmers.
From the Live screen, you can enter 1 ON. This will take
channel 1 to the ON level. Use NEXT / LAST to advance
up / down the channels that are in your system.
Page 1 of 2
Advertisement

Related Manuals for Strand Lighting 300 Series

Summary of Contents for Strand Lighting 300 Series
- Page 1 Strand 300 Series Quick Start Channel Control Groups The console defaults to channel mode. So just start by Groups allow you to put multiple channels at different levels taking channel 1 to 100%. into a single item. Set some channels at different levels.
- Page 2 Quick Start Modes Undo Macro The 300 series console has the unique ability to change You can use whatever macro you want but I will Modes. Press the MODE key above Playback 1. (That’s recommend the USER key. To record this macro live, type, the left set of playbacks.) The softkeys give you the...
Need help?
Do you have a question about the 300 Series and is the answer not in the manual?
Questions and answers