Table of Contents
Advertisement
Available languages
Available languages
Advertisement
Table of Contents

Related Manuals for Memorex iWakeUp Mi4014


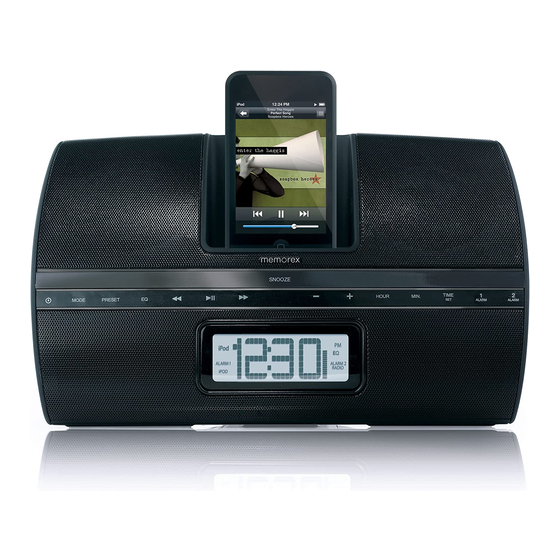
Summary of Contents for Memorex iWakeUp Mi4014
- Page 1 All manuals and user guides at all-guides.com iWak eUp User Guide Please read these instructions completely, before operating this product. Guía del usario Por favor lea toda las instruciones antes de tratar de usar este producto. memorexelectronics.com Mi4014...
-
Page 2: Safety Precautions
SAFETY PRECAUTIONS All manuals and user guides at all-guides.com CAUTION RISK OF ELECTRIC SHOCK DO NOT OPEN CAUTION: TO REDUCE THE RISK OF ELECTRIC SHOCK, DO NOT REMOVE COVER (OR BACK). NO USER- SERVICEABLE PARTS INSIDE. REFER SERVICING TO QUALIFIED SERVICE PERSONNEL. DANGEROUS VOLTAGE: The lightning flash with arrowhead symbol within an equilateral triangle is intended to alert the user to the... -
Page 3: Surge Protectors
SAFETY PRECAUTIONS All manuals and user guides at all-guides.com INFORMATION: This equipment complies with Class B digital device regulations. This equipment generates, uses and can radiate radio frequency energy and, if not installed and used in accordance with the instructions, may cause harmful interference to radio communications. - Page 4 All manuals and user guides at all-guides.com Dear Customer: Selecting fine audio equipment such as the unit you’ve just purchased is only the start of your musical enjoyment. Now it’s time to consider how you can maximize the fun and excitement your equipment offers.
-
Page 5: Location Of Controls
LOCATION OF CONTROLS All manuals and user guides at all-guides.com FRONT SNOOZE 1. Left Speaker 12. Volume Down Button 2. SNOOZE/SLEEP Button 13. Volume Up Button 3. Power Button 14. Remote Sensor 4. MODE Button (AM/FM) 15. HOUR Button 5. PRESET/SET Button 16. - Page 6 LOCATION OF CONTROLS (CONTINUED) All manuals and user guides at all-guides.com REAR 1. DIMMER Switch (OFF/L/M/H) 2. DC 12V Jack (AC ADAPTER PART NO. 0251-207200-10103*) 3. LINE IN Jack 4. DST (Daylight Savings Time) Switch (-1/+1) 5. Headphones Jack 6. FM Wire Antenna 7.
- Page 7 LOCATION OF CONTROLS (CONTINUED) All manuals and user guides at all-guides.com REMOTE 1. Power Button 6. EQ Button 2. Volume Up Button 7. MODE Button 3. PLAY/PAUSE (®p) Button 8. Tune/Skip/Search n 4. Tune/Skip/Search o Button Button 9. Volume Down Button 5.
-
Page 8: Power Source
POWER SOURCE All manuals and user guides at all-guides.com AC CONNECTION Insert the small end of the AC adapter into the DC IN 12V jack (located on the rear of the unit). Connect the other end to a wall outlet having 120V AC, 60 Hz. AC Adapter, DC 12V Z NOTES: •... -
Page 9: Remote Battery Installation
POWER SOURCE (CONTINUED) All manuals and user guides at all-guides.com REMOTE BATTERY INSTALLATION Remove the Battery Compartment by pressing in on the tab and then sliding the compartment out. Install a CR2025 battery, by popping it in through the back of the compartment, paying attention to the polarity diagram in the compartment (positive side up). -
Page 10: Inserting An Ipod
INSERTING AN iPod All manuals and user guides at all-guides.com Insert the Universal Dock included Slide the iPod (A) into the with your iPod (A) into the iPod Universal Dock (B) (as shown). compartment (B) (as shown), Gently push down so the making sure the tabs are facing connector on the iPod slides onto front, and slip the tabs into place. -
Page 11: Operation
OPERATION All manuals and user guides at all-guides.com USING AN iPod WITH THIS UNIT SNOOZE SNOOZE You can operate the iPod using its With an iPod connected (see own controls, as per its owner’s previous page), if this unit is not manual, or you can use the already on, turn this unit on by controls on this unit to operate... - Page 12 OPERATION (CONTINUED) All manuals and user guides at all-guides.com ADJUSTING THE VOLUME AND EQ (Equalizer) SNOOZE SNOOZE To adjust the EQ (Equalizer): To adjust the main volume: Press the EQ button to cycle Press the Volume Up 1 and/or through the following options: EQ1, Down 2 button to increase and/or EQ2, EQ3, EQ4 or Off (Normal).
-
Page 13: Using The Radio
OPERATION (CONTINUED) All manuals and user guides at all-guides.com USING THE RADIO SNOOZE SNOOZE Turn this unit on by pressing the Repeatedly press the MODE button Power button. to select AM or FM mode; “AM” or “FM” will appear in the display. NOTES: •... - Page 14 OPERATION (CONTINUED) All manuals and user guides at all-guides.com SETTING THE RADIO PRESETS (10 for each band) SNOOZE SNOOZE Follow Steps 1-3 on the previous Press the Tune/Skip/Search o 1 page to tune a station. Press and or n 2 button to select a desired hold the PRESET/SET button;...
- Page 15 OPERATION (CONTINUED) All manuals and user guides at all-guides.com TO SET OR RESET THE ACTUAL TIME SNOOZE SNOOZE Within 15 seconds, press the MIN With the power off, press and hold the TIME SET/DISPLAY button; (Minute) button 1 to set the present minute and the HOUR the time will blink.
-
Page 16: Continued On The Next Page
OPERATION (CONTINUED) All manuals and user guides at all-guides.com TO SET OR RESET THE ALARM TIME SNOOZE SNOOZE With the power off, press and hold Within 15 seconds, press the MIN (Minute) button 1 to set the alarm either the ALARM 1 button 1 (to set minute and the HOUR button 2 to set Alarm 1) or ALARM 2 button 2 (to the alarm hour. - Page 17 OPERATION (CONTINUED) All manuals and user guides at all-guides.com SNOOZE If set to iPod, select your desired track, insert the iPod as shown on page 9 and turn off the iPod. When the alarm time is reached, the unit will start playback on the track that you selected and the tracks following it in the playlist.
-
Page 18: To Shut The Alarm Off
OPERATION (CONTINUED) All manuals and user guides at all-guides.com TO SHUT THE ALARM OFF SNOOZE Press the ALARM 1 1 or ALARM 2 2 button (which corresponds to the alarm that was set) and the alarm will turn off and NOT be set for the next day. To set the alarm for the next day, press any other buttons (except ALARM 1, ALARM 2 or SNOOZE button). -
Page 19: Dimmer Switch
OPERATION (CONTINUED) All manuals and user guides at all-guides.com SLEEP DIMMER SWITCH SNOOZE Slide the DIMMER switch to adjust With the unit in the Radio (FM or AM), iPod or LINE IN mode, press the the dimmer of the display. You can SNOOZE/SLEEP button;... -
Page 20: Troubleshooting Guide
TROUBLESHOOTING GUIDE All manuals and user guides at all-guides.com If you experience a problem with this unit, check the chart below before calling for service. SYMPTOM CAUSE SOLUTION No sound. Volume is Increase volume. set to minimum. AM or FM, no sound. Power is not on or Press the Power button, AM or FM mode is not... -
Page 21: Specifications
All manuals and user guides at all-guides.com SPECIFICATIONS GENERAL: Power Source ....DC 12V Adapter (Center Positive) Battery Backup......2 x 1.5V “AAA” size batteries Speaker...............2 x 3 ohms Output Power ............2 x 4.5 W Weight ..............2.25 lbs Dimensions ....10.5 (L) x 4.5 (W) x 6.5 (H) inches RADIO SECTION: Frequency Range (FM) ........87.5–108 MHz Frequency Range (AM) .......520–1710 KHz... -
Page 22: Medidas De Seguridad
MEDIDAS DE SEGURIDAD All manuals and user guides at all-guides.com CUIDADO RIESGO DE DESCARGA ELÉCTRICA. NO ABRIR ADVERTENCIA: Para reducir el riesgo de descargas eléctricas no abra la cubierta o tapa posterior. Allí no hay partes que el usuario pueda reparar. Lleve su unidad a un Centro de Servicio Autorizado. - Page 23 MEDIDAS DE SEGURIDAD All manuals and user guides at all-guides.com INFORMACIÓN: Este equipo cumple con los reglamentos de un aparato digital de Clase B. Este equipo genera, usa y puede irradiar energía de radiofrecuencia y, si no se instala y usa conforme a las instrucciones, puede generar interferencia dañina con las radiocomunicaciones.
- Page 24 All manuals and user guides at all-guides.com Estimado Cliente: En el momento en que seleccionó un equipo de tan alta tecnología como el que usted acaba de comprar, su entretenimiento musical recién comenzó. Ahora es tiempo de pensar en cómo puede optimizar el entretenimiento que su equipo le ofrece.
-
Page 25: Ubicación De Los Controles
UBICACIÓN DE LOS CONTROLES All manuals and user guides at all-guides.com FRENTE SNOOZE 1. Altavoz izquierdo 10. Altavoz derecho 2. Botón de REPETICIÓN DE 11. Compartimiento de iPod con ALARMA/APAGADO conector (para utilizar con bases AUTOMÁTICO dock universales) (SNOOZE/SLEEP) 12. Botón de disminución del 3. -
Page 26: Parte Trasera
UBICACIÓN DE LOS CONTROLES (CONTINÚA) All manuals and user guides at all-guides.com PARTE TRASERA 1. Selector de ATENUADOR DE LUZ (DIMMER) (APAGADO/BAJO/MEDIO/ALTO) (OFF/L/M/H) 2. Conector de CC de 12V (ADAPTADOR DE CA NO 0251-207200-10103*) 3. ENTRADA DE LA LÍNEA 4. Selector de DST (Ahorro de Energía) (-1/+1) 5. -
Page 27: Control Remoto
UBICACIÓN DE LOS CONTROLES (CONTINÚA) All manuals and user guides at all-guides.com CONTROL REMOTO 1. Botón de 7. Botón de MODO (MODO) Encendido/Apagado (Power) 8. Botón de 2. Botón de aumento del Sintonía/Salto/Búsqueda volumen (Volume Up) (Tune/Skip/Search) n 3. Botón REPRODUCIR/ 9. -
Page 28: Fuente De Energía
FUENTE DE ENERGÍA All manuals and user guides at all-guides.com CONEXIÓN A CORRIENTE ELÉCTRICA Inserte el extremo pequeño del adaptador CA en el conector de entrada de 12VCD (Ubicado en la parte trasera de la unidad) Contacto Conecte el otro extremo al contacto eléctrico eléctrico de 120VCA, 60 Hz. -
Page 29: Conexiones Opcionales
FUENTE DE ENERGÍA (CONTINUACIÓN) All manuals and user guides at all-guides.com INSTALACIÓN DE LAS PILAS EN EL CONTROL REMOTO Quite puerta compartimiento ejerciendo presión en la pestaña y deslizándola. Coloque una pila CR2025 pasándola por el reverso del compartimiento y teniendo en cuenta el diagrama de polaridad que se encuentra en el mismo (lado positivo hacia arriba). - Page 30 COLOCAR UN iPod All manuals and user guides at all-guides.com Deslice el iPod (A) en el puerto Inserte el puerto universal incluido con su iPod (A) en el compartimiento universal (B) (como se muestra). de iPod (B) (como se muestra), Empújelo suavemente para que asegurándose de que las dos el conector en el iPod se deslice...
- Page 31 FUNCIONAMIENTO All manuals and user guides at all-guides.com UTILIZACIÓN DE iPod CON ESTA UNIDAD SNOOZE SNOOZE Con el iPod conectado (vea la página Podrá operar el iPod utilizando los anterior), si la unidad no está controles del mismo, según indica el encendida, enciéndala con el botón manual del usuario o utilizar los de Encendido/Apagado (Power) 1.
- Page 32 FUNCIONAMIENTO (CONTINÚA) All manuals and user guides at all-guides.com AJUSTAR EL VOLUMEN Y EL ECUALIZADOR (EQ) )(Ecualizador) SNOOZE SNOOZE Para ajustar el Ecualizador Para ajustar volumen (EQ): principal: Oprima los botones de Oprima el botón de EQ para Aumento de volumen (Volume navegar por las siguientes Up) 1 y/o Disminución de opciones: EQ1, EQ2, EQ3, EQ4...
- Page 33 FUNCIONAMIENTO (CONTINÚA) All manuals and user guides at all-guides.com USAR LA RADIO SNOOZE SNOOZE Para encender la unidad, oprima Oprima repetidamente MODO (MODE) Encendido/Apagado (Power). para seleccionar el modo AM o FM; “AM” o “FM” aparecerá en la pantalla. NOTAS: •...
- Page 34 FUNCIONAMIENTO (CONTINÚA) All manuals and user guides at all-guides.com CONFIGURACIÓN PARA ALMACENAR ESTACIONES DE RADIO (10 para cada banda) SNOOZE SNOOZE Siga los pasos 1-3 explicados en Mantenga presionado el botón la página anterior para sintonizar Sintonizar/Saltar/Buscar (Tune/ Skip/Search) o 1 o n 2 para una estación de radio.
- Page 35 FUNCIONAMIENTO (CONTINÚA) All manuals and user guides at all-guides.com AJUSTE O REAJUSTE DE LA HORA SNOOZE SNOOZE Con la unidad apagada, oprima y Dentro de los 15 segundos, oprima el mantenga presionado el botón de botón de MINUTOS (MIN) 1 para ajustar los minutos actuales y el botón ;...
- Page 36 FUNCIONAMIENTO (CONTINÚA) All manuals and user guides at all-guides.com AJUSTE O REAJUSTE DE LA HORA DE ALARMA SNOOZE SNOOZE Con la unidad apagada, mantenga Dentro de los 15 segundos, oprima el botón de MINUTOS (MIN) 1 para ajustar los oprimido botón ALARMA minutos de la alarma y el botón de HORA...
- Page 37 FUNCIONAMIENTO (CONTINÚA) All manuals and user guides at all-guides.com SNOOZE Si se encuentra en el modo de iPod, seleccione su pista preferida, coloque el iPod como se explica en la página 9 y apague el mismo. Cuando la unidad marque la hora de la alarma programada, comenzará...
- Page 38 FUNCIONAMIENTO (CONTINÚA) All manuals and user guides at all-guides.com COMO APAGAR LA ALARMA SNOOZE Oprima ALARMA (ALARM) 1 1 o ALARM (ALARM) 2 2 (según la alarma que se haya programado). La alarma se apagará y NO se programará para el día siguiente. Para programar la alarma para el día siguiente, oprima un botón cualquiera (excepto ALARMA (ALARM) 1, ALARM (ALARMA) 2 o REPETICIÓN DE LA ALARMA (SNOOZE)) NOTA: Si la unidad se encuentra en modo iPod o Radio mientras la alarma está...
-
Page 39: Apagado Automático
FUNCIONAMIENTO (CONTINÚA) All manuals and user guides at all-guides.com APAGADO AUTOMÁTICO SELECTOR DE ATENUADOR (SLEEP) DE LUZ (DIMMER) SNOOZE Desplace selector Oprima el botón REPETICIÓN DE ATENUADOR DE LUZ (DIMMER) ALARMA/ APAGADO AUTOMÁTICO (SNOOZE/SLEEP) con la unidad en el para ajustar la intensidad de luz de modo de Radio (FM o AM), iPod o la pantalla. -
Page 40: Guía De Resolución De Problemas
GUÍA DE RESOLUCIÓN DE PROBLEMAS All manuals and user guides at all-guides.com Si la unidad presenta algún inconveniente, lea la siguiente tabla antes de llamar al servicio técnico. PROBLEMA: CAUSA SOLUCIÓN Sin sonido. El volumen está al Suba el volumen. mínimo. -
Page 41: Especificaciones
All manuals and user guides at all-guides.com ESPECIFICACIONES ENERAL: Fuente de Alimentación ..Adaptador de CC de 12V (Centro ..positivo) Respaldo de la pila......2 Pilas tamaño “AAA” de 1,5 V Altavoz................2 x 3 Ohms Potencia de Salida ............2 x 4,5 W Peso ................2,25 libras Tamaño....10,5 (Largo) x 4,5 (Ancho) x 6,5 (Alto) pulgadas. - Page 42 Dock. Memorex, the Memorex logo, and "Is it live or Memorex, el logotipo de Memorex y la frase "Is it live is it Memorex?", and iWakeUp are trademarks of the or is it Memorex?" y iWakeUp son marcas registradas af liates of Memorex Products, Inc.
Need help?
Do you have a question about the iWakeUp Mi4014 and is the answer not in the manual?
Questions and answers