Table of Contents
Advertisement
Advertisement
Table of Contents

Related Manuals for Radenso RC M

Summary of Contents for Radenso RC M
- Page 1 RC M installation guide nol imits...
-
Page 2: Table Of Contents
Functionality Using your RC M ....... 9 Menu Settings ......10-12 Troubleshooting Warranty . -
Page 3: Installation Components
what’s inside. A. Front Radar Antenna D. Display and Control Module Weatherproof radar antenna • Magnetically detachable display/control pad • • Flush-mountable base station • Universal mountin brackets with stainless • Mounting hardware and adhesive pads steel • Micro USB cable to display •... - Page 4 RC M AL Priority Laser Defense Kit (optional) • Three individual AL Priority laser sensors • AL Priority CPU • Radenso RC M bridge cable Please Note: RC M AL Priority Laser Rear All intellectual property incorporated in AL PRIOR- Defense Kit (optional) ITY product is reserved to its legal proprietor.
-
Page 5: Installation
It is recommended that you have a profes- installation: sional install your new Radenso RC M. To Determine the best location for the front properly install this system requires exten- and rear radar antenna. For the front sive experience with automotive electronics. -
Page 6: Rc M Cpu Installation
(-) Plug the cable into the RC M CPU. to ground, and the red wire to a switched 12-volt power supply. It is highly recom-... -
Page 7: Al Priority Front Sensors
Route the wires through the same firewall USB cord to pass through the opening pass-through that you previously ran the RC and into the area where the RC M CPU is M front antenna wires through. located. Plug the sensors into the AL Priority Bridge Plug the USB end of the display cable box. -
Page 8: Rear Radar Antenna
AL Priority Sensors, but proceed to the next section to update the with the sensors oriented to point out the software on the RC M and ALP. rear of the vehicle. As with the front sensors, they MUST be... -
Page 9: Software Updates
- “Download all in one ZIP archive,” or time, we will be preparing to update the “Download files individually.” firmware on the RC M CPU and the ALP CPU Click on the blue download icon next (if present). Updating the firmware is man- to the “Download all in one ZIP archive”... -
Page 10: Updating The Al Priority
Click on the blue “Enter” button to enter you plug it in. the configuration file setup. Turn on the RC M system and wait sever- Select “North America” under the region al seconds. The RC M will automatically drop-down. This will take you to a page recognize that the ALP has the firmware with several options. -
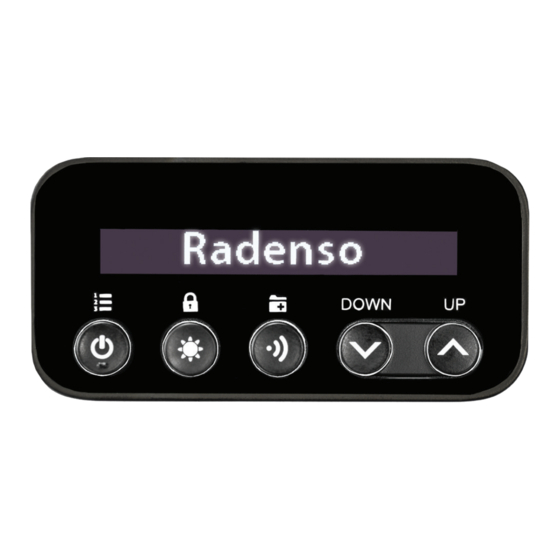
Page 11: Using Your Rc M
RC M user interface C. Driving Mode Button The Radenso RC M has an easy to use interface. The removable, magnetic display Short Press: Changes current driving mode has five buttons - each with dual function- Long Press: Stores user GPS point of... - Page 12 Recommended setting: AutoCity abled or disabled All setting options: AutoCity, Highway, City Description: Default driving mode when the Front K Band RC M is powered up Default setting: on Recommended setting: on AutoCity Speed Limit All setting options: off, on...
- Page 13 All setting options: off, on All setting options: off, ALP, FF Description: Enables or disables laser de- Description: Tells the RC M if there is a tection for the front antenna laser jammer present. If the AL Priority is present, please select ALP.
- Page 14 Description: Sets the time after the RC M Description: When an alert is received, will automatically disable the laser jammer controls whether or not the RC M beeps first after an active laser encounter. Gives the (followed by a voice alert), or alerts the user user time to slow down and allow a speed with voice first (followed by a beep).
-
Page 15: Warranty
Two (2) Years Limited Warranty This Warranty does not apply with respect RADENSO warrants, for two years, to the original retail owner, this RADENSO product to the following: to be free from defects in materials and craftsmanship with only the limitations or... - Page 16 12. Maintenance, cleaning or periodic check-ups. OBTAINING OF WARRANTY SERVICE: If, after contacting Radenso Customer Service, you are certain that the product is defective, pack the product carefully (pref- erably in its original packaging) and include evidence of original purchase and a note de- scribing the defect.
-
Page 17: Support And Contact
Contact Information Thank you for purchasing the most advanced radar and laser defense in the world. Here at Radenso, we take your support very se- riously; if you need support in any capacity, please contact us immediately. Address...
Need help?
Do you have a question about the RC M and is the answer not in the manual?
Questions and answers